Teaching shot selection is one of the simplest ways youth basketball coaches can improve both individual decision-making and team offense. Young players naturally want to score, and many hear plenty about points from parents and teammates. However, good basketball requires players to recognize when they have a quality opportunity, when a teammate has something better and when the smartest decision is to keep the ball moving.
For coaches, the challenge is making those decisions easy enough for young players to understand in real time. One useful approach is to classify every scoring opportunity as a great shot, a good shot or a no shot. The language is simple, the feedback can happen immediately, and players gradually learn to evaluate their own choices instead of relying on a coach to make every decision for them.
The Importance of Shot Selection in Youth Basketball
Young players often judge offensive success by one thing: whether they scored. Adults can reinforce the same mindset by asking how many points a player had instead of asking about defense, passing or decision-making. Basketball, of course, works better when five players are working together. Sometimes the right basketball play is taking the shot. Other times, it means making one more pass.
Good shot selection also connects directly to efficient scoring. A player who consistently attempts balanced, open shots from a comfortable range gives the offense a better chance to produce points than a player forcing contested attempts simply because the ball is in his or her hands.
Coaches can start by giving players three easy categories:
Great shot: A high-quality scoring opportunity the player should confidently take.
Good shot: A reasonable attempt, although a better option might exist.
No shot: An attempt the player probably shouldn’t take based on balance, defensive pressure, distance or skill level.
This framework creates a common vocabulary that players can quickly understand during practices and games.
Teaching Shot Selection with the Great Shot, Good Shot, No Shot Method
The key to teaching shot selection is defining each category before expecting players to recognize it. At the youth level, a great shot usually comes when the shooter is balanced, open and comfortably within his or her shooting range. A wide-open layup is one of the clearest examples, especially for younger players who are still developing finishing skills and shooting strength.
A good shot might be an uncontested mid-range attempt that the player can make consistently. Meanwhile, a no shot could include a heavily contested attempt, an off-balance jumper or a three-pointer taken by a player who doesn’t yet have the strength or consistency to shoot comfortably from that distance. The goal is for coaches to give players a practical framework for evaluating what they see.
1. Ask players to explain the decision
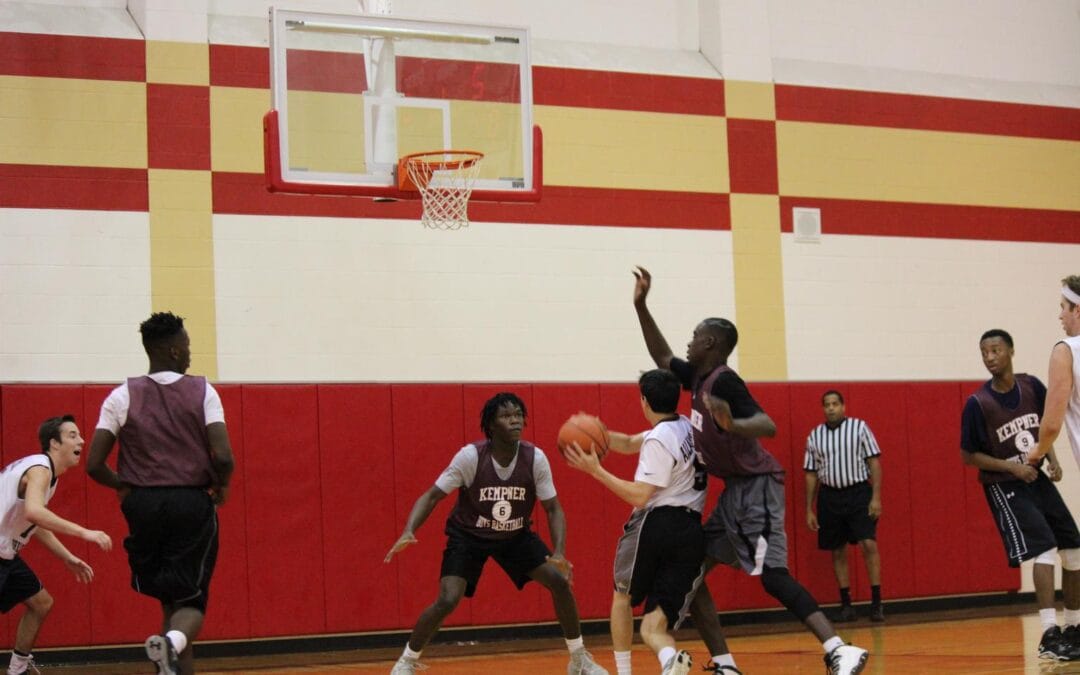
One of the most effective parts of this approach happens during live play. During a scrimmage, a coach can stop the action after a questionable shot and ask the team to classify it. Was it a great shot, a good shot or a no shot? Then comes the important question: Why?
Rather than immediately telling players whether they’re correct, ask them to explain their thinking. A player might recognize that the shot was contested. Another might notice the shooter was off balance. Someone else may point out that a teammate had a better opportunity.
Those conversations turn shot selection into something players learn to diagnose themselves. In the podcast discussion, the coach explains that this immediate feedback helped his players begin passing up weaker attempts in favor of teammates who had better looks.
2. Use immediate feedback during scrimmages
Film can be useful for older players, but youth coaches don’t have to wait for a video session to teach better decisions. Scrimmages provide plenty of opportunities. Stop briefly when a teaching moment appears, ask the question, get an explanation and move on.
The process can look like this:
A player takes a questionable shot.
The coach stops play.
Players classify the attempt.
The coach asks why they chose that category.
Players identify factors such as balance, distance, defensive pressure or another open teammate.
Play resumes.
Keep the conversation short. Long lectures can drain the pace from practice, while a quick question keeps players thinking without turning every possession into a classroom discussion. Over time, the terminology becomes part of the team’s basketball vocabulary. Players start recognizing shot quality before the whistle ever blows.
3. Help players learn their shooting range
Distance is another important part of shot selection. Kids usually have a pretty good sense of where they’re comfortable shooting, especially once coaches give them enough repetitions in practice. Coaches can reinforce that awareness through shooting drills, small-sided games and scrimmages.
A player’s usable range should be a distance where he or she can maintain normal mechanics and make a reasonable percentage of attempts. If a player has to heave the ball toward the basket or regularly can’t reach the rim, the shot probably falls outside that player’s current range.
Instead of simply saying, “Don’t shoot threes,” give the player a reason. Explain that developing reliable range takes time. Then help the player build strength, mechanics and confidence until the longer shot becomes a realistic option. This approach keeps the conversation developmental rather than punitive.
Shot Selection should be different for different players
One important piece of teaching shot selection is recognizing that the same attempt won’t always receive the same grade for every player. Players have different skills. One child may comfortably make three-pointers, while another might struggle to reach the rim from the same distance. A strong ball handler may be able to split two defenders and finish under control, but another player attempting the same move could be forcing a low-percentage opportunity.
Coaches shouldn’t pretend those players have identical offensive abilities. Instead, shot selection should reflect what each player can currently do successfully. The podcast specifically emphasizes this type of individual differentiation, describing how a shot can be appropriate for one player while being a poor choice for someone with a different skill set.
This doesn’t mean labeling players or limiting what they can eventually become. It simply means coaching the player who’s standing in front of you right now. As skills improve, the definition of a good or great shot can change with them.
Teach players to look for a better shot
Good shot selection isn’t only about stopping bad shots. Coaches also want players looking for better opportunities. A good shot might be available, but a great shot could be one pass away. For example, a player may catch the ball open for a mid-range jumper while a teammate cuts toward the basket for an uncontested layup. The first attempt isn’t necessarily bad, but recognizing the second opportunity shows better awareness.
As players understand this distinction, passing becomes connected to scoring instead of feeling like the alternative to scoring. Players begin asking themselves:
Am I balanced?
Am I open?
Am I within my range?
Is somebody else more open?
Can we create an even better opportunity?
Those are valuable questions for any young offensive player.
Keep the shot selection system simple
Youth basketball players don’t need a complicated analytics lesson every time they take a jumper. Give them clear categories, explain what each one means and reinforce the concepts consistently.
Coach Steve and Coach Bill in the episode above recommend defining a great shot, good shot and no shot while remaining conscious of each individual player’s abilities. Learning those differences can take time because coaches first have to understand what every player can realistically do.
Once the framework is established, use it regularly during practice. Ask quick questions. Encourage players to explain what they saw. Praise the extra pass when someone gives up a decent opportunity to create a better one. Consistency matters more than complexity.
Teaching shot selection gives youth players a decision-making tool they can carry into every possession. Instead of hearing only “shoot” or “don’t shoot,” they begin understanding why one attempt makes sense and another doesn’t. The great shot, good shot, no shot system gives coaches a simple starting point. Combine it with immediate feedback, individual expectations and plenty of practice repetitions, and players can gradually learn to recognize balance, range, defensive pressure and better opportunities for teammates.
Most importantly, they start making those decisions themselves. Youth coaches want players who can think and react when the game gets fast. Helping them recognize the difference between a possible shot and the best shot is a practical place to start.
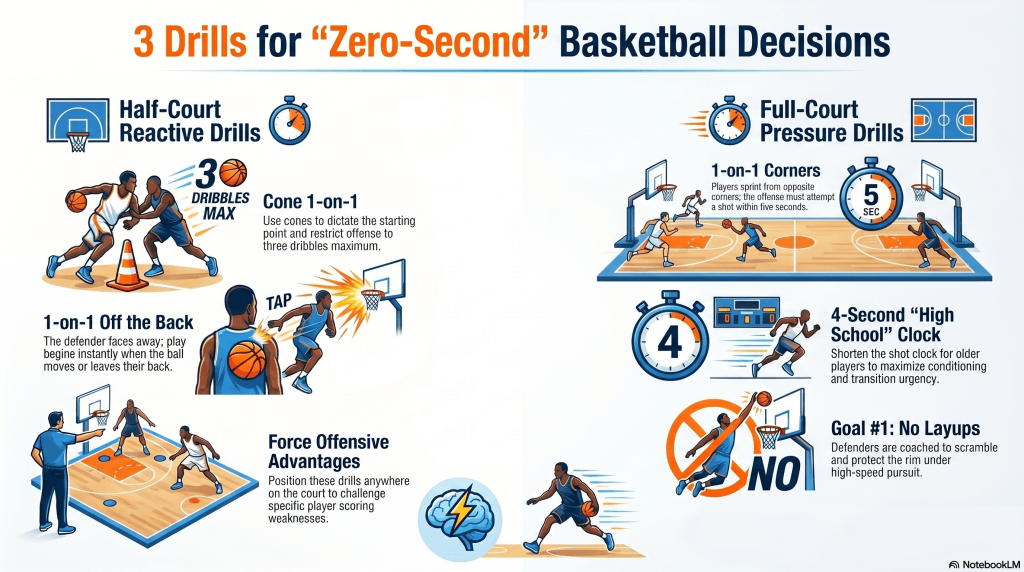
The best basketball decision-making drills force players to think while moving at game speed. Players must react, adjust, and execute in real time. Small-sided games and controlled one-on-one situations can create those moments naturally.
Great basketball teams make quick decisions. Players who can read defenders, attack space, and react under pressure often separate themselves from the competition. Coaches spend countless hours teaching offense and defense, but many practices still lack enough live decision-making opportunities.
A recent TeachHoops video breaks down several simple but effective drills that challenge players to make fast reads while attacking the basket.
Why Basketball Decision-Making Drills Matter
Many traditional drills teach movement patterns without adding pressure or unpredictability. Players may look great in lines but struggle once defenders enter the picture. Decision-making drills help players improve:
Ball handling under pressure
Offensive spacing
Defensive recovery
Change-of-speed moves
Shot selection
Transition awareness
Competitive toughness
Live-action drills also increase practice intensity while keeping players engaged.
Cone One-on-One Drill
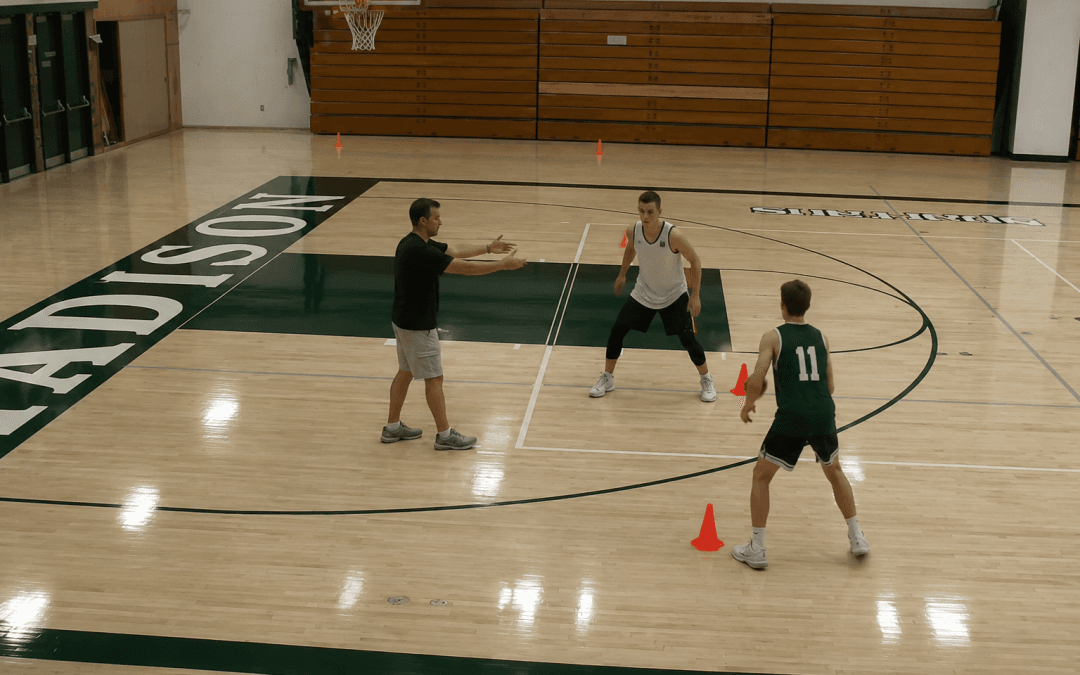
One of the simplest basketball decision-making drills from the video uses cones to guide offensive and defensive players into specific areas on the floor.
The setup is flexible and easy for coaches at any level.
How the Drill Works
Players start on opposite sides of the cones. The offensive player dribbles slowly into the action while the defender approaches from the opposite direction. Once both players clear the cones, the game becomes live one-on-one basketball.
Coaches can limit the offensive player to three dribbles to encourage quick decisions and efficient scoring moves.
Why This Drill Helps Decision-Making
The cone placement allows coaches to control where the attack begins. Players learn how to react from different spots on the floor instead of repeating the same drive every possession. Coaches can:
Force attacks toward the baseline
Create middle-drive situations
Simulate wing isolation actions
Emphasize finishing near the paint
Work on hesitation and change-of-direction moves
One strong teaching point from the video focused on selling fakes with the shoulders during hesitation moves.
Small details like body language and pacing often determine whether players can create separation.
Using Dribble Limits to Improve Basketball IQ
Limiting dribbles changes how players think. Players who know they only have two or three dribbles stop over-dribbling and start reading defenders earlier. Offensive players must attack decisively, while defenders learn how to contain space quickly. The TeachHoops video repeatedly reinforces three-dribble restrictions during live reps.
Dribble limits teach players to:
Read help defense faster
Attack gaps immediately
Avoid wasted movement
Improve footwork efficiency
Finish through contact
Many high school players struggle because they dribble without purpose. Constraints help eliminate that habit.
One-on-One Back Drill
Another excellent basketball decision-making drill from the video creates an immediate reaction environment.
Setup
The defender faces the basket while the offensive player stands behind them with the basketball resting on their back. Once the ball moves or comes off the back, the defender can turn and play live defense.
The offensive player gains a slight advantage, which forces the defender to react quickly.
Coaching Points
This drill teaches offensive players how to:
Attack immediately
Read defensive recovery angles
Use space efficiently
Finish before help arrives
Defenders learn how to:
Recover under pressure
Sprint into position
Contest without fouling
Stay balanced after turning
Reaction time becomes a huge factor in this drill. Players cannot rely on scripted movement. The video also highlights an important rule adjustment. Players previously tried rolling the ball down their backs to trick defenders, so the coach modified the rules to trigger the action whenever the ball starts moving.
Good coaches constantly adapt drills to remove loopholes and maintain competitive integrity.
One-on-One Corners Full-Court Drill
Transition basketball demands quick thinking. Coaches need drills that combine conditioning, defensive urgency, and offensive pressure. The one-on-one corners drill checks every box.
Drill Setup
One player starts with the basketball in one corner while the defender starts in the opposite corner. The offensive player attacks full court and must score within five seconds.
For high school teams, the coach in the video recommends shortening the limit to four seconds.
What Players Learn
Offensive players develop:
Speed attacking in transition
Decision-making at full speed
Finishing against pressure
Time awareness
Defenders develop:
Sprint recovery habits
Rim protection instincts
Transition communication
Competitive hustle
The video emphasizes one major defensive teaching point: do not allow easy layups. Even when defenders cannot fully stop the play, they still learn how to disrupt timing and contest at the rim.
How Coaches Can Add Variations
The best basketball decision-making drills evolve throughout the season. Simple adjustments can completely change the challenge level:
Offensive Variations
Weak-hand finishes only
Pull-up jumpers only
No paint touches
One-dribble scoring
Read-and-react passing options
Defensive Variations
Closeout starts
Trailing defense
Shot contest bonuses
Charge-taking emphasis
Recovery angle restrictions
Conditioning Variations
Shorter shot clocks
Consecutive reps
Continuous transition
Winner-stays-on format
Minor changes prevent drills from becoming stale while continuing to challenge players mentally.
Why Basketball Decision-Making Drills Improve Player Development
Players improve fastest when they compete. Controlled chaos creates better habits than stationary drills. Athletes learn how to process information under pressure while building confidence in live situations.
Competitive basketball decision-making drills also increase practice energy. Players stay engaged because every rep feels like a real possession. Strong practices should include:
Fast decisions
Limited overthinking
Live defenders
Real consequences
Game-speed repetition
Those elements build smarter basketball players over time.
Final Thoughts on Basketball Decision-Making Drills
Coaches do not need complicated systems to improve player IQ. Simple one-on-one games can create powerful teaching moments when structured correctly. Cone drills, reaction-based games, and transition competitions all force players to think quickly while executing skills under pressure. Players become more confident because they repeatedly experience live basketball situations during practice.
Coaches searching for better basketball decision-making drills should focus on creating competitive environments where players must read, react, and attack in real time.
One of the most overlooked skills in youth basketball is how to play without the ball, especially under pressure. This Full-Court No-Dribble drill is a simple but powerful way to teach players spacing, angles, and decision-making while reinforcing toughness against defensive pressure.
This drill forces players to think the game instead of relying on speed or dribbling. It’s a great fit for youth, middle school, and even high school programs looking to clean up press offense fundamentals.
Why the Full-Court No-Dribble Drill Matters
When players are allowed to dribble, they often default to habits instead of reading the floor. Taking the dribble away:
Offense must advance the ball up the floor using passes only
Objective: Get the ball from baseline to baseline without dribbling, turnovers, or poor spacing.
Coaching Emphasis Points
This drill works best when you are very intentional with your teaching cues.
1. Eliminate Diagonal Cuts
Players naturally want to drift diagonally toward the ball. That shrinks spacing and invites steals.
Coach it hard:
Sprint wide and straight
Fill lanes parallel to the sidelines
Maintain clear passing windows
2. Teach Pass-and-Move Habits
After every pass:
Relocate
Fill open space
Create the next passing angle
Standing still kills this drill.
3. Stress Ball Security Under Pressure
Once defenders are live:
Two-hand, strong passes
No lazy floats
Pass fake → move the defense → deliver
This is where players learn what real pressure feels like.
Progressions to Increase Difficulty
Once players understand the concept, layer in challenges:
Time limit (e.g., 8–10 seconds to cross half court)
Limited catches (no holding longer than 2 seconds)
Score the drill (1 point for success, defense gets a point for a turnover)
Advantage defense (5 offense vs. 6 defenders)
These progressions simulate late-game and press situations without running full sets.
Common Mistakes to Watch For
Players bunching toward the ball
Overpassing instead of advancing
Poor spacing after the first pass
Panicking when trapped near the sideline
Stop the drill early if needed. Teach first, then play.
Why This Drill Belongs in Your Practice Plan
This is a high-return, low-setup drill that fits easily into:
Press offense days
Early-season fundamentals
Practice segments focused on decision-making
Best of all, it translates directly to games. Players who can move the ball without dribbling are far harder to press and far more confident late in games.
Final Thought
Great teams don’t rely on the dribble to solve every problem. They rely on spacing, movement, and smart decisions. The Full-Court No-Dribble drill is a simple way to build all three, while making your players tougher and more composed under pressure.
If you want more drills like this, plus full practice plans and coaching clinics, make sure you’re plugged into TeachHoops.com.
June and July aren’t just for rest. They’re the most important months for basketball summer skill development. This is the time when players and coaches should focus on improving, not just maintaining.
If you’re still running isolated drills or relying on routines from five years ago, it’s time to update your plan. Summer is where habits are built, shots are refined, and smart decisions get hardwired into players’ games.
Add Decision-Making to Every Summer Drill
Summer workouts shouldn’t look like a layup line or cone gauntlet. Instead, design sessions around decision-making and in-game reads.
Here are a few ideas to build smarter players:
Toss the ball and ask: “Attack baseline or middle?”
Teach players how to read a hedge, switch, or trap on a ball screen.
Use small-sided games that mimic pressure, spacing, and timing issues.
These kinds of drills teach players to react, something isolated reps can’t do.
Basketball Summer Skill Development Must Include Rebounding
Rebounding often gets ignored in offseason workouts, but it needs attention. You don’t need a true center to rebound well, you need urgency, positioning, and consistent reminders.
Build rebounding into your summer development plan by:
Creating drills with consequences (missed box-out = team sprint).
Teaching angles and timing through controlled chaos.
Repeating the phrase: Find, Hit, Get.
Make it part of your culture, not just an afterthought. You don’t need a true center to dominate the glass, just a team that’s committed to it.
Join the TeachHoops Community
TeachHoops.com offers a unique platform for coaches to share experiences and gain new insights. Learn from others who have navigated similar challenges. It’s an invaluable resource for those looking to:
Summer is the best time to refine mechanics, reps, and confidence. But there’s a big difference between being a shooter and being a scorer.
A few summer goals for shooters:
Hit 60% of open threes in an empty gym consistently.
Practice movement shooting, not just spot-ups.
Learn to shoot after contact or closeouts.
Shooting improvement happens in workouts. Scoring shows up when the lights are on. Both start in the summer.
Don’t Forget On-Ball Defense in Your Summer Workouts
Too many coaches overlook ball pressure in their summer sessions. But staying in front of the ball is a skill that can be built—if you prioritize it.
Make sure your basketball summer skill development plan includes:
Lateral quickness drills with resistance or reaction components.
Daily work on closeouts and proper stance.
Reps where defenders must force a player to their weak hand.
Defense wins in the winter, but it’s built in the summer.
Build Game-Like Habits, Not Just Reps
You want players who think fast and adjust in real time. That doesn’t come from doing 100 perfect reps. It comes from 100 imperfect reps under game-like stress.
Here’s what to include in your summer sessions:
Game-speed, game-like reps with variable outcomes.
Partner or group work to simulate pressure.
Drills that include consequences and choices, not just movements.
Basketball summer skill development should feel like practice with a purpose, not a training video.
Final Word: Put in the Time, Build the Habit in Basketball Summer Skill Development
Skill development only works when it’s consistent. Set expectations, track progress, and encourage players to train with intent.
Whether you coach varsity, AAU, or a rising 6th-grade team, use the summer to build habits that translate to wins. And remember: the offseason is where players are made.t practice.