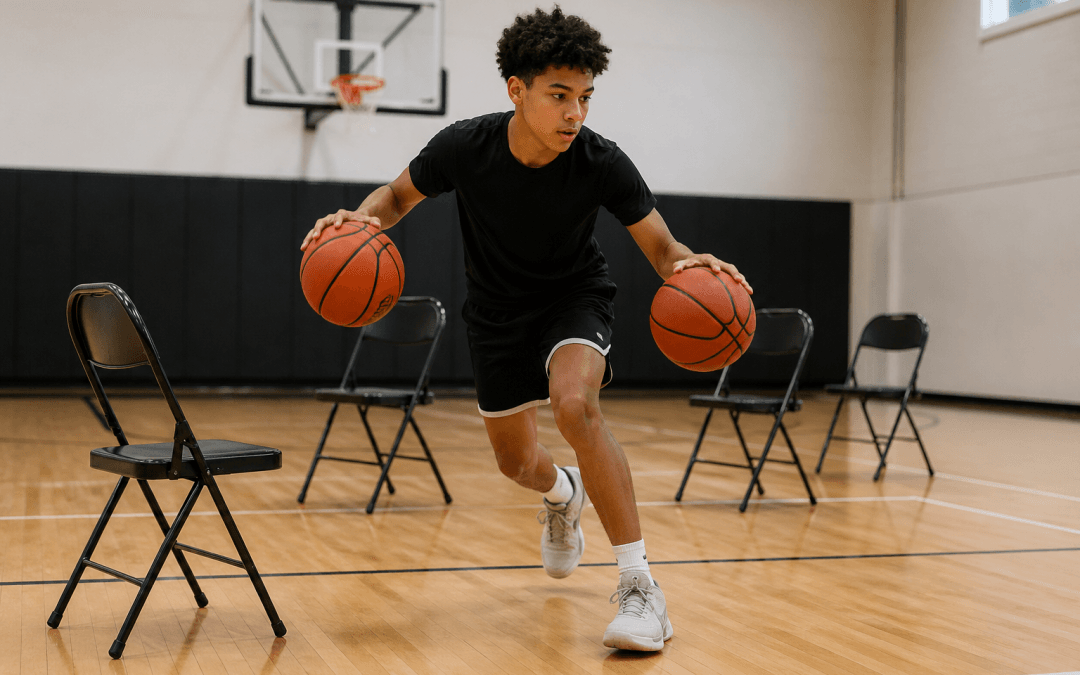
If you want a 2 ball basketball drill that challenges ball control while forcing players to finish with both hands, this is a strong addition to your practice plan. It combines tight dribbling, decision-making, and disciplined finishing into one continuous sequence.
This drill works especially well for youth players, but it scales up for advanced guards who need sharper handles and better body control in traffic.
What Is This 2 Ball Basketball Drill?
This 2 ball basketball drill uses two basketballs and a series of obstacles, like chairs or cones, to simulate defenders. Players attack each obstacle with a move, then finish at the rim using only one hand while still controlling the second ball.
The setup creates a simple challenge: Handle pressure, make a move, and finish clean without cheating the rep.
Setup
You’ll need:
2 basketballs per player
3–5 chairs or cones (set in a zigzag pattern)
A clear lane to the basket
Space the chairs out like defenders in a slalom. Each one represents a decision point.
How to Run the Drill
Step 1: Attack Each “Defender”
The player starts at the top with two basketballs.
Dribble toward the first chair
Perform a move at the chair
Continue through the course
Encourage a variety of moves:
Crossover
Between the legs
Behind the back
Hesitation or fake crossover
Each chair should feel like a live defender.
Step 2: Stay Under Control With Two Balls
The second ball is what makes this a true 2 ball basketball drill.
Players must maintain control of both basketballs
No picking up early or dropping the off-hand ball
Keep eyes up while navigating the course
Coaching point: This builds coordination and forces players to stay balanced.
Step 3: Finish With the Correct Hand
At the rim, the rules tighten.
On the right side, finish with a right-handed layup only
On the left side, finish with a left-handed layup only
The second ball stays in the opposite hand. That removes the option to switch or cheat the finish.
Coaching point: This is where younger players grow fast. It forces true weak-hand development.
Why This 2 Ball Basketball Drill Works
Forces Weak-Hand Development
Players can’t rely on their dominant hand. The extra ball keeps them honest.
Improves Ball Control Under Pressure
Handling two basketballs through obstacles builds tighter, more confident dribbling.
Teaches Game-Like Movement
Zigzag spacing mimics real drives against defenders.
Builds Coordination and Balance
Players must stay controlled from start to finish, even while managing two balls.
Coaching Tips
Keep the pace controlled before increasing speed
Emphasize clean, sharp moves at each chair
Demand proper footwork on finishes
Reinforce finishing high off the glass
Remind players that every rep should look like a game situation.
Variations to Increase Difficulty
Once players get comfortable, level up this 2 ball basketball drill:
Add a live defender at the end for contact finishes
Limit dribbles between chairs
Add a pull-up jumper before the layup
Time each run to create competition
You can also flip the starting side to balance reps.
Final Thoughts
This 2 ball basketball drill does more than improve handles. It builds confidence, coordination, and finishing ability in one sequence. Players learn to stay composed, control the ball, and finish with either hand under pressure.
Add it to your workout plan and watch your players become more complete offensive threats.
If you’re looking for a basketball shooting game that keeps players engaged while sharpening mechanics, the 3-2-1 Shooting Drill delivers. It blends repetition, pressure, and progression into one simple format. Players compete against themselves, stay locked in, and build confidence from every spot on the floor.
This is the kind of drill you can plug into any practice, from youth teams to varsity groups. It moves quickly, creates accountability, and rewards consistency.
What Is the 3-2-1 Basketball Shooting Game?
The 3-2-1 Shooting Drill is a three-phase basketball shooting game built around five spots on the court. Players must complete a sequence of makes at each spot before advancing.
The structure is simple:
Round 1: Make 3 shots at each spot
Round 2: Make 2 shots in a row at each spot
Round 3: Make 1 shot at each spot… but with a twist (you can’t miss)
Each round increases the pressure and forces players to stay mentally sharp.
Court Setup
You’ll need:
1 shooter
1 rebounder (or partner)
1 basketball
5 perimeter spots (both corners, both wings, and top of the key)
Spacing matters. Keep shots game-like and consistent with your offensive system.
How to Run the 3-2-1 Shooting Drill
Round 1: Make 3 at Each Spot
Start in the corner.
The player must make three total shots at that spot
Shots do NOT need to be consecutive
Once they hit three, they move to the next spot
By the end of the round, the player will have made 15 total shots (5 spots × 3 makes).
Coaching point: This round builds rhythm and confidence. Players should focus on form and footwork.
Round 2: Make 2 in a Row
Now the pressure increases.
The player must make two consecutive shots at each spot
If they miss, the count resets at that spot
They move around the same five spots until they complete the sequence.
Coaching point: This is where focus kicks in. Players must lock in after a miss and respond right away.
Round 3: Make 1 at Each Spot (No Misses Allowed)
This is where the drill becomes a true basketball shooting game.
The player must make one shot at each spot
If they miss at any point, they go back to the beginning
That means five straight makes from five different spots to finish.
Coaching point: This simulates game pressure. Every shot matters.
Why This Basketball Shooting Game Works
1. Builds Mental Toughness
Players can’t drift through this drill. The reset in later rounds forces them to stay focused and compete.
2. Creates Game-Like Pressure
Round 3 mirrors late-game situations. One miss changes everything.
3. Encourages Accountability
Players track their own progress. No shortcuts, no hiding.
4. Keeps Practice Competitive
Turn it into a timed challenge or team competition. Players will push each other.
Ways to Level It Up
Want to get more out of this basketball shooting game? Try these variations:
Add a timer: Players must finish all three rounds within a set time
Track scores: Keep a leaderboard across practices
Add movement: Require a cut or dribble move before each shot
Conditioning twist: Add sprints after missed sequences
Coaching Tips for Success
Demand proper footwork every rep
Keep passes crisp and consistent
Encourage quick shot preparation
Reinforce next-shot mentality after misses
This drill works best when players treat every rep like a game shot.
Final Thoughts
The 3-2-1 drill is more than just a routine. It’s a basketball shooting game that challenges players to stay sharp, shoot with confidence, and handle pressure. It fits into any practice plan and scales easily across skill levels.
If you want a drill that players will remember and compete in, this one belongs in your rotation.
If you want to improve at how to talk to players after a loss, you have to understand this first: players aren’t just listening to what you say. They’re deciding what the loss means. For some, it becomes motivation. For others, it turns into doubt. Your words shape that outcome.
Why Postgame Conversations Matter So Much
The minutes after a loss are emotional. Players are frustrated, disappointed, and sometimes embarrassed. This is where many coaches make a mistake. They jump straight into corrections: “We didn’t execute, didn’t rebound, didn’t play hard enough.”
There’s a time for film breakdown. The locker room right after a loss is not that time. If you’re serious about how to talk to players after a loss, you have to address the person before the performance.
Start With Emotion, Not Evaluation
Before players can learn, they need to process how they feel. Ask simple questions:
How are you feeling right now?
What was the toughest part of that game?
What stuck with you?
You don’t need long answers. You just need to show them that the feeling is normal. Ignoring emotion doesn’t make it go away. It just pushes it underground, where it turns into frustration or self-doubt.
Separate the Player From the Performance
One of the most important parts of how to talk to players after a loss is helping them understand that a bad game doesn’t define them. Make that clear:
“You’re not your last game”
“One result doesn’t change who you are as a player”
“We’re evaluating what happened, not who you are”
Players, especially younger ones, tend to connect performance to identity. When they struggle, they start to question themselves. Your job is to break that connection.
Shift the Focus to What They Can Control
After acknowledging emotion, move the conversation toward controllables. Ask:
Did we give consistent effort?
Did we communicate?
Did we stay together when things got tough?
This helps players understand that improvement comes from actions, not outcomes. When players learn this, losses become information instead of judgment.
Turn the Loss Into Feedback
Every loss carries information. The key is helping players see it that way. Instead of saying, “We failed,” reframe it:
What did we learn from this game?
What can we do differently next time?
What did this expose about our preparation?
This is a critical part of how to talk to players after a loss. When players see failure as feedback, they stay engaged in the process.
Keep It Short and Clear
Right after a game, less is more. Players are not in a state to absorb a long speech. They need clarity and direction. A simple structure works best:
Acknowledge the effort
Recognize the emotion
Identify one or two areas to improve
Reinforce belief in the group
Save the deeper breakdown for practice or film sessions.
What Players Actually Remember
Years from now, players won’t remember every score. They will remember how they felt in moments like this. They’ll remember:
Whether their coach believed in them
Whether mistakes were treated as learning opportunities
Whether they felt supported after struggling
If you master how to talk to players after a loss, you’re doing more than coaching a game. You’re helping players build resilience, confidence, and perspective. And those lessons last a lot longer than any result on the scoreboard.
If you’re serious about understanding what coaches need to know about player development, you have to start with how you see your players. Labels show up everywhere in youth basketball. “He’s too small.” “She’s not athletic.” “That kid can’t focus.” Over time, those labels stop being observations and start becoming identity.
Great coaching begins when you move past that.
What Coaches Need to Know About Player Development Starts With Perspective
One of the most important things coaches need to know about player development is that players are not fixed. They are constantly changing, learning, and adapting. When a player gets labeled early, it can shape how they approach the game:
They avoid challenges
They stay in a comfort zone
They stop seeing themselves as capable of growth
Your job is to break that cycle. Players need to understand that where they are right now is not where they will always be. Development is not linear, and it rarely happens on a predictable timeline.
Labels Can Quietly Limit Potential
Labels can seem harmless, but they often come with unintended consequences. When players hear the same message repeatedly, they start to believe it:
“I’m not a shooter”
“I’m not quick enough”
“I’m just a role player”
That belief affects effort, confidence, and decision-making. If you’re focused on what coaches need to know about player development, this is a key point. A player’s ceiling is often shaped more by belief than ability. When belief shrinks, development follows.
Shift From Labels to Traits
A better approach is to focus on traits instead of labels. Every player has a combination of strengths that can be developed:
Energy and motor
Court awareness
Coordination
Competitiveness
Instead of defining a player by what they lack, identify what they bring. A smaller player may have an advantage with speed and ball handling, whereas high-energy player may become a defensive anchor. A player who struggles with focus may excel in fast-paced situations.
This is the mindset behind what coaches need to know about player development. You are not just evaluating players. You are shaping how they see themselves.
Environment Plays a Huge Role in Development
Players don’t develop on their own. They develop within the structure you create. One of the biggest things coaches need to know about player development is that environment can either unlock or limit potential. Ask yourself:
Does your practice allow different types of players to succeed?
Are you giving players opportunities to grow outside their comfort zone?
Do players feel safe making mistakes?
The right environment helps players turn raw traits into usable skills. The wrong environment reinforces labels.
Coaching Language Matters More Than You Think
The way you talk to players can either reinforce a label or open the door for growth. Consider the difference:
“You’re not a good shooter.”
“You’re still developing as a shooter. Let’s work on your reps and footwork.”
One shuts a player down. The other gives direction. If you want to apply what coaches need to know about player development, your language has to reflect growth. Players are always listening, and they often repeat what they hear.
4 Practical Ways to Move Beyond Labels
Here are a few ways to put this into action:
1. Highlight Strengths Daily
Make it a habit to point out what players do well, especially in areas they may not recognize.
2. Expand Player Roles
Give players chances to handle the ball, defend different positions, and make decisions.
3. Emphasize Habits Over Outcomes
Focus on effort, communication, and decision-making. These are areas every player can improve.
4. Give Clear, Actionable Feedback
Replace general statements with specific guidance players can use right away.
The Long-Term Impact on Player Development
When you apply what coaches need to know about player development, you’re doing more than improving performance. You’re helping players:
Build confidence that isn’t tied to labels
Stay open to growth
Approach challenges with the right mindset
Most players won’t remember the exact drills you ran. They will remember whether they felt capable of improving. That belief can change how they approach not just basketball, but everything that comes after it.
If you’re serious about teaching players how to handle losing in basketball, you have to go beyond the scoreboard. Every coach says they value effort, growth, and mindset. The real test comes after a loss. What you say, what you emphasize, and what you reward in those moments will shape how your players view the game and themselves.
One of the most powerful lessons you can teach is this simple distinction: there’s a difference between losing and getting outscored.
Losing vs Getting Outscored: A Lesson Every Player Needs
I was in a practice with a fifth grade girls team when this idea came to life in a way I’ll never forget. We were talking about a recent game, and I asked the players what the difference was between losing and getting outscored.
One player answered it better than most coaches could. She said losing is when you don’t give your best effort. Getting outscored is when you give everything you have and still come up short. That changed the entire conversation.
When players understand this, the game shifts. A loss on the scoreboard no longer defines the experience. Effort, focus, and growth become the measuring stick.
If you want to succeed in teaching players how to handle losing in basketball, this is the foundation.
Why Coaches Need to Redefine Losing
Players take their cues from us. If we react to every loss with frustration or disappointment, they will attach their self-worth to the outcome. Young athletes are always asking themselves questions, even if they never say them out loud:
Did I play well enough?
Did I let my coach down?
Am I good enough?
When the only thing that matters is the final score, those questions get answered in the worst possible way. But when you redefine losing, you give players a healthier framework:
Effort matters
Growth matters
Learning matters
That doesn’t lower standards. It raises them in the right areas.
How to Talk to Players After a Loss
Your postgame message is one of the most important moments you have as a coach. This is where teaching players how to handle losing in basketball becomes real.
Start with questions instead of statements:
What did we do well today?
Where did we improve?
What can we build on next practice?
Then guide them toward effort-based evaluation:
Did we compete the entire game?
Did we communicate?
Did we stick together when things got tough?
Players need help separating performance from identity. A bad game should never turn into “I’m a bad player.” Keep the focus on controllables. Effort, attitude, and preparation are always within reach.
Let Them Feel It, Then Help Them Grow
Losing should sting. That’s part of sports. Trying to remove that feeling takes away the lesson. Players need to experience disappointment so they can learn how to respond to it. Your role is not to eliminate failure. Your role is to guide them through it.
Give them space to feel frustrated, then bring them back to perspective:
What did this game teach us?
What will we do differently next time?
When players learn to process failure this way, they build resilience that carries far beyond basketball.
A Simple Practice That Builds the Right Mindset
One of the best ways to reinforce this lesson is to define a “win” before the game starts. Set a team goal that has nothing to do with the score:
Hold the opponent under a certain number of offensive rebounds
Communicate on every defensive possession
Reach a target number of assists
After the game, evaluate that goal first.
I once had a team set a goal of reaching 15 points against a much stronger opponent. They hit it late in the game and celebrated like they had just won a championship. They were outmatched, but they didn’t lose. Moments like that stick with players.
The Long-Term Impact of Teaching Players How to Handle Losing in Basketball
Most players won’t remember the exact scores of their games years from now. What they will remember is how they felt and what they learned.
When you focus on teaching players how to handle losing in basketball, you’re doing more than building better athletes. You’re helping them develop:
Confidence that isn’t tied to outcomes
The ability to respond to adversity
A mindset that values growth over perfection
Those lessons show up in school, relationships, and eventually in their careers. And it all starts with a simple shift in perspective. Not every loss is the same. Some are just moments where you got outscored.
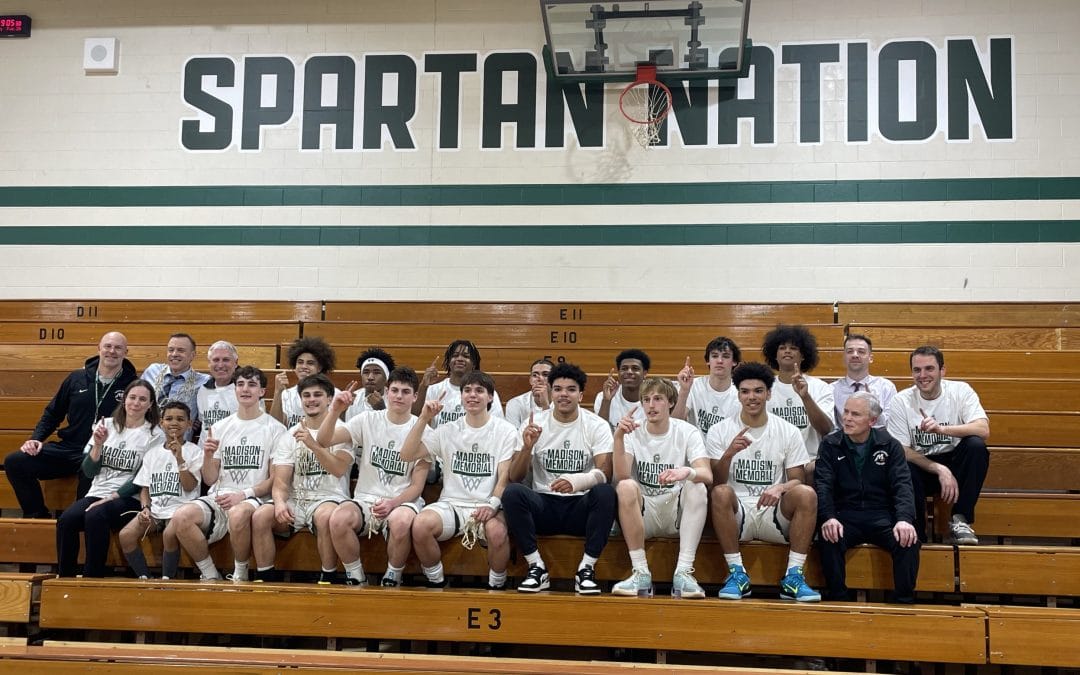
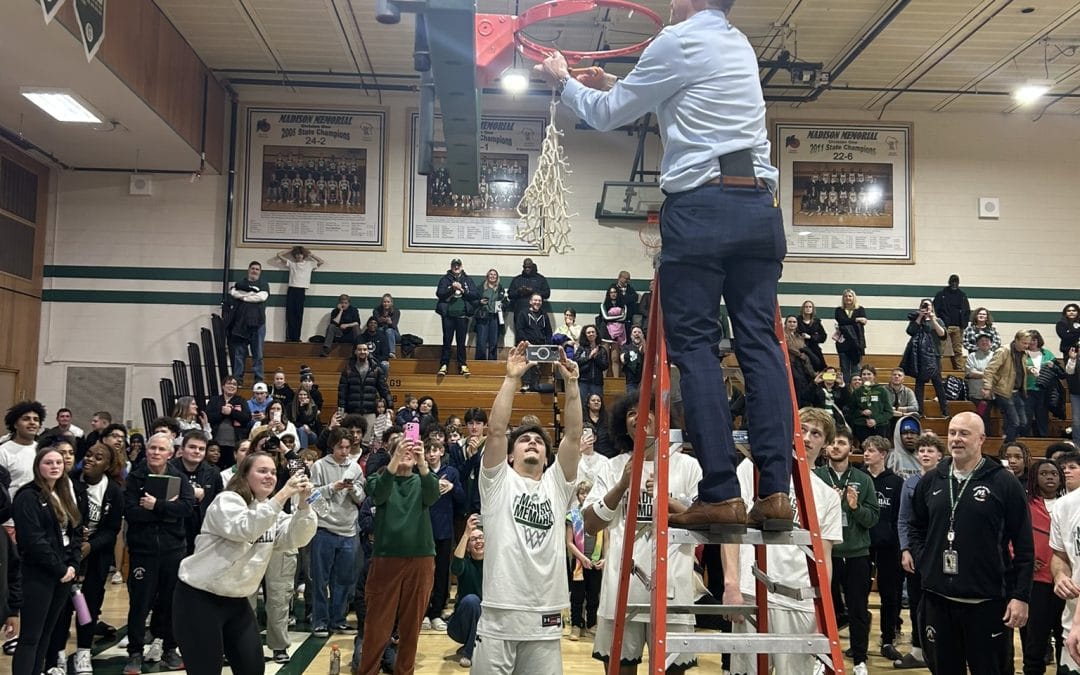
When legendary Wisconsin high school coach Steve Collins announced his retirement after 27 seasons at Madison Memorial, the basketball world naturally focused on the numbers. More than 500 wins. Three state championships. Fourteen straight conference titles. Hall of Fame recognition. But if you listen closely to Collins speak about his career, one thing becomes clear: his legacy was never about the trophies. Instead, Collins built his reputation on something every coach should aspire to create: a lasting youth basketball coaching culture. For coaches looking to build programs that endure beyond wins and losses, Collins’ career offers a blueprint worth studying.
Basketball Coaching Culture Starts With Relationships
Throughout his retirement interview, Collins repeatedly emphasized that his greatest pride did not come from banners hanging in the gym. It came from watching former players become successful adults.
That mindset reflects one of the foundational truths of great coaching: players may remember the wins, but they never forget how a coach made them feel.
The best programs are built when players trust their coach beyond basketball strategy. They buy in when they know their coach genuinely cares about them as people. Collins understood that early, and it shaped everything about his program.
A strong youth basketball coaching culture begins when players believe the relationship matters more than the result of Friday night’s game.
Consistency Creates Confidence
One of the most fascinating parts of Collins’ interview was his discussion of routines. He talked about wearing the same blue suit and tie on game days. He mentioned his consistent pregame schedule. He reflected on his famous “Thanks for coming” greeting before home games. While those habits may seem small, they point to something deeper: elite coaches understand the value of consistency.
Players thrive when expectations, preparation, and routines stay steady. Consistency removes uncertainty. It gives athletes confidence in the process.
Championship-level programs are often built not on dramatic motivational speeches, but on repeated daily habits that players can trust.
If your players know exactly what practice will demand, exactly what preparation looks like, and exactly what your standards are every day, your culture becomes stronger.
Great Coaches Build Programs Bigger Than Themselves
Perhaps Collins’ most telling quote came when discussing the future of Madison Memorial basketball. He said he wants the next coach to make the program their own. That reflects true leadership.
Some coaches build programs entirely around their personality. When they leave, everything falls apart because the culture was dependent on one person.
Great coaches build systems and standards that can survive beyond their own tenure. That means creating traditions players believe in, standards assistants understand, and values the entire community embraces.
The goal is not to build a program people remember because of the coach. The goal is to build a program people remember because of what it stands for.
Success Is Measured Beyond The Scoreboard
Collins finished his career with enough wins and championships to cement his reputation. Yet in retirement, he consistently downplayed those accomplishments in favor of discussing player development and relationships. That should challenge every coach to reflect.
Winning matters. Competing matters. Championships matter. But if those things become the only measure of success, coaches lose sight of their real impact.
Every practice, every film session, and every timeout is an opportunity to teach discipline, resilience, communication, and accountability. Those lessons stay with players long after the final buzzer.
Final Thoughts
Steve Collins’ retirement reminds coaches everywhere that the best youth basketball coaching culture is not built on tactics alone. It is built on trust, consistency, relationships, and purpose. Wins may define seasons, but culture defines programs.
If you want your team to compete at a high level year after year, focus less on chasing quick results and more on building standards your players believe in every day. That is how programs last. And that is how coaches leave a true legacy.
Every player says they want to improve, but not every player trains with purpose. One of the best ways to separate yourself from the competition is by committing to a high-intensity basketball workout that pushes your conditioning while sharpening real game skills.
Coach Collins recently broke down one of his favorite individual player workouts, a fast-paced 20-minute routine designed to help guards improve shooting, ball handling, finishing, and conditioning all at once. The beauty of this workout is its simplicity. You can complete it alone in a gym, at a park, or anywhere with a hoop and a basketball.
Why This High-Intensity Basketball Workout Works
Many players think improvement requires spending hours in the gym every day. That is not always true. A focused, demanding workout can be more effective than a long, unfocused one. This high-intensity basketball workout works because it forces players to:
Train while fatigued
Practice game-speed movements
Develop conditioning naturally through skill work
Build confidence in shots they will actually use in games
By the end of the workout, players are shooting when tired, finishing when tired, and making decisions when tired. That is exactly what happens during real competition.
Start with Form and Touch
The workout begins with perfect shots, also known as form shooting. Players start close to the basket and focus on making clean shots without touching the rim. This helps develop touch and rhythm before the pace increases. From there, players progress into:
Mid-range baseline shots
Bank shots
Elbow jumpers
These early reps help establish feel before moving into more explosive movements.
Add Finishing and Creative Scoring
Once warm, players attack the basket with runners and floaters. Coach Collins emphasizes using different hands, angles, and footwork. Players should practice getting uncomfortable here. If every shot goes in, they probably are not pushing hard enough.
Next comes:
Hesitation pull-ups
Crossover jumpers
One-dribble scoring moves
This section builds confidence in attacking defenders off the bounce.
Do Not Ignore Post Work
Even guards benefit from learning to score in the post. This high-intensity basketball workout includes time on both blocks practicing:
Up-and-unders
Fadeaways
Baby hooks
Jump hooks
Coach Collins notes that guards can exploit mismatches when switched onto smaller or weaker defenders. Having post moves adds another layer to your offensive game.
Finish with Fatigue Shooting
The final portion of the workout focuses heavily on shooting while exhausted. Players work through:
One-dribble pull-ups
Three-pointers
Step-back jumpers
Pick-and-roll simulations
Deep range threes
This is where the workout becomes mentally challenging. Coach Collins intentionally saves perimeter shooting for the end because players need to learn how to shoot with tired legs. Great shooters knock down shots late in games when fatigue sets in.
End with Pressure Free Throws
To finish, players shoot free throws while completely exhausted. The goal is simple: make a set number in a row before leaving.
This creates pressure and simulates game situations. Anyone can make free throws fresh. Great players make them when their legs are heavy and their breathing is elevated.
Final Thoughts on This High-Intensity Basketball Workout
If players commit to this high-intensity basketball workout every day, they will improve. The workout does not take hours. It takes focus, effort, and discipline. Coach makes it clear that consistent, intense work beats occasional marathon sessions. Twenty hard minutes of purposeful training can change a player’s game if done with the right mindset.
For coaches, this is also an excellent template to give players who want structured individual workouts outside of team practice.
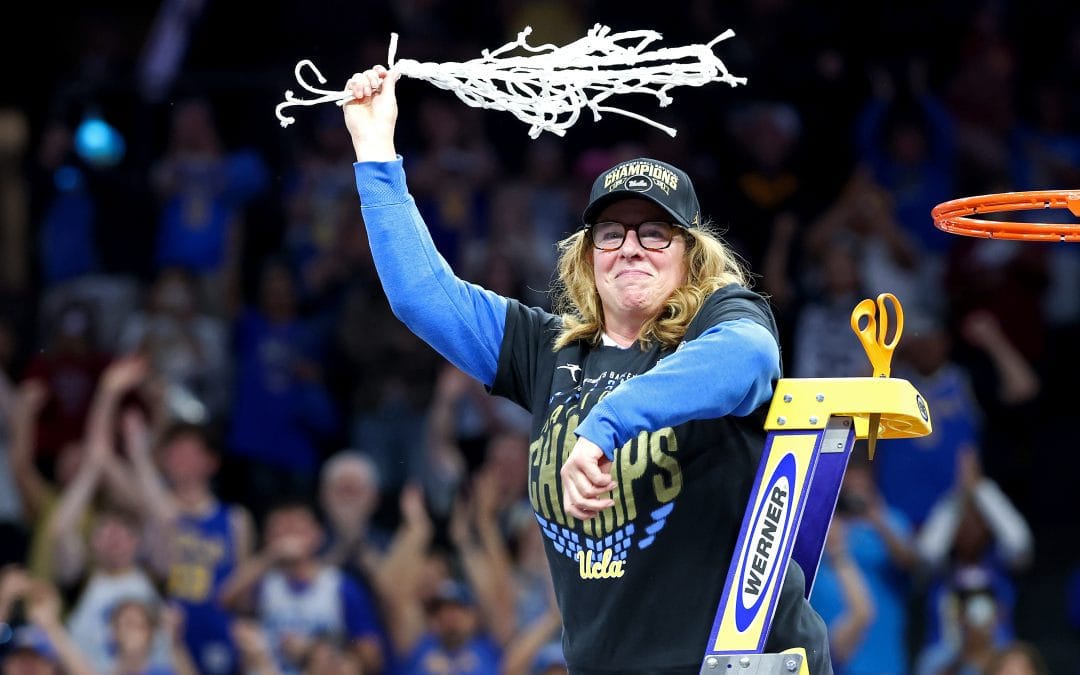
The rise of UCLA Bruins women’s basketball under Cori Close offers one of the clearest models of UCLA basketball coaching done right. This was not a quick turnaround. It was a steady shift built on culture, player development, and a clear approach to leadership that led to a National Championship in 2025–26, thanks to the 79-51 victory over South Carolina last Sunday.
For youth coaches, there is a lot here that translates directly to your gym.
Culture Drives UCLA Basketball Coaching
Close built her program around daily habits and personal responsibility. Two simple objects sit in her office: a broom and a shovel. They represent how the program operates.
The broom is about accountability. Players are expected to own mistakes and handle the small details without excuses. The shovel represents the work required to build something real. It reminds players that progress comes from consistent effort, even when it is not visible on the scoreboard.
This approach shows up in what Close calls the “Mind Gym.” Players are trained to reset quickly after mistakes. Missed shots, turnovers, and bad possessions do not linger. The focus shifts immediately to the next play. Over time, that habit becomes part of the team’s identity.
Youth coaches can apply this by building reset habits into practice. After mistakes, require a quick verbal or physical reset. Track body language the same way you track performance. When players learn how to respond, everything else becomes easier to teach.
Recruiting and Development in UCLA Basketball Coaching
Another defining piece of UCLA basketball coaching is how Close handles talent. She recruits at a high level, but development is what separates the program. Instead of easing young players into small roles, Close gives them real minutes early. Her freshman classes have played more than most programs in the country. That experience speeds up growth and prepares players for high-pressure moments later.
The addition of Lauren Betts gave UCLA a dominant interior presence. That helped the Bruins control the glass and protect the rim at an elite level. But the impact goes beyond one player. The system allows talent to develop quickly and fit into a larger structure.
For youth coaches, the lesson is simple: Development happens through reps. Players improve when they are trusted with meaningful minutes, even if mistakes come with it. Holding players back can slow growth more than it helps.
Mentorship and the John Wooden Influence
Close’s connection to John Wooden shaped how she leads. She adapted his principles for today’s players without losing the core message.
One of her key ideas is shifting language from obligation to opportunity. Players are encouraged to see practice and competition as something they get to do, not something they have to do. That small change can affect energy and focus right away.
She also emphasizes identity beyond performance. Players are not defined by stats or outcomes. They are defined by who they are as people. That reduces pressure in big moments and helps players stay grounded during the season.
At the youth level, this can change how players approach the game. When they feel secure in who they are, they compete with more freedom and confidence.
The Strategic Shift That Elevated UCLA Basketball Coaching
The biggest leap in Close’s tenure came when she evaluated her own approach. Around 2022, she sought feedback from people who would challenge her thinking. That led to adjustments in offensive strategy and a stronger focus on recovery and sports science.
These changes mattered during the transition to the Big Ten, where travel and physical demands increased. The program adapted instead of staying static.
This is a reminder that growth as a coach requires honest evaluation. Improvement often starts with recognizing what is not working.
What Youth Coaches Can Take From UCLA Basketball Coaching
Cori Close built a championship program by focusing on habits, mindset, and development over time. The lessons carry over at any level.
Teach accountability every day.
Create a standard for effort that players understand.
Train players to reset quickly after mistakes.
Give young players opportunities to grow through real minutes.
Keep the focus on the person, not just the player.
UCLA basketball coaching shows that sustained success comes from clarity and consistency. When those pieces are in place, results follow.
Every youth coach wants to win, but the real challenge is building something that lasts beyond one group of players, and that is where basketball coaching culture matters most, because the best programs create habits, expectations, and standards that carry from one season to the next regardless of who is on the roster.
1. Culture Is What Gets Passed Down
At the strongest programs, players do not need constant reminders. Older players teach younger ones how things work. Expectations become part of the environment. This shows up in simple ways:
How players warm up
How they communicate
How they respond to coaching
When those behaviors repeat without constant correction, culture is taking hold.
2. Your Best Players Set the Tone
Culture starts with your most talented players. If they defend, compete, and accept coaching, the rest of the team will follow. If they cut corners, everything slips.
This is one of the most important realities for youth coaches. You cannot build a strong basketball coaching culture if your best players are not fully bought in.
3. Effort Must Be Taught and Reinforced
One of the defining traits of successful programs is consistent effort. That does not happen by accident. Coaches have to teach players what hard work looks like and hold them to it daily. That includes:
Sprinting in drills
Finishing plays
Practicing with focus
Effort becomes a skill when it is expected every day.
4. Consistency Builds Trust
Players need to know what they are walking into every time they step into the gym. When expectations stay the same, players begin to trust the structure of the program. That trust leads to better focus, stronger habits, and more accountability within the team.
When standards change from day to day, players hesitate and culture weakens.
5. Discomfort Drives Growth
Strong programs are demanding. Players are pushed, corrected, and held accountable. That environment can feel uncomfortable, especially for younger athletes. That’s part of the process.
Players improve when they are challenged and when they are expected to meet a higher standard than they are used to.
6. Success Brings Attention and Criticism
Programs that win consistently draw attention. With that attention comes opinions. Some will respect what you are building, others will question it. That’s normal.
When a program is working, people notice. Staying focused on your standards matters more than outside noise.
Final Thought
A strong basketball coaching culture is built over time through daily habits, clear expectations, and consistent accountability. When done well, it allows a program to sustain success across different teams and seasons.
If your players understand what is expected and carry it forward, your culture is doing its job.
If you coach long enough, you’re going to run into this reality: winning doesn’t guarantee everyone will like you. That’s one of the biggest takeaways from the career of longtime Madison Memorial coach Steve Collins, who retired after nearly three decades of success, including over 500 wins and multiple state championship appearances. For youth basketball coaches, his story offers a powerful lens into what it really means to build a basketball coaching mindset that lasts.
1. Your Identity as a Coach Will Show Up Every Day
Coach Collins was described as intense, animated, and relentless on the sidelines. That wasn’t an act, it was who he was. Young players and coaches often think they need to “turn it on” during games. But the truth is:
Your team becomes a reflection of your habits, energy, and expectations.
If you’re:
Organized → your team will be disciplined
Competitive → your team will fight
Inconsistent → your team will be unpredictable
The lesson: Don’t try to be someone else. Be consistent in who you are.
2. Winning Programs Are Built on Standards, Not Motivation
One of the most underrated details from Collins’ program was the emphasis on non-negotiables like being on time and showing respect. That’s not flashy, but it wins.
Too many youth coaches rely on:
Pep talks
Energy speeches
Emotional highs
Instead, elite programs rely on:
Daily standards
Clear expectations
Accountability
Motivation fades. Standards stay.
3. You Don’t Have to Be Liked, You Have to Be Respected
Collins openly acknowledged that he wasn’t universally loved in coaching circles. And yet, his teams kept winning. This is a tough pill for young coaches:
Players won’t always like hard coaching
Parents won’t always agree
Other coaches will have opinions
But here’s the truth: Respect is greater than popularity.
If your players play hard, improve, and compete, you’re doing your job.
4. Innovation Matters Even at the Youth Level
Collins was ahead of the curve using analytics and statistics to teach shot selection. That’s a huge takeaway. You don’t need advanced software to apply this. You can teach:
Good vs. bad shots
Spacing concepts
Decision-making
Smart basketball is learned early or not at all.
5. Longevity Comes from Consistency, Not Magic
28 seasons. 500+ wins. Conference dominance. That doesn’t happen because of one great team. It happens because of:
Systems
Culture
Daily habits
The best youth coaches think long-term:
“How will this look in 3 years?”
“What are we building?”
Final Thought
Collins’ career proves something every youth coach needs to hear: If you’re doing it right, not everyone will agree with you.
But if your players grow, compete, and learn…You’re winning where it matters most.
If you’re looking for a free throw drill that builds focus, pressure, and consistency all at once, this 30-second challenge is one of the most effective tools you can add to your practice plan. It’s simple, competitive, and mirrors real game situations where players must perform under stress.
At TeachHoops, we always emphasize drills that translate directly to games, and this one checks every box.
What Is the 30-Second Free Throw Drill?
This free throw drill challenges players to make as many free throws as possible in 30 seconds. That’s it. But the simplicity is what makes it powerful.
How It Works:
Player starts at the free throw line
Coach (or teammate) rebounds and passes quickly
Timer is set for 30 seconds
Player shoots continuously
Track makes (not just attempts)
Why This Free Throw Drill Works
This isn’t just about getting shots up—it’s about simulating pressure.
1. Game-Speed Pressure
Players feel rushed, just like in late-game moments. Heart rate goes up, mechanics get tested.
2. Fatigue Shooting
As the drill progresses, legs get tired. This exposes flaws in form and balance.
3. Mental Toughness
Players must reset quickly after misses. No time to dwell—next shot mentality.
4. Built-In Competition
You can easily track results and create accountability across your team.
Coaching Points for Maximum Impact
To get the most out of this free throw drill, emphasize these details:
Routine matters: Even under time pressure, players should maintain a consistent pre-shot routine
Balance and follow-through: Watch for drifting or rushed mechanics
Next-shot mentality: No reacting emotionally to misses
Eyes and focus: Lock in on the rim every rep
Variations to Fit Your Team
One of the best things about this free throw drill is how easily it adapts.
Youth Players
Track makes AND attempts
Focus on form over speed
Extend time to 45–60 seconds if needed
High School / Varsity
Require a minimum percentage (e.g., 70%)
Add consequences for low scores
Track weekly improvement
Team Competition
Divide into groups
Keep a leaderboard
Add pressure: lowest score runs or does conditioning
Advanced Free Throw Drill Challenges
Ready to take it up a notch? Try these:
Streak Challenge: Must hit 5 in a row within 30 seconds
Pressure Finish: End practice with this drill—fatigue is real
Game Simulation: Sprint before each attempt to elevate heart rate
How to Use This in Practice
This free throw drill fits perfectly into multiple parts of your practice plan:
Warm-up: Light version to get focused
Mid-practice: Add competitive element
End of practice: Simulate pressure and fatigue
Consistency is key. Use it 2–3 times per week and track results.
This drill hits all three. It creates better shooters, tougher players, and more confident teams at the line.
If your team is leaving points at the free throw line, this free throw drill is a must-add to your practice routine. It’s quick, effective, and builds the kind of confidence players need when the game is on the line.
If you want to punish aggressive defenses and create easy scoring opportunities, the back door cut drill needs to be a staple in your practice plan. This simple but powerful concept teaches players how to read defenders, time their cuts, and finish at the rim, skills that translate directly into game situations.
Let’s break down how to teach it effectively and get the most out of your players.
Why the Back Door Cut Drill Matters
The back door cut drill is all about reading defensive pressure. When a defender overplays the passing lane, your offensive player must react instantly, cutting hard to the basket for a high-percentage shot. This drill develops:
Court awareness and basketball IQ
Timing between passer and cutter
Explosive first steps and decisive movement
Finishing ability at the rim
In short, it turns defensive pressure into offensive advantage.
How to Set Up the Back Door Cut Drill
Start simple and emphasize spacing and communication.
Basic Setup:
One passer at the top or wing
One offensive player on the wing
A defender applying pressure (optional at first)
Execution:
The offensive player begins on the wing.
The defender slightly overplays the passing lane.
The offensive player “pins” or steps toward the ball to sell the pass.
Once the defender commits, the player cuts backdoor hard.
The passer delivers a quick, accurate pass “down the line.”
The cutter finishes at the rim.
Key Teaching Points from the Drill
Here are several coaching cues that are critical to success:
1. Read the Overplay
Players must recognize when the defender is denying the pass. That’s the trigger.
“She reads the overplay… she goes backdoor.”
Train your players to react, not think, when they see that pressure.
2. Timing Is Everything
One of the biggest mistakes is cutting too early.
“Too soon, too soon… that’s okay.”
Reinforce patience. The cut should happen after the defender commits.
3. Sell the Initial Action
Players should step toward the ball before cutting.
“You’re getting in the teeth… she’s going slightly up the cut line…”
This small movement forces the defender to lean, creating the backdoor opportunity.
4. Pass on a Line
The passer must deliver the ball quickly and directly.
“You are gonna pass it right down the line.”
No lobs. No hesitation. The pass should lead the cutter to the basket.
5. Cut Hard—No Jogging
Effort matters. Lazy cuts kill the drill.
“You guys gotta cut harder… my grandmother’s guarding that!”
Demand game-speed cuts every rep.
6. Finish with Purpose
Encourage players to finish strong, using either hand when appropriate.
“Drop it off to the left hand…”
This adds realism and builds finishing versatility.
Common Mistakes to Watch For
Even experienced players struggle with this drill if details slip. Watch for:
Cutting too early before the defender commits
Floating passes instead of sharp, direct feeds
Slow or rounded cuts instead of straight-line attacks
Poor spacing that clogs the lane
Correct these immediately to keep the drill sharp and effective.
Progressions to Level Up the Drill
Once your team understands the basics, increase the challenge:
Add live defenders to force real reads
Incorporate a dribble drive before the pass
Add a help defender to simulate game pressure
Track finishes to build accountability
These progressions turn a simple drill into a game-ready skill builder.
Final Thoughts
The back door cut drill is one of the most efficient ways to teach players how to exploit defensive pressure. When executed correctly, it builds chemistry, improves decision-making, and creates easy buckets.
If your team struggles against aggressive defenses, start here. Drill it consistently, demand precision, and you’ll see the results show up on game night.
If you coach youth basketball long enough, you learn something important pretty quickly. The job is not just about plays, defenses, or what to run after a timeout. The best youth basketball coaching tips have less to do with whiteboards and more to do with teaching, communication, confidence, and connection.
That was one of the biggest takeaways from a recent conversation with legendary Bay Area coach Margaret Gartner, who has spent 40 years coaching and 32 years teaching. Her perspective is a powerful reminder that coaching kids is about much more than basketball. It is about helping young players learn, grow, and believe in themselves.
For coaches trying to build better practices, stronger teams, and more confident athletes, that mindset changes everything.
The Best Youth Basketball Coaching Tips Start With Teaching
One of the smartest things Coach Gartner shared was an idea should shape every youth practice:
It is not about how much you can teach. It is about how much they learn.
Too often, coaches feel pressure to cover as much as possible. We want to install an offense, teach help defense, work on press breaks, fix passing angles, and get through the whole practice plan. But players do not improve because a coach said more. They improve because they understood it, practiced it, and repeated it enough to use it in a game.
That means one of the most valuable youth basketball coaching tips is simple: talk less and let players do more.
Kids need reps. They need guided mistakes. They need a chance to try a skill, fail, adjust, and try again. If practice becomes one long lecture, learning slows down.
Confidence Is a Coach’s Real Job
A lot of coaches think their responsibility is to teach plays and fundamentals. Those things matter, but confidence might matter more. Young players do not perform at their best when they are afraid of making mistakes. They perform better when they know mistakes are part of the process. That’s why great coaches praise effort, decision-making, and growth, not just results.
If a player attacks the basket and turns it over, the easy thing to do is focus on the turnover. A better coaching approach is to start with what was right. Maybe the player attacked with confidence. Maybe she finally made an aggressive read. Or maybe she did exactly what the coach had been asking her to do. Feedback like this helps players stay engaged instead of shutting down.
For youth coaches, this is one of the most important basketball coaching principles to remember: you are not just coaching performance, you are coaching belief.
Less Control, More Flexibility
One of the biggest mistakes new coaches make is trying to control every second of practice. Most of us have been there. You create the perfect practice plan. You want to move drill to drill with no wasted time. Then one thing goes wrong, and the whole workout feels off track. Experienced coaches know better.
Practice has to breathe a little. You need backup drills. You need alternatives. And you need to be willing to scrap something that is not working and pivot to something players can handle. Flexibility becomes even more important in youth basketball, where players develop at different speeds. A concept that seems simple to one player may feel completely new to another.
The best youth basketball coaching tips are rarely about being more rigid. They are about being more adaptable.
Every Player Learns Differently
This is where teaching and coaching overlap in a big way. Some players need to hear it, some need to see it, and some need to walk through it slowly before they can do it live. Some are confident right away. Others are afraid to fail in front of teammates. A coach who treats every player exactly the same will miss chances to help them improve.
That does not mean every practice needs to be individualized from start to finish. It means smart coaches build in ways to reach more players. Small groups help. Station work helps. Grouping players by confidence or skill level helps. Giving players specific tasks while you work more closely with another group helps.
If one player is scared to box out, maybe she needs a pad first before real contact. If another is overwhelmed, maybe she needs fewer players in the drill and more encouragement.
Good coaches do not say, “She just cannot do it.” They ask, “How can I teach this better?” It can transform a team.
Stop Comparing Kids
Comparison is one of the fastest ways to crush confidence in youth sports. Players develop at different rates. Some are physically ready earlier. Others understand the game faster. Some are more aggressive, while others need more time and more reps before things click. A player’s journey should not be measured by where someone else is. It should be measured by growth.
This applies to coaches and parents too. Not every player will score the same. Not every player will shoot the same number of times. Not every player will be ready for the same role at the same time.
One of the best youth basketball coaching tips for building a healthy team culture is to keep players focused on progress, not comparison. Help them look at how far they have come, not just how far they have left to go.
Coaching Parents Matters Too
Every youth coach knows this part of the job is real. Parents are part of the team experience, whether we like it or not. The best coaches do not ignore that. They manage it with communication, patience, and perspective. A great reminder from the conversation was that parents are trusting you with their most valuable gift: their child.
One of the smartest approaches a coach can take is to listen without making everything personal. A frustrated parent is usually reacting from emotion, fear, or concern about their child. If a coach can stay calm, listen carefully, and communicate clearly, a difficult situation often becomes manageable.
This is another reason youth basketball coaching is about more than the game. Coaches are teachers, leaders, and relationship-builders too.
Youth Basketball Is About Life Skills
Basketball is a vehicle. Yes, players should learn how to pivot, pass, box out, and rotate on defense. But they should also learn how to be responsible, how to work with others, how to handle mistakes, how to respond to adversity, and how to keep going when something feels hard. Those are life skills.
Team sports teach kids that they will not always get the role they want. They teach them that hard work matters and that being part of something bigger than themselves has value. That’s why so many experienced coaches stay in it for decades. The wins matter, but the deeper reward is knowing you helped young people grow.
What Youth Coaches Should Really Focus On
If you coach younger players, there is one more lesson worth highlighting. At the youth level, skill development matters more than chasing wins. If players cannot dribble, pass, finish, and make decisions under pressure, the best plays in the world will not save you. Coaches who spend all their time on strategy but skip the fundamentals are building on shaky ground.
The best youth basketball coaching tips often sound basic. Work on footwork and on layups. On passing. Balance. Work on confidence, and on decision-making. Then keep doing it. Games are not the only goal. Development is.
Final Thoughts
The best youth basketball coaches are teaching confidence, resilience, communication, teamwork, and growth. If you are coaching a youth team this season, remember this: your players do not need a perfect coach. They need a coach who cares, keeps learning, communicates well, and helps them believe they can improve.
That’s how you build better players. More importantly, that’s how you help build better people.
If you’ve coached for more than a few seasons, you’ve seen it. Players walk into the gym with a different mindset than they did even five years ago. They are watching highlights, tracking rankings, and comparing themselves to athletes they’ve never met. The social media impact on youth basketball is real, and it’s changing how kids learn, compete, and define success.
The question for coaches is simple. How do you work with it without letting it take over your program?
How the Social Media Impact on Youth Basketball Shows Up
Social media has completely changed what young players think the game looks like. Instead of learning basketball through pickup games, practice reps, and watching full games, many players now learn through short clips. Those clips usually highlight things like dunks, step-back threes, and flashy handles.
What they do not show is just as important:
Defensive positioning
Team concepts
Practice habits
Film study
Consistency over time
This creates a gap between what players see and what actually leads to success. As a coach, you feel it when players rush development, avoid fundamentals, get frustrated with smaller roles, and focus more on highlights than habits.
The Comparison Trap for Young Athletes
One of the biggest challenges tied to the social media impact on youth basketball is comparison. Players are constantly measuring themselves against nationally ranked athletes, viral clips, older players further along physically, and, perhaps most importantly, edited highlight reels.
The problem is simple. They are comparing their real life to someone else’s best moments. That can lead to:
Confidence issues
Unrealistic expectations
Pressuring themselves too early
Losing patience with development
Coaches need to recognize this is happening, even if players never say it out loud.
Why Highlight Culture can Hurt Development
Highlight culture is not all bad. It can motivate players, expose them to the game, and build excitement. But when it becomes the goal, it creates problems. Players start chasing moments instead of mastering skills.
You may see:
Forcing tough shots
Ignoring team concepts
Playing for attention instead of winning
Skipping steps in development
The truth is simple. The best players are not built on highlights. They are built on habits.
What Players actually Need to Hear
In a world shaped by social media, coaches need to be more intentional with their messaging. Players need to hear things like:
Your development matters more than your exposure
Your habits matter more than your highlights
Your role today helps build your opportunity tomorrow
Your work when no one is watching is what separates you
These messages may not go viral, but they build real players.
The Positive Side of Social Media in Youth Basketball
There is a good side to all of this, and it is worth using. Social media can inspire a love of the game, provide access to skill training ideas, connect athletes and coaches, and create opportunities for exposure.
The key is helping players use it the right way. Encourage them to:
Watch full games, not just clips
Study players who play the right way
Learn, not just scroll
Stay grounded in their own journey
5 Ways Coaches can Manage the Social Media Impact on Youth Basketball
You cannot remove social media from your players’ lives. But you can control the environment they step into at practice and games. Here are a few practical ways to lead:
1. Define what success looks like in your program
Make it clear early. Success is not about clips or attention. It is about effort, growth, and team play.
2. Praise habits, not hype
Celebrate the player who rotates on defense, makes the extra pass, or shows up ready to work.
3. Teach the “why” behind fundamentals
Help players understand how the small things connect to winning. When they see the value, they buy in.
4. Have honest conversations
When needed, talk directly with players about expectations. Help them understand where they are and what comes next.
5. Protect the joy of the game
Do not let pressure take over your gym. Players still need to enjoy competing, improving, and being part of a team.
Don’t let Social Media Define your Players
One of the best reminders from the conversation was this. Most kids are not chasing a professional career. They are chasing experiences, friendships, and growth. Social media can blur that.
A player who is having fun, improving, and contributing to a team is winning, even if there is no camera on them. As a coach, your job is to keep that perspective clear.
The social media impact on youth basketball is not going away. If anything, it will continue to grow. But strong coaching still wins. When you build a culture around:
Development
Discipline
Honesty
Enjoyment
You give your players something social media cannot replace. You give them a foundation. And in the long run, that matters far more than any highlight ever will.
If you coach long enough, you see the same tension show up again and again. A player dreams big. A parent wants the best. A coach wants to encourage growth without creating false hope. That is why setting expectations in youth basketball matters so much. When expectations are healthy, players develop confidence, discipline, and perspective. When expectations get out of line, the game can start to feel like pressure instead of joy.
In a recent Coaching Youth Hoops episode, Coach Bill Flitter talked with Cameron Korab of Made Hoops and the Youth Sports Business Report about the current youth sports landscape. One of the most useful takeaways for basketball coaches was simple: kids need guidance that is honest, patient, and grounded in long-term development.
Why Setting Expectations in Youth Basketball Matters
Too many players grow up hearing mixed messages. A coach may be trying to teach patience and fundamentals. Meanwhile, outside voices may be telling that same player they are already on a Division I path or destined for something bigger. That disconnect can create frustration fast.
Coach Korab made an important point during the conversation. Most kids are not going to become professional athletes, and even college opportunities are limited. That does not mean young players should stop dreaming, but that adults need to frame those dreams the right way. For coaches, that starts with helping players understand that success is built in steps:
Make the next team
Improve your role
Build stronger habits
Learn how to compete
Become a reliable teammate
Fall in love with the work
Those goals are real, useful, and motivating. They also keep players focused on progress they can control.
The Problem with Skipping Steps
One of the biggest mistakes in youth basketball is talking about the finish line before a player has learned how to run the race. Middle school players do not need constant conversations about scholarships, rankings, and exposure. They need skill work, confidence, consistency, and a reason to keep showing up. When adults jump too far ahead, players can start measuring themselves against outcomes they are not ready to chase yet.
That can lead to a few common problems:
Burnout
Frustration over playing time
Poor response to coaching
Unrealistic parent expectations
Loss of joy in the game
A better approach is to break development into smaller wins. For one player, that may mean improving footwork and defense. For another, it may mean earning trust as the first guard off the bench. For another, it may simply mean becoming more mentally prepared every day. That is real growth. And real growth lasts.
4 Tips on Setting Expectations in Youth Basketball for Players and Parents
Coaches often have one tough job that nobody talks about enough. They are not only coaching players. They are also helping shape the expectations around those players. That can be difficult when parents, trainers, social media, and highlight culture are all influencing how a kid sees themselves.
The best coaches handle this by being clear, calm, and consistent. Here are a few strong ways to approach those conversations:
1. Start with the truth, but do not crush belief
A young player should never be told to stop dreaming. But they do need to understand that dreams require work, time, and growth. You do not have to tell a seventh grader what they cannot become. You do need to show them what they need to do next.
2. Focus on the next milestone
Instead of jumping to varsity, college, or beyond, help players focus on the next realistic benchmark. That might be making the freshman team, earning late-game minutes, or becoming a stronger defender.
3. Tie expectations to habits
Korab pointed to discipline and mental readiness as traits that separate serious players. Coaches can use that idea right away. Expectations should be tied to effort, attitude, preparation, and consistency, not hype.
4. Remind families that development is not always linear
Some players grow early. Some grow late. Some dominate young and stall out. Some look average at 12 and become special at 17. Coaches should leave room for growth while still being honest about the present.
The Habits that Matter Most
One of the strongest parts of the discussion was the focus on habits. Talent matters, but habits often determine whether a player gets the most out of that talent. For youth basketball players, that can look like:
Showing up ready to practice
Listening and applying coaching
Repeating fundamentals daily
Competing with energy
Handling mistakes without shutting down
Being coachable even when frustrated
Those habits help players in basketball, but they also help them outside the game. That is one reason youth sports still matter so much. A player may not remember every score or stat line, but they will carry discipline, resilience, and teamwork with them for years.
Don’t let Social Media Set the Standard
One of the most interesting points from the episode was how much technology and social media have changed youth sports. Players now see clips, rankings, and highlight reels constantly. That can distort what development is supposed to look like.
A young athlete sees another kid dunking, getting posted online, or picking up attention from big platforms and starts to think that is the standard. It’s not. The standard should still be growth, effort, and love for the game.
Coaches have to keep reminding players that a highlight is not a career. A viral moment is not the same as daily improvement. The best thing a coach can do is create an environment where players care more about getting better than getting noticed.
Joy still has to be Part of the Process
Coach Bill shared a story in the episode about a young player making a beautiful rebounding and outlet play in one fluid motion, then running by the bench with a huge smile because she knew she had done it right. That moment says everything. That is youth basketball at its best.
Not pressure. Not branding. Not future projections. Just a kid working on something, executing it, helping the team, and feeling real joy. Coaches should protect more moments like that.
Yes, players need accountability. Yes, they need standards. Yes, they need honest feedback. But they also need room to enjoy the game with their teammates and feel proud of their improvement. That balance is what keeps kids playing.
What Coaches Can Do:
If you want to improve how you handle expectations with your team, start here:
Talk to players about goals they can reach this season
Praise habits, not just results
Be honest with parents without being harsh
Keep skill development ahead of status talk
Make sure players still have fun competing together
That approach does more than build better athletes. It builds healthier team culture.
Final Thoughts
The conversation between Coach Bill Flitter and Cameron Korab was a good reminder that youth basketball works best when adults keep the big picture in mind. Setting expectations in youth basketball is not about limiting kids. It is about giving them a healthier path to grow.
Players need dreams. They also need honesty, patience, and adults who care more about development than image. If coaches can provide that, the game stays what it should be: challenging, rewarding, competitive, and fun.
If you want a strong defensive team, it starts with coaching defensive mindset. Defense isn’t just stance, slides, or rotations. It’s habits, communication, and how players respond when things break down.
In a conversation on the Coaching Youth Hoops podcast, Coach Bill Flitter spoke with former college coach Hannah Howard about what actually creates great defensive teams. Their discussion kept circling back to a few practical ideas youth coaches can use right away.
Coaching Defensive Mindset Starts with Communication
Coach Howard’s first answer to youth coaches was simple: communication. The best defensive teams talk constantly. Players warn teammates about screens, call out cutters, and let each other know when help is coming.
Strong defensive communication usually includes:
All five players talking, not just one leader
Early calls on screens and cuts
Clear, short instructions (“help,” “switch,” “left”)
Teammates coaching each other during possessions
When players communicate well, the defense starts solving problems on the floor without waiting for the coach.
Let Your Defense Fit Your Team
Every roster is different. One team might thrive pressing full court. Another might defend best by protecting the paint. Instead of forcing a system, coaches should ask:
What are our players good at defensively?
Can we pressure the ball, or do we need to contain?
Are we better in man, zone, or a mix of both?
Many strong defensive teams discover their identity during the season. Good coaches stay flexible and lean into what works.
Culture Shows Up in Small Habits
“Culture” gets talked about a lot in sports, but players usually notice it in simple things. Culture is built through daily habits such as: how players enter the gym, whether they are ready when practice starts, body language after mistakes, and how teammates respond to coaching, among other things.
If a coach consistently reinforces these habits, players begin to carry them into games.
Use Adversity as a Teaching Moment
Practice rarely goes perfectly, and that’s actually useful for coaches. When a drill falls apart or players get frustrated, it creates an opportunity to teach. Instead of moving on immediately, coaches can:
Repeat the situation until players solve it
Address poor communication on the spot
Teach players how to support teammates under pressure
Games include plenty of difficult moments. Practice should prepare players for them.
Build Defensive Confidence
Young players sometimes apologize after making mistakes. That usually means they think they disappointed the coach. A better message is simple: mistakes are part of learning.
Players improve when they stay engaged after errors, listen to feedback, and try again on the next possession. Confident defenders recover quickly and keep playing.
Youth Basketball Needs More Development
Coach Howard also noted that youth basketball often prioritizes games over development. Players sometimes compete in dozens of games but spend little time reflecting or improving skills.
Coaches can help by spending more time on fundamentals in practice, creating space for players to reflect after games, and emphasizing improvement instead of just results. Growth happens when players have time to process and learn.
Final Thought
Coaching defensive mindset means teaching players to work together. Communication, accountability, and resilience matter just as much as technique. When a team begins to: talk on defense, help teammates, recover after mistakes, and compete every possession, the defense improves naturally.
And more importantly, players learn habits that last well beyond the season.
Youth sports injuries are no longer something that only happens to “other teams.” They are a growing reality for coaches, parents, and athletes across every level of competition. If you coach long enough, you will have players deal with sprained ankles, overuse issues, concussions, knee pain, and the mental frustration that comes with missing time. The real question is not whether injuries will happen. The question is whether you are prepared when they do.
In a recent episode of Coaching Youth Hoops, Bill Flitter sat down with Dr. Kelly Morgan of Elite 7 Sports Medicine to talk about one of the most important topics in youth athletics today: injury prevention, active rest, load management, and how coaches can better support injured athletes. For any coach working with young players, this conversation was a reminder that protecting athletes is part of building a successful program.
Why youth sports injuries are becoming a bigger issue
Dr. Kelly Morgan brings a unique perspective to the topic of youth sports injuries. She is an emergency physician, a former athletic trainer, and a sports medicine professional who has worked with elite athletes and large sports organizations. Through her work with Elite 7 Sports Medicine, she has seen firsthand how many athletes fall through the cracks after getting hurt. That is especially true in youth and club sports.
Many players do not have access to a school athletic trainer. Tournament medical coverage can be inconsistent. Parents are often left trying to decide whether an injury needs rest, rehab, urgent care, or an expensive trip to the emergency room. In too many cases, families are guessing.
For coaches, that matters because injuries affect far more than just one game or one weekend tournament. They can impact confidence, skill development, team chemistry, long-term health, and even whether a kid stays in sports at all.
Injury prevention starts with smart coaching
One of the biggest takeaways from the conversation was simple: coaches can do more than they think when it comes to injury prevention. You do not need to be a doctor to help reduce injury risk. You just need to build smart habits into your practices.
Dr. Morgan pointed to neuromuscular training as one of the clearest examples. In sports that involve cutting, jumping, and change of direction, like basketball, ACL prevention work can make a major difference. Even 15 minutes of targeted movement training a few times each week can help athletes develop better control, stability, and body awareness. So keep your warm-up in mind.
Lunges, jumping mechanics, balance work, landing technique, and movement control drills are not throwaway parts of practice. They are part of keeping players healthy. Coaches who consistently include those habits are doing more than preparing athletes to compete. They are helping protect them from preventable injuries.
The role of active rest and load management
One of the most important ideas from this episode was the difference between total rest and active rest. Young athletes do need recovery, but recovery does not always mean doing nothing. Active rest can include walking, light movement, observing practice, mental reps, basic rehab work, or modified conditioning that does not aggravate the injury. The goal is to help players recover while still staying connected to the game, something that ties directly into load management.
At the youth level, many players are doing more than ever before. They may have team practice, private training, shooting sessions, travel tournaments, school ball, and strength work all packed into the same week. Some are overloaded before they even step into practice. Good coaches pay attention to that.
If a player looks unusually tired, flat, irritable, or physically off, it may be overload. As Dr. Morgan explained, coaches should think in terms of total activity over time, not just what happens during one practice.
That means asking better questions:
How much basketball has this player done this week?
Are they doing extra training outside of team activities?
Are they moving well, or are they compensating?
Do they need a lighter day?
Is today better served as a mental practice day?
The best coaches understand that pushing harder is not always the answer. Sometimes the smartest decision to help prevent youth sports injuries is backing off before a small issue becomes a major one.
Signs a coach should never ignore
Not every injury announces itself in a dramatic way. Sometimes the warning signs are subtle. A coach should pay attention when a player:
suddenly loses energy or enthusiasm
becomes unusually snappy or withdrawn
starts favoring one side
looks slower than normal
avoids certain movements
struggles to focus
shows behavioral changes over time
Those signs may point to physical fatigue, pain, stress, or something deeper going on mentally and emotionally. That’s why communication matters so much.
Players, especially young ones, don’t always speak up right away. Sometimes they do not want to disappoint a coach. Sometimes they are afraid of losing playing time. And sometimes they don’t know how to explain what they are feeling. A strong youth coach creates an environment where athletes know they can be honest.
Injured players still need to be part of the team
This may have been the most practical coaching takeaway from the entire conversation. If a player is hurt, do not disconnect them from the team.
An injured athlete can still learn, contribute, and grow. They can chart drills, record shooting percentages, observe defensive rotations, help communicate during practice, and watch film with purpose. They can still be involved in team culture and development. Injuries are not just physical, they can take a toll mentally too.
When athletes feel isolated, forgotten, or left behind, frustration can quickly turn into anxiety, discouragement, or disengagement. Keeping them connected helps protect their confidence and their identity as part of the team.
Sometimes the best thing a coach can say is, “You are still part of this. Here is how you can help today.”
Parents and coaches need to ask better questions
Another strong point from Dr. Morgan on youth sports injuries was that too many adults assume medical support is already in place. At tournaments, showcases, and events, coaches and parents should not assume someone is ready to handle an injury. They should ask:
Where are medical services located?
Who handles concussions or acute injuries?
What is the emergency plan?
Is there athletic training support available?
What happens if a player gets hurt during competition?
Those questions matter. If youth sports organizations want to improve athlete safety, healthcare cannot be treated like an afterthought. It has to be part of the structure. Coaches and parents who advocate for that are helping create better environments for kids.
Better injury care should not be a luxury
A major part of this discussion centered on access. Many families are forced into expensive care settings because they do not know what else to do. A bruised ankle, possible concussion, or overuse problem may not always require an emergency room visit, but without guidance, parents often feel they have no other option.
That gap is exactly what Dr. Morgan and Elite 7 Sports Medicine are trying to address. Their model is built around affordable, accessible sports medicine support, along with long-term athlete records that can actually follow the player instead of disappearing into separate systems.
For coaches, the lesson is clear: injury support matters, and affordable access matters too.When kids do not get the right care early, small problems can become major long-term problems. The better the support, the better the chance an athlete can recover fully and keep playing.
To learn more about Dr. Kelly Morgan and Elite 7 Sports Medicine, visit e7sportsmed.com and look for Elite 7 Sports Medicine on social platforms. Coaches and sports organizations interested in athlete care, injury support, and prevention resources should also connect with Dr. Morgan and her team on LinkedIn.
Final thoughts for youth basketball coaches
If you coach youth basketball, prevention of youth sports injuries and recovery support have to be part of your program. You do not need to become a medical expert, but you do need to be intentional. Build smart warm-ups. Watch for fatigue. Use active rest. Manage workload. Keep injured players engaged. Ask questions at events. Communicate with parents. Pay attention when something feels off.
Most of all, remember this: your job is not only to help players perform. It is to help them stay healthy enough to enjoy the game, develop through the game, and keep playing the game. That’s good coaching.
If you want to develop better basketball players, the best place to start is with the one-on-one basketball drill. Many coaches jump straight into five-on-five scrimmages, but great player development begins with small-sided games that teach individual responsibility, decision-making, and defensive accountability.
At TeachHoops.com, we believe in building skills step-by-step. Hall-of-Fame coach Steve Collins often emphasizes that basketball is a simple game when broken down properly. By focusing on one-on-one, two-on-two, and three-on-three situations, players learn the core elements of the game that actually show up during real competition.
If you’re looking for a simple but powerful basketball practice drill, this one-on-one progression can help develop both offensive attackers and defensive stoppers.
Why One-on-One Basketball Drills Matter
Many young players can disappear during five-on-five drills. They might stand in the corner, avoid the ball, or rely on stronger teammates to carry the play. That doesn’t happen in one-on-one basketball drills.
When players compete one-on-one:
They can’t hide
They must attack or defend
Their strengths and weaknesses become obvious
Coaches can evaluate players honestly
This is especially useful during basketball tryouts, when coaches need to separate the “haves” from the “have-nots.” A player might survive in a scrimmage, but in a one-on-one setting, their skill level becomes clear. Even at the highest levels of basketball, the game often becomes a two- or three-man game. Teaching players to succeed in these smaller situations prepares them for real game scenarios.
The One-on-One Advantage Drill
This drill is designed to teach offensive aggression and defensive recovery. Setup:
Two lines at half court
One basketball
One offensive player
One defensive player
A chair or marker to create a starting point
The offense begins with a one-step advantage, forcing the defense to react and recover.
Phase 1: Defensive Disadvantage
In the first progression, the defense starts behind the offensive player. The goal for the offense is to attack the basket quickly and finish. For the defense it’s to slow the offensive player down and attempt to get in front.
Key defensive teaching points:
Sprint to recover
Avoid fouling
Get in front of the offensive player
Try to take a charge or force a tough shot
In this phase, the defender is simply trying to recover from a disadvantage.
Phase 2: Even Start
Next, both players begin even with each other. Now the expectations change. The defensive objective becomes clear:
The offense should NOT get a shot in the paint.
This forces defenders to:
Stay in front
Cut off driving lanes
Use proper defensive positioning
If the offensive player reaches the paint for a clean shot, the defense has failed the drill.
Phase 3: Defensive Advantage
In the final progression, the defender starts in front of the offensive player. At this stage, the defender should be in full control. The expectation becomes:
No easy drives
No paint shots
Strong defensive positioning
If the offense scores easily here, it highlights a defensive breakdown that coaches can immediately correct.
Why This Drill Works
This drill works because it mirrors real game situations. Players constantly face scenarios where they must:
Recover defensively
Attack with a slight advantage
Defend an isolation drive
By practicing these situations repeatedly, players build the instincts needed for real competition. The drill also allows coaches to teach critical defensive concepts:
Transition recovery
Getting in front of the ball
Protecting the paint
Defending without fouling
A Great Tool for Basketball Tryouts
One-on-one drills are one of the best ways to evaluate players. In five-on-five scrimmages, weaker players can hide. In one-on-one situations, every player must compete. You quickly learn:
Who can score
Who can defend
Who competes
Who avoids the challenge
This makes the drill extremely valuable during basketball tryouts and early practices.
Final Thoughts
Basketball is a simple game when it’s taught the right way. By using one-on-one basketball drills like this advantage drill, coaches can develop aggressive scorers, disciplined defenders, and smarter players. Small-sided games reveal the truth about your players and accelerate their development.
And when you consistently teach the fundamentals in these situations, the results will show up when it matters most.
Youth basketball is evolving quickly, and one of the biggest shifts happening right now involves how coaches, players, and parents use video. For years, capturing basketball highlights required expensive cameras, hours of editing, and a lot of time sitting behind a screen instead of watching the game.
Today, new AI-powered tools are making it possible for coaches to capture game footage, create highlights, and review teaching moments instantly. For youth basketball programs, this technology is changing how players learn, how coaches teach, and how families preserve memories from the season.
If you coach youth basketball, understanding how modern highlight technology works can help you improve player development while saving valuable time.
Why Basketball Highlights Matter in Youth Sports
When people think about highlights, they often picture flashy dunks or big scoring plays. But highlights serve a much bigger purpose in youth basketball. For players and families, highlights capture memories. Kids put in countless hours of practice and games. Being able to look back at those moments matters.
For coaches, highlights provide teaching opportunities. Video allows players to:
See what they did well
Identify mistakes
Understand spacing, timing, and decision-making
Many coaches believe one of the fastest ways to improve is simple: play the game and watch yourself play the game. Video brings that learning process to life.
The Problem With Traditional Game Film
Despite its value, traditional basketball video has several challenges.
First, recording games often forces parents to spend the entire game behind a camera instead of enjoying the moment. Second, editing film takes time. Coaches and parents may spend hours scrubbing through video trying to find a specific play. Finally, storage becomes an issue. Many parents record full games only to keep a few clips.
The reality is most families want just a handful of meaningful moments from each game.
AI Is Changing How Basketball Highlights Are Created
New video platforms are using artificial intelligence and computer vision to solve these problems. Instead of filming an entire game and editing it later, these tools allow users to capture only the moments that matter.
The process is simple:
Set a phone on a tripod to record the game
Watch the game normally with other parents or players
Tap a button when a big play happens
The app automatically saves the clip
The system grabs the previous few seconds of action, reframes the video, and creates a highlight clip instantly. Within seconds, players can share the moment or store it for later review.
Why This Matters for Basketball Coaches
For coaches, the biggest benefit is time. Film study traditionally takes hours. Finding a specific play during a game can be tedious. With AI-assisted tagging, coaches can mark plays instantly during the game. That means:
A missed defensive rotation can be saved immediately
A great screen or assist can be tagged for later praise
Players can review specific moments after the game
Instead of watching an entire game again, players can jump directly to the clips that matter most. This makes film sessions faster and more focused.
Better Video for Player Development
One important detail that often gets overlooked in highlight clips is the camera angle. Many social media clips focus tightly on the player with the ball. While that works for social media, it doesn’t always help coaches evaluate decision-making. A wider horizontal view allows coaches to see:
Defensive help positioning
Offensive spacing
Timing of screens and cuts
Overall court awareness
This makes video much more valuable for coaching and recruiting.
Helping Players Share Their Journey
Another advantage of modern highlight tools is how easily clips can be shared. Players can quickly send clips to:
Coaches
Scouts
Trainers
Teammates
Instead of building a highlight reel months later, players can collect clips throughout the season. Over time, those clips become a record of development and growth. For many athletes, these highlights are not just social media content. They become part of their basketball story.
Using Video During Games
One of the most exciting possibilities with modern video tools is real-time coaching. Imagine a coach tagging a play during a game and showing it to players during halftime or a timeout.
Players today are highly visual learners. Seeing the mistake immediately often helps them understand the correction much faster. Instead of saying, “You missed the screen,” a coach can show the clip. Film does not lie.
A Tool for Programs and Teams
Beyond individual players, highlight technology can help entire basketball programs. Teams can use clips to:
Promote their program on social media
Highlight player development
Share recruiting footage
Build engagement with families
Clubs and schools that consistently share video content often attract more players and attention.
In today’s digital environment, visibility matters.
Technology Is Making It Easier for Everyone
The most exciting part of these new systems is accessibility. Instead of requiring expensive cameras and editing software, many tools now use the camera already sitting in your pocket. That means parents, coaches, and teams can capture professional-quality highlights with very little equipment.
More importantly, it allows families to stay present at the game instead of worrying about filming every second. And in youth sports, that may be the most valuable feature of all.
If you are looking for a competitive basketball practice drill that players genuinely enjoy while still building key skills, Spartan Ball is one of the best options you can add to your practice plan. After more than three decades of coaching, including state championships and working with players who reached the professional level, I have learned that practices must combine intensity with engagement. When players compete, communicate, and think on the fly, improvement happens quickly.
Spartan Ball is a fast-paced competitive basketball practice drill that creates chaos in a controlled way. It forces players to communicate, react, and find defensive matchups while the offense looks for scoring opportunities. The drill feels like a game to the players, which is why they constantly ask to play it again after tough practices.
Spartan Ball: A Competitive Basketball Practice Drill Players Love
Spartan Ball is played three on three, but the court setup is what makes it unique. Instead of one offensive direction, teams have multiple baskets available depending on how the drill is organized.
One team begins with the ball after the coach tosses it in. Each team has a primary basket they are supposed to attack. At the same time, there may be additional baskets that either team can use depending on how the drill is structured.
For example:
Blue team attacks one end of the court
White team attacks the opposite end
A middle basket can be used by either team
As soon as the ball is tipped or thrown into play, chaos begins. Players sprint, turn, and communicate as they figure out where the ball is going and who they should guard.
At first it looks disorganized. That is part of the point. Eventually players learn they must talk to each other, identify matchups quickly, and cut off driving angles before the offense finds an easy scoring opportunity.
Why This Competitive Basketball Practice Drill Works
Many drills isolate a single skill. Spartan Ball challenges several skills at the same time, which makes it extremely valuable late in practice when players need to stay engaged.
The biggest benefit is communication. Because the action changes direction quickly, players must talk to teammates to organize their defense. Without communication, open shots appear immediately.
Players also learn how to:
Identify defensive assignments quickly
Take away driving angles
Recover in transition situations
Move without the ball offensively
Another advantage is energy. This drill naturally raises the intensity level because players view it as a game instead of a drill.
After a demanding practice, teams often ask to play Spartan Ball. Many coaches even add a winner’s court element where the winning team stays on the floor while challengers rotate in.
Adjusting the Drill for Your Gym
The flexibility of Spartan Ball makes it easy to run in almost any gym setup. If you only have two baskets, the drill can still work with each team attacking opposite ends. If your gym has side baskets, the drill becomes even more chaotic and competitive.
Some coaches adjust the drill based on the number of baskets available:
Two baskets: standard three on three format
Four baskets: multiple scoring options for both teams
Additional baskets: larger team formats such as four on four
The number of baskets often determines how many players participate at once. One word of caution. If you have six baskets and try six on six, the gym can become complete chaos for this competitive practice drill.
Bringing Competition Into Every Practice
The best practices include moments where players forget they are doing a drill. That is exactly what happens with Spartan Ball. The competitive environment forces players to react, communicate, and compete.
A competitive basketball practice drill like Spartan Ball can break up the structure of practice while still teaching important concepts. It also keeps players mentally engaged when fatigue sets in late in the workout.
If you are searching for drills that combine fun with real player development, Spartan Ball is worth adding to your next practice plan.
Final Thoughts
Great coaches understand that improvement happens when players compete. A well-designed competitive basketball practice drill creates situations where players must think, communicate, and react under pressure. Spartan Ball accomplishes all of those goals while keeping players energized and motivated.
If you want more drills, practice planning strategies, and coaching resources, visit TeachHoops.com. It was built by coaches for coaches who want to get better every day.
If you are searching for basketball press break concepts that translate directly into game success, the key is understanding spacing, timing, and decision making under pressure. Many youth basketball teams struggle against full court pressure because they rely on memorized plays instead of movement concepts. When players understand where to move, how to cut, and how to create space, breaking pressure becomes far more consistent.
This blog post covers practical basketball press break concepts, plus coaching ideas for inbound situations, rebounding principles, and defensive adjustments drawn from real coaching conversations with TeachHoops.com members.
Why Spacing Is the Foundation of Every Press Break
The biggest reason press breaks fail is poor spacing. Players often start too close together, which allows defenders to deny passing lanes and trap quickly. A simple adjustment can help immediately:
Move your bigs closer to half court and give guards more room to operate. When cutters have space to accelerate, defenders must react instead of dictate.
Players know where they are going. Defenders do not. That advantage creates separation.
Let Your Point Guard Inbound Against Heavy Pressure
One of the effective basketball press break concepts is an adjustment against aggressive denial. Have your point guard throw the ball in.
This works because defenders can deny a player on the court more easily than an inbounder. After passing, the point guard can cut off a screen and receive the ball back in motion. It also reduces early traps near the sideline.
Small tactical choices like this often make a major difference against pressure defenses.
A Simple Press Break Concept That Gets Your Best Player the Ball
One of the most reliable basketball press break concepts involves using a big as a release valve near half court. The movement works like this:
Guards begin near the sideline areas
Bigs start higher toward half court
A guard screens to create confusion
A big cuts hard toward the ball
The pass goes to the big
The point guard curls back to receive the return pass
The big is difficult to deny because he is moving downhill. Once the ball is secured, the guard knows exactly where the return pass is coming from. The defender is reacting instead of anticipating.
Using X-Cuts to Beat Denial Pressure
Another strong basketball press break concept is crossing guards off a stationary big near the free throw line area. The tight crossing action creates confusion and forces defenders to communicate quickly.
Spacing is critical. When the court is spread, one of the cutters will usually have an advantage. Even if the first option is denied, the second guard can read space and adjust.
Teaching players to recognize open space is more valuable than teaching a specific route.
End of Game Inbound Strategy for Free Throw Situations
Late game situations require intentional planning, especially when you need the ball in the hands of your best free throw shooter.
A strong approach is to have two players screen for each other while deep players stretch the defense. After screening, the screener rolls back toward the ball. This creates multiple passing options and large space in the backcourt.
The inbounder should always have several reads available. Predictability helps the defense.
A Detail That Improves Sideline Out of Bounds Plays
One adjustment that many coaches overlook is what happens after a player sets a screen.
Screeners should roll back toward the ball after contact. When defenders help on cutters, the screener often becomes open. This also creates another passing lane for the inbounder.
Giving the passer multiple options increases success rates dramatically.
Rebounding Out of a 1-3-1 Alignment
Teams running a 1-3-1 offense often worry about rebounding balance. The solution comes from teaching responsibility based on shot location.
Players opposite the shot should crash hardest. Coaches can teach this by creating a target area near the blocks and emphasizing contact with opponents instead of just chasing the ball.
Rebounding success comes from anticipation and physical positioning.
How to Slow Down a High Scoring Guard
When facing a player capable of scoring 30 or more points, the focus shifts to disruption and fatigue.
Rotating multiple defenders onto that player throughout the game can help. Picking the player up full court forces constant effort. Special defenses such as box and one or diamond and one may also be necessary.
The goal is to reduce efficiency over time by making every possession difficult.
Teaching Players to Move Away From the Ball
Across all situations, one concept appears repeatedly. Players you want open should have teammates moving away from them. This creates misdirection and forces defenders to shift their attention.
Coaches who emphasize movement without the ball see better results against pressure defenses.
Final Thoughts on Basketball Press Break Concepts
The best basketball press break drills focus on decision making, spacing, and timing rather than memorization. When players understand how to create space and anticipate movement, they gain confidence against pressure.
If you want more practice plans, systems, and coaching resources, TeachHoops.com was built for coaches who want to improve and help their players succeed.
If you coach long enough, you know pressure is inevitable. Whether it’s a full-court press, aggressive traps late in games, or opponents trying to speed you up when you’re ahead, your team must be ready to handle chaos. That’s why basketball pressure drills should be a consistent part of your practice plan, not something you only work on before playing a pressing opponent.
In this article, we’ll break down a package of chaos-based drills that simulate real defensive pressure, improve decision-making, and help players stay composed when the game speeds up.
Why Basketball Pressure Drills Must Be Done Year-Round
Many coaches only focus on pressure when they know it’s coming. The reality is:
Players must make decisions while tired and stressed
You also want to prepare for the moments when you need to create pressure defensively.
Another key coaching point: fundamentals don’t always need to come first. Instead of doing pivoting or passing drills at the beginning of practice, you can revisit them after live play, when players understand why those skills matter. Context increases retention.
Drill 1: Two to the Ball (3-on-3)
This is one of the simplest and most effective basketball pressure drills you can run.
Setup:
3-on-3 half court
Every pass triggers two defenders attacking the ball
No defensive safety sitting back
Coaching Points:
Eyes up immediately after catching
Maintain spacing to create passing angles
Attack advantages quickly
Make fast decisions, not perfect ones
This drill simulates aggressive trapping teams even if you don’t have enough athletes to replicate that pressure physically. Run about 30 repetitions for strong learning.
Drill 2: Two to the Ball (4-on-4 Game Version)
Now we add more realism and spacing.
Setup:
4-on-4 live play
Two defenders trap the ball on every pass
Players read and react freely
Why It Works:
Offense learns to create chaos opportunities
Defense practices emergency trapping situations
Players develop instincts instead of memorized patterns
This is excellent preparation for late-game scenarios when you need a turnover quickly.
Drill 3: 4-on-4-on-4 Continuous Pressure
This drill combines conditioning, transition, and decision-making.
Setup:
Three teams of four players (12 total)
One team waiting on opposite end
Continuous play after rebounds or scores
Two defenders always attack the ball
Optional addition:
Teams can pressure in the backcourt until half court
You’ll see mistakes. That’s part of the learning. For example, throwing a pass toward midcourt often leads to a dunk the other way. Those are great teaching moments players remember.
Drill 4: Wild Transition Chaos Drill
This is where basketball pressure drills become truly game-like. Traditional transition drills add defenders after the ball crosses half court. Instead, we create chaos immediately.
Setup:
Transition situation begins
As soon as the shot goes up, an extra defender sprints into the play
Defense attacks aggressively right away
The goal is pure chaos.
Players must:
Keep their head on a swivel
Identify double teams early
Communicate constantly
Make quick reads under pressure
Yes, it will look messy at first. That’s a good thing.
Why Chaos Basketball Pressure Drills Work
Many practices are too controlled and predictable.
Chaos drills develop:
Faster decision-making
Court awareness
Confidence under stress
Offensive spacing instincts
Defensive aggressiveness
Transition recognition
Most importantly, players stop panicking in games because they’ve already experienced chaos in practice.
Final Thoughts
The teams that handle pressure best aren’t always the most talented, they’re the most prepared. By incorporating basketball pressure drills like Two-to-the-Ball, continuous pressure games, and wild transition chaos scenarios, you train players to stay calm and make good decisions when the game speeds up.
If you’re looking for more practice plans, drills, and a complete roadmap to becoming a better coach, make sure you check out TeachHoops.com, built by coaches, for coaches who want to get better.
We’d gone 19-7. Made it to regionals. Lost a heartbreaker.
Good season. Not great.
As players filed out of the locker room after our final game,
The next week I had our post-season meetings.
Fifteen minutes. One-on-one. Just me, my coaches and them.
And I handed each of them a piece of basketball net.
A real one. Cost me a few dollars each.
My point guard looked at me confused.
“Coach, why are you giving me this?”
I looked him dead in the eye.
“Because next February, when we cut down the REAL nets after winning conference, I’m going to ask you for that net back. You’re going to trade me that cheap one for a real championship net. Deal?”
He stared at me for a second.
Then he smiled.
“Deal.”
Fast forward to February 2026.
We just won our 15th conference championship in 27 years.
After the game, scissors in hand, we cut down the nets.
I gathered the team at half court.
“Alright, who’s got their net from last year?”
Every single player reached into their bag.
Pulled out that cheap replica net I’d given them 11 months earlier.
Some were crumpled. Some were hung on bedroom walls. One kid had hung it on his rear view car window
But they ALL had it.
We made the trade. Cheap net for real net.
And in that moment, they understood:
Championships aren’t won on game day.
They’re won in the VISION you create 365 days before.
WHY THIS WORKED (The Psychology of Pre-Commitment)
Here’s what most coaches get wrong about building culture:
They wait until the season starts to set expectations.
October rolls around. First practice.
“Alright guys, this year we’re going to win conference!”
Too late.
Your players just spent six months with NO vision. NO accountability. NO target.
You’re trying to build a championship mindset in October when you should’ve started in March.
THE NET STRATEGY (How It Actually Works)
When I handed each player that net in March 2024, here’s what I was doing:
1. CREATING A VISUAL ANCHOR
That net sat in their room all summer.
Every time they saw it, they thought:
“Conference championship. That’s the goal.”
It wasn’t abstract anymore. It was REAL.
Visual reminders build commitment.
2. ESTABLISHING EXPECTATION BEFORE PREPARATION
I didn’t say “let’s see what happens.”
I said “WHEN we cut down the nets.”
Not “if.” WHEN.
That’s a MASSIVE psychological shift.
You’re not hoping for a championship. You’re EXPECTING one.
And expectation drives behavior.
3. LINKING CURRENT EFFORT TO FUTURE REWARD
Every workout, every open gym, every weight room session that summer.
That net was the reminder:
“This rep matters. This shot matters. This sprint matters. Because in February, we’re cutting down REAL nets.”
It connected the GRIND to the GOAL.
4. BUILDING COLLECTIVE ACCOUNTABILITY
It wasn’t just MY vision.
It was THEIR commitment.
When one player thought about skipping a workout, he’d see that net and think:
“My teammates are working. I can’t let them down.”
Shared vision creates shared accountability.
WHAT HAPPENED OVER THE SUMMER (The Culture Shift)
Here’s what I noticed from April to October:
OPEN GYM ATTENDANCE: Up 40%
Players who normally disappeared all summer? Showing up.
WEIGHT ROOM CONSISTENCY: Best we’d ever had
Our strength coach told me: “I don’t know what you did, but these kids are LOCKED IN.”
LEADERSHIP EMERGENCE: Captains stepped up WITHOUT being told
They started organizing extra shooting sessions. Team runs. Accountability checks.
Why?
Because they had a CLEAR TARGET.
And they’d COMMITTED to it publicly (by accepting that net).
NOVEMBER: FIRST PRACTICE
When we gathered for our first official practice, I didn’t need to give a big speech about goals.
I just said:
“Alright, who still has their net?”
Every hand went up.
“Good. Let’s go earn the real ones.”
That’s it.
Three sentences.
Because the vision was already planted 7 months earlier.
THE SEASON (How the Vision Sustained Us)
We started started strong….but lost to a rival early.
Then hit a tough patch. Lost our best player to a hand issue.
Players were frustrated. Doubting.
At practice, I gathered them:
“Who’s still got their net?”
Hands up.
“Then we’re not done. We’ve still got 6 games left. Let’s finish this.”
The net became the ANCHOR when things got hard.
It reminded them:
We set a goal in March
We committed to it
We don’t quit just because January is tough
Visual symbols matter when words aren’t enough.
CONFERENCE CHAMPIONSHIP GAME
We’re playing our rival for the conference title.
Tied game. IN Overtime
Timeout.
I look at my guys in the huddle.
“You’ve been carrying that net for 11 months. Let’s go get the real one.”
No complicated speech. No Xs and Os breakdown.
Just a reminder of the COMMITMENT they made.
We won by 2 and hit a shot to win it
THE EXCHANGE
Half court. Scissors. Nets coming down.
I gathered the team.
“Alright, trade time..
Some of them cried.
Not because we won.
Because they’d BELIEVED 11 months ago that this moment would come.
And they made it happen.
15 CONFERENCE TITLES IN 27 YEARS (The Pattern)
Here’s what people don’t understand about sustained success:
Winning programs don’t rebuild every year.
Build not rebuild
They create CULTURE that outlasts individual seasons.
Over 27 years, I’ve won 15 conference championships.
That’s a 56% championship rate.
How?
Not because I’m smarter than other coaches.
Not because I always have the best talent.
Because I plant the vision EARLY and make it TANGIBLE.
The net is just one example.
But the PRINCIPLE applies to everything:
THE CULTURE-BUILDING FRAMEWORK
PRINCIPLE #1: VISION BEFORE WORK
Most coaches:
October: “Here’s our goals for this season”
Players: “Okay cool” (but they don’t really believe it yet)
Championship coaches:
March: “Here’s what we’re building next year”
April-October: Every workout reinforces the vision
October: Vision is already embedded in the culture
You don’t BUILD culture during the season.
You ACTIVATE culture you already built.
PRINCIPLE #2: MAKE IT TANGIBLE
Abstract goals don’t work.
“Let’s be great this year!” = Meaningless
Tangible commitments DO work:
The net they carry all summer
The team motto written on their shoes
The championship photo hung in the weight room
The “unfinished business” sign in the locker room
Give them something PHYSICAL that represents the GOAL.
PRINCIPLE #3: PUBLIC COMMITMENT
When you hand a player that net and say “I’ll ask for this back when we win,” you’re doing something powerful:
You’re making their commitment PUBLIC.
Not just to you. To themselves.
Public commitments are harder to break than private ones.
PRINCIPLE #4: CONNECT DAILY EFFORT TO BIG PICTURE
The net wasn’t just a goal.
It was a REMINDER.
Every time they saw it:
“This workout matters. This rep matters. This matters.”
When players see HOW today connects to the championship, they work differently.
PRINCIPLE #5: CELEBRATE THE VISION, NOT JUST THE WIN
After we won conference, I could’ve just celebrated the trophy.
Instead, I made the NET exchange the focal point.
Why?
Because I wanted them to remember:
“We won because we BELIEVED 11 months ago.”
The victory validated the VISION.
And that builds belief for next year.
500+ WINS. 15 CONFERENCE TITLES. 3 STATE TITLES. HALL OF FAME COACH
People ask me all the time:
“Coach, how do you sustain success for 27 years?”
Here’s the answer:
I don’t rebuild. I RELOAD.
Every March, I’m already planting seeds for next February. I’m casting vision, every exit meeting. Every off-season, I’m building belief BEFORE the season starts.
Championships aren’t won in November.
They’re won in March when you hand a player a net and say: “See you in February.”
YOU CAN LEARN THIS
Here’s the truth:
The net strategy is just ONE example of how to build championship culture.
Over 30 years, I’ve developed dozens of these strategies:
How to set expectations in March that drive behavior in October
How to create accountability without being a dictator
Learn the strategies that win 15 championships in 27 years.
Your next championship starts TODAY.
Coach Steve Collins 500+ Wins | 15 Conference Titles in 27 Years Hall of Fame | 3 State Championships TeachHoops.com
P.S. — That point guard who asked “Coach, why are you giving me this?” in March 2025? He was our leading scorer when we won conference in February 2026. After we cut down the nets, he told me: “I looked at that net every single day this summer. It kept me going when I didn’t want to work out.” That’s the power of TANGIBLE vision. Give your players something to believe in BEFORE the season starts. [www.teachhoops.com]
Are you looking for a structured way to improve your finishing and shooting consistency? Whether you are a player looking to level up your game or a coach searching for effective practice plans, the Magic 20 drill is a high-repetition, timed shooting drill designed to sharpen your skills under pressure. This drill focuses on essential shots, from layups to elbow jumpers, requiring you to make every shot before you finish the clock.
What is the Magic 20 Timed Shooting Drill?
The Magic 20 is a timed shooting drill where a player must complete a circuit of 20 made shots. The goal is to finish the circuit as quickly as possible, allowing players to record their times in a notebook and track their improvement over weeks and months.
For younger players or shorter practice segments, you can also run a “Magic 10” version, where you make one of each shot instead of two.
The Magic 20 Shot List
To complete the full Magic 20, you must make two of each of the following shots:
Right-Handed Layups: Don’t just stand under the rim; drive in to simulate game speed.
Left-Handed Layups: Focus on proper footwork and finishing with your off-hand.
Right-Handed Mikan Drill: High-repetition finishing near the rim.
Left-Handed Mikan Drill: Developing touch on the left side.
Reverse Right-Handed Mikans: Improving your ability to finish on the opposite side of the rim.
Reverse Left-Handed Mikans: A great challenge for younger players to develop coordination.
Right-Side Bank Shots: Shoot from approximately 8 to 9 feet out, using the glass.
Left-Side Bank Shots: Mirror the right side to ensure balanced scoring ability.
Right Elbow Shots: Step out to the high post for a mid-range jumper.
Left Elbow Shots: Complete the circuit with shots from the opposite elbow.
How to Run the Drill Successfully
The beauty of the Magic 20 is its simplicity. Here is how to execute it:
Make to Move On: You cannot move to the next shot until you have successfully made the required number of baskets for your current station.
Stay Focused: Because the drill is timed, it forces you to maintain your shooting form even as you get tired.
The Finishing Touch: Once you have completed all 20 shots, head to the charity stripe and shoot five free throws to finish the workout.
Why Track Your Time?
Coach Collins emphasizes the importance of writing down your results. By keeping a record of your best times, you create a “roadmap” for your development. If it takes you four minutes today, your goal should be three minutes and fifty seconds next week. This “beat the clock” mentality simulates the pressure of a real game.
Take Your Coaching to the Next Level
If you found the Magic 20 drill helpful, there are many more resources available to help you become a better basketball coach. From comprehensive practice plans to 1-on-1 mentoring, checking out specialized coaching platforms like TeachHoops.com can provide the tools you need to lead your team to a state title.