Welcome to our guide on planning a successful youth basketball season. Whether you’re a seasoned coach or just starting out, having a clear plan in place is crucial for a successful season. In this article, we will break down the three key steps to help you prepare for a productive and enjoyable youth basketball season for your young athletes.
Step 1: Setting Your Vision for the Youth Basketball Season
The first step in planning a youth basketball season is to define your coaching philosophy and vision. This sets the foundation for everything that follows. Here are some key points to consider:
Coaching Philosophy: Determine what kind of coach you want to be. Are you more inclined toward offense or defense? Do you prefer a fast-paced game or a more controlled one? Write down your coaching beliefs.
Goals and Objectives: What do you want your players to achieve during the season? Your goals may vary depending on the age and skill level of your team. It could be about skill development, teamwork, or even winning games. Be specific about your objectives.
Communication: Clearly communicate your vision to the parents of your players. When they understand your goals and approach, they are more likely to support your decisions and methods throughout the season.
By setting a clear vision, you provide a roadmap for the entire season, which will guide your coaching decisions, practice plans, and game strategies.
Step 2: Tryouts and Player Selection
The second step is conducting tryouts or player evaluations. How you select your team will greatly influence the success of your season. Here are some considerations:
Align with Your Vision: Ensure that your player selections align with your coaching philosophy and team goals. Look for players who fit your system and values.
Balanced Team: Assemble a well-balanced team that includes players with various skills. Prioritize fundamental skills like ball-handling, shooting, and defense.
Parent Behavior: Unfortunately, sometimes you may need to consider the attitudes and behavior of parents when selecting players. A great athlete with a disruptive parent can create problems for your team.
Remember that tryouts are not just about talent but also about finding players who can work together and contribute positively to the team.
Step 3: Developing Systems
The third key step involves developing the systems for your team. This includes offensive and defensive strategies. Consider the following:
Simplicity: Keep your systems simple, especially for younger players. Focus on teaching basic concepts that they can grasp and execute effectively.
Adaptability: Be prepared to adapt your systems based on the abilities of your players. Your initial plan may need adjustments once you see how your team performs in practice and games.
First Practice Analysis: Use your first practice as a deep dive into understanding your team’s strengths and weaknesses. This will help you tailor your systems to the specific needs of your players.
Having well-defined systems in place will give your team direction and a sense of purpose on the court.
Conclusion
Planning a successful youth basketball season requires careful consideration of your coaching philosophy, player selection, and the development of effective systems. By following these three key steps, you can set your team on the path to growth, development, and a memorable season. Remember that flexibility and adaptability are essential as the season progresses, but having a strong foundation from the start will help ensure a successful and enjoyable experience for both you and your young athletes.
If you coach a K-8th grade team, we have hundreds of resources. All laid out in an easy-to-follow, step-by-step system to save you time and money. Check out coachingyouthhoops.com today!
Calling all basketball enthusiasts and aspiring youth coaches! Are you ready to elevate your coaching game and make a lasting impact on young basketball players? We’re thrilled to introduce the latest addition to our basketball coaching community – the Youth Basketball Coaches Clinic!
If you’re passionate about nurturing the next generation of basketball stars and want to gain practical insights and knowledge on how to effectively teach the game to youth players aged 6 to 14, this clinic is tailor-made for you. In this blog post, we’ll give you a sneak peek into what you can expect from this exciting coaching experience, designed to empower coaches of all levels with the skills and strategies needed to inspire and develop young athletes on the court. So, let’s lace up those sneakers and dive into a world of youth basketball coaching excellence!
Youth Basketball Coaches Clinic [All New for 2023]
The basketball coaches clinic is a 5-day season prep accelerator master class. It provides practical insight and education on how to teach the game specifically to youth players of all ability levels from ages 6 to 14. Your trainers are both veteran coaches who’ve seen just about everything during their careers.
Coach Steve Collins sports 30 years of experience as a high school coach. He’s won three state titles and is the mastermind behind TeachHoops.com. Coach Bill Flitter holds 15 years of coaching experience, having run programs at both the high school and grade school levels. Both coaches host the Coaching Youth Hoops Podcast.
Get An All Access Pass to the Youth Coaching Clinics, with over 150 minutes of training, today! If you want to streamline your season prep, implement winning strategies immediately, and get better results faster, these five immersive videos are your springboard to coaching excellence.
Youth Basketball Coaches Clinic Modules
Module 1: The 5-Step System to Running Tryouts Like a 10-Year Head Coach
Say goodbye to guesswork! No more biased choices. Included in the packet are all the basketball tryout evaluation forms, including the Player Selection Rubric – an indispensable tool for fair evaluations. Create your dream team based on merit and skill.
Module 2: Learn this one thing that will make everything else fall into place
We are going to walk you through the one thing that took us over 5 years to learn that has completely transformed the way we coach.
Module 3: How to teach your offense and defense in one practice
Wondering what basketball offense to run? Struggling to defend? Learn how to quickly boost player’s retention and teach your offense and defense in one practice.
Module 4: How to create the perfect basketball practice plan in under 30 minutes
Your practice plan could be hurting your success on the court. Learn the winning ways to create a structured practice plan that doesn’t require a lot of time or knowledge of the game.
Module 5: 10 insider secrets winning coaches use to sneak out more wins
Learn the art that is managing game flow. We dive into proper time outs, bench etiquette , pre and post game routines and so much more.
If you coach a K-8th grade team, we have hundreds of resources. All laid out in an easy-to-follow, step-by-step system to save you time and money. Check out coachingyouthhoops.com today!
Most basketball fans remember or have heard of the famous 3-1 NBA Finals comeback the 2016 Cleveland Cavaliers had over the Golden State Warriors. For those that do not remember, Golden State set an NBA record that year with 73 victories during the regular season. And a rematch was set back up for the 2016 NBA Finals. The Golden State Warriors defeated the Cleveland Cavaliers in the 2015 NBA Finals 4 games to 2. That is the backdrop for the book “Return of the King” by Brian Windhorst.
“Return of the King” starts out by chronicling the start of LeBron James’ career with the Cleveland Cavaliers from 2003-2010. It moves on to the “The Decision” that lead him to the Miami Heat. The book then goes over James’ time with the Heat and the success LeBron had in Miami. This is where the book gets really interesting and starts to get in depth.
Windhorst describes the various steps the Cleveland Cavaliers started to lay down in a potential attempt to lure James back to Cleveland. And the new decision James had to make in regards to his next NBA city. Windhorst goes through all the various stages in the process and for any NBA junkie. This is very interesting and insightful.
After James makes his decision to return to Cleveland, this is where the basketball junkie will really appreciate the book. Windhorst goes into detail over the next two years of what it was like to follow and report on the Cleveland Cavaliers in their journey to the 2016 NBA Championship. Along the way you meet a variety of characters from LeBron James to Kyrie Irving to Kevin Love and two head coaches, David Blatt and Tyronn Lue.
Important Takes Aways from Windhorst’s “Return of the King”
For a basketball fan and coach out there, I feel there are 3 main lessons that can be taken and applied to any team and program:
Importance of Team Building
When LeBron James elected to come back to the Cleveland Cavaliers, it was important to try to assemble a team around his particular strengths. While at the high school level, we cannot necessarily go out and find a LeBron James and then sign free agents to fill in the needs.
What we can learn from this is adapting our coaching style to fit the needs of our team. If one year we have great guards, we need to build our offensive and defensive principles around those great guards. If one year we have great post players, we need to adjust accordingly.
Importance of Holding Players Accountable
Over those first two seasons when LeBron James came back to Cleveland he had two coaches: David Blatt and Tyronn Lue. Windhorst really pushed forward the notion that the second coach, Tyronn Lue, did a much better job at holding his players accountable. Lue did not give special privileges to anyone, especially James who is arguably one of the three greatest NBA players of all time.
As a coach, it is important to see all of your players holding all your players accountable. And not just those players at the end of the bench. The entire team saw that Coach Lue was going to hold LeBron accountable and that really made an impact on the whole team.
Importance of the Power of Belief
It would have been very easy for the Cleveland Cavaliers to bow out and give up on their 2016 NBA Championship hopes. Especially after being down 3-1 to a 73-win Golden State Warriors team that just beat them 4-2 in the previous NBA Finals. Many people would not have faulted them for doing that. Many would have applauded their efforts on a great regular season and pretty dominant run to the NBA Finals in the Eastern Conference Playoffs. The Cavaliers kept believing they could win.
There are two cool stories from both David Griffin (Cavaliers General Manager at the time) and the power of an email he sent the ENTIRE Cavaliers organization, not just the basketball side. And Coach Lue and his motivation of getting the Cavaliers back to Oakland after their game five victory. Both of these stories show the importance of believing in your cause and keeping a united front.
This book is a breezy 250 pages. It’s one that is a page turner to see what happens next with this iteration of the Cleveland Cavaliers and the career of Lebron James.
The book can be found at your local library or by clicking on this link!
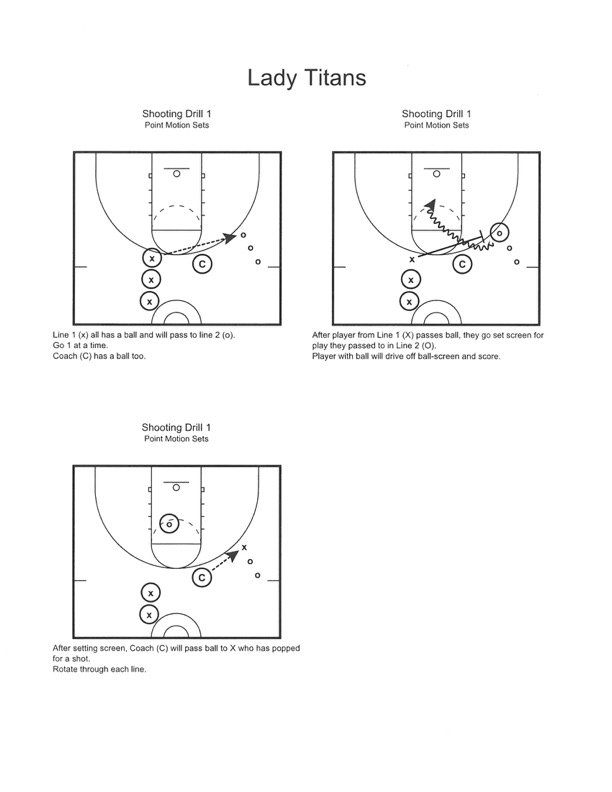
Kyle Brasher | Gibson Southern High School
Lady Titans Basketball Coach
If you coach a K-8th grade team, we have hundreds of resources. All laid out in an easy-to-follow, step-by-step system to save you time and money. Check out coachingyouthhoops.com today!
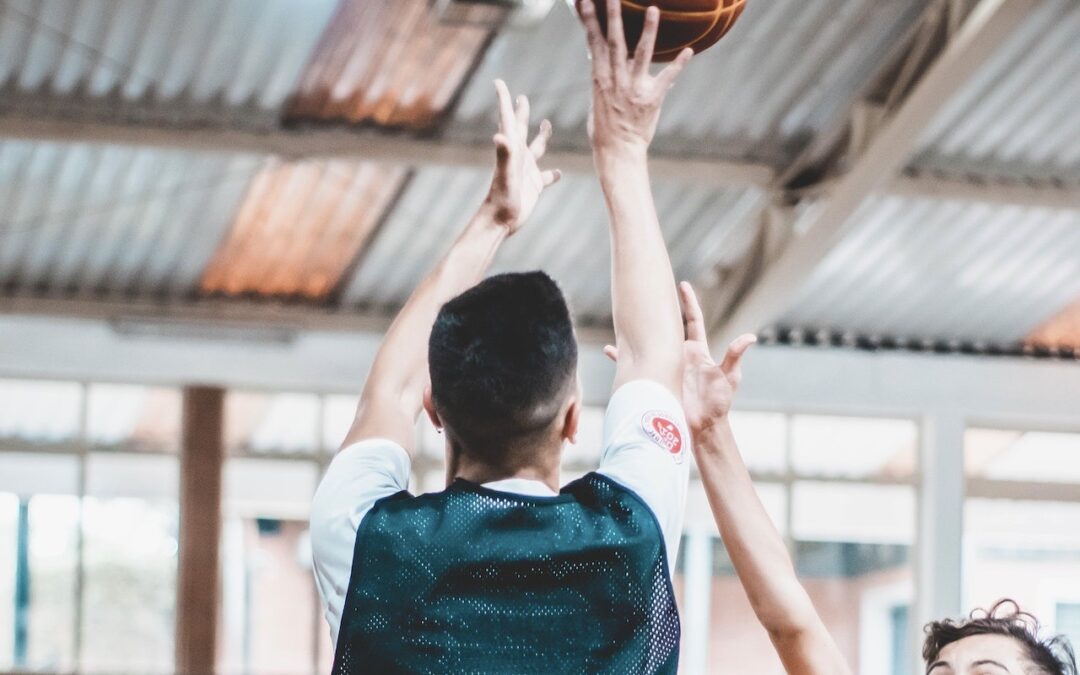
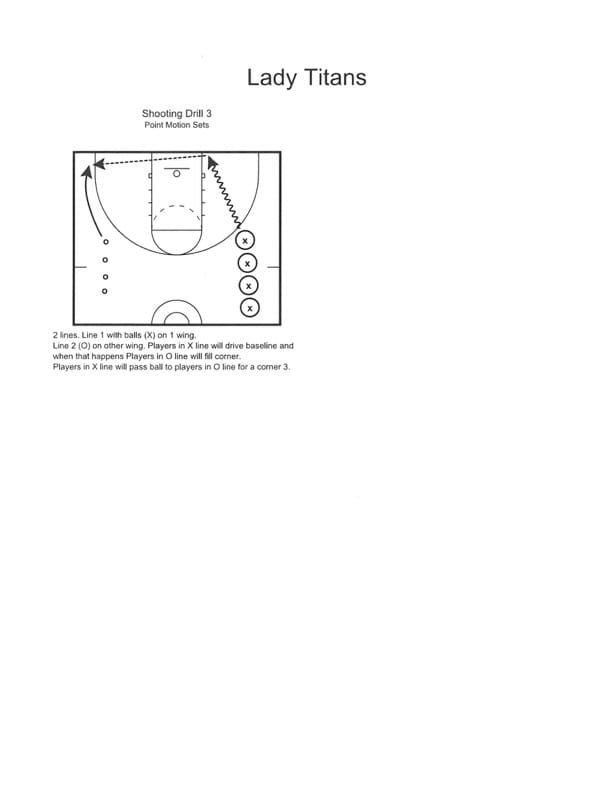
In the world of basketball coaching, we know that nailing those shots is a game-changer. Whether you’re a seasoned coach or just starting out, we’ve got a lineup of the top 5 youth basketball shooting drills that will revolutionize your team’s accuracy and boost their confidence on the court.
Picture this: your players confidently sinking shots from all angles, their form impeccable and their focus unwavering. That’s the power of a well-practiced shooting routine, and that’s exactly what we’re here to help you achieve. We’ve curated a range of dynamic and engaging drills that target everything from catch and shoot finesse to mastering free throws under pressure.
In this blog post, we’ll walk you through the ins and outs of each drill, explaining their rationale, suggesting variations to increase the challenge, and highlighting the coaching points that will ensure your players develop solid shooting fundamentals. Plus, we’ve sprinkled in some invaluable tips on how to adapt these drills to suit different skill levels, keeping your players engaged and eager to improve.
5 Youth Basketball Shooting Drills
As coaches, we know that mastering the art of shooting is crucial for any youth basketball team. So, let’s gear up and explore the five best shooting drills that are not only effective but also fun and engaging for your players. These drills will not only improve their accuracy but also boost their confidence on the court.
1. Catch and Shoot Frenzy
Drill Details: Players form a line on the perimeter, each with a ball. The first player shoots from a designated spot, retrieves their rebound, and passes to the next player. The sequence continues until all players have shot from that spot. Then, rotate to a new spot.
Rationale: This drill develops quick release, shooting under pressure, and efficient footwork when catching and squaring up to the basket.
Variation: Add a defender who lightly contests shots to simulate game situations.
Coaching Points: Emphasize proper hand placement on the ball, balance, and using legs to generate power. Encourage players to focus on form and rhythm.
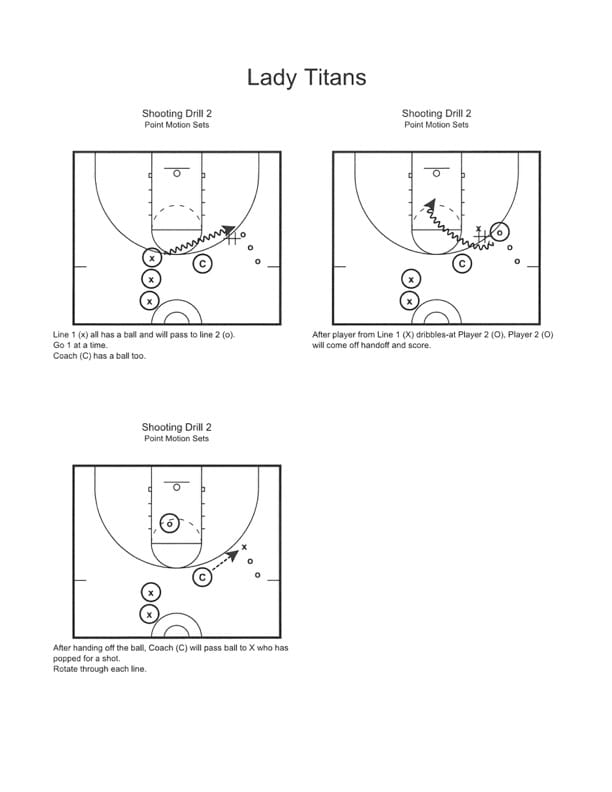
2. Form Shooting Focus
Drill Details: Players work in pairs, standing close to the hoop. They focus on perfect shooting form – elbow in, wrist locked, follow-through – without the ball touching the rim.
Rationale: Building muscle memory for correct form is crucial for consistent shooting.
Variation: Increase distance gradually and introduce light competition by challenging players to hit a certain number of consecutive shots.
Coaching Points: Stress the importance of consistent form and repetition. Use positive reinforcement to create a routine of proper technique.
3. Around the World
Drill Details: Place markers at various spots around the three-point line. Players take turns shooting from each spot. Once a shot is made, the player moves to the next spot. The goal is to complete the circuit.
Rationale: This drill improves shooting from different angles and distances, simulating various game situations.
Variation: Set a time limit for completing the circuit or require players to make a certain number of shots at each spot.
Coaching Points: Encourage players to focus on using their legs and consistent follow-through. Remind them to adjust their shooting angle based on their position on the court.
4. Partner Passing and Shooting
Drill Details: Players work in pairs, with one player passing and the other shooting. The passer alternates between chest passes, bounce passes, and overhead passes.
Rationale: Teaches players to catch and shoot quickly after receiving a pass, enhancing their overall court awareness.
Variation: Increase the distance between players for longer passes, challenging both passing accuracy and shooting range.
Coaching Points: Emphasize being ready to shoot upon receiving the pass. Highlight the importance of catching in a shooting-ready stance.
5. Free Throw Pressure Cooker
Drill Details: Players shoot a series of free throws with added pressure. For each miss, players must perform a physical activity (e.g., jumping jacks) before attempting the next shot.
Rationale: Simulates the pressure of free throws during a game and helps players focus under stress.
Variation: Increase the number of physical activities for consecutive misses to up the challenge.
Coaching Points: Discuss maintaining focus and concentration despite distractions. Remind players to take a deep breath and execute their routine before each shot.
There you have it – five engaging and effective shooting drills to elevate your youth basketball team’s shooting prowess. Remember, practice makes perfect, so integrate these drills into your training sessions and watch your players’ shooting skills skyrocket. Let’s turn those misses into swishes and create a team of confident, accurate shooters!
If you coach a K-8th grade team, we have hundreds of resources. All laid out in an easy-to-follow, step-by-step system to save you time and money. Check out coachingyouthhoops.com today!
t’s game time here on the blog, and today, we’re delving into a motion offense drill that’s going to transform your team’s offense from good to unstoppable. I’m thrilled to bring you a coaching gem that’s all about honing those essential pass and cut skills within the dynamic framework of a motion offense.
Imagine your players on the court, a symphony of movement and coordination. The ball glides seamlessly from one player to another, creating lanes, opening up opportunities, and leaving the defense scrambling to keep up. That’s the beauty of the pass and cut in a motion offense – a strategy that not only cultivates teamwork but also generates high-percentage scoring chances.
Whether you’re a seasoned coach seeking fresh ideas or a new coach eager to build a strong foundation, mastering the pass and cut with this motion offense drill is a game-changer. Get ready to lace up those sneakers, gather your team, and witness the magic unfold as players seamlessly pass, cut, and score their way to victory.
Motion Offense: Pass and Cut Practice Drill
5-out motion provides basketball teams at any level a key structure. This is especially true for youth basketball teams. This set up forces players to make decisions by reading the play of their teammates and defenders. It remains a great tool for teaching players how to play basketball.
One drill to teach basic 5-Out motion to your basketball team is a simple pass-and-cut drill.
This drill begins with Player 1 making a pass to the wing. From there, that player cuts to the basket. When that cut occurs, everyone behind the pass rotates to fill the open space along the perimeter. Player 1 takes the open space in the corner after his cut.
Next, the ball is passed to the right again and the passer cuts to the basket. Once again, the weak side players rotate to fill all open spots.
The only exception to this rule is a pass from the corner. A pass from the corner results in a short cut and retreat. A pass up from the wing to the top results in the corner player rotating up to fill on the wing, making sure all five players participate in station movement.
Stress to your players the key concept of great spacing. If they’re in the right positions at the right time, the offense should be wide open. This approach opens driving lanes and minimizes quick help from opposing defenders.
Coaches can teach 5-Out Motion in progressions to avoid their players getting overwhelmed learning an entire offense all at once.
If you coach a K-8th grade team, we have hundreds of resources. All laid out in an easy-to-follow, step-by-step system to save you time and money. Check out coachingyouthhoops.com today!
Picture this: a team that moves like a well-choreographed dance, passing the ball seamlessly, creating open shots, and leaving the opposing defense scratching their heads. It’s not just a dream; it’s the power of the motion offense. And when we combine it with the 5-out alignment, something magical happens – the court opens up, opportunities multiply, and teamwork takes center stage.
Whether you’re a seasoned coach looking to fine-tune your strategy or a rookie coach eager to make a mark, mastering motion offense with the 5-out alignment is a game-changer. So, grab your clipboard, rally your team, and let’s delve into the magic of fluid movement, precision passing, and scoring galore.It’s time to take your coaching playbook to the next level and lead your team to victory through the art of motion offense and the 5-out alignment.
Motion Offense with the 5-Out Set
For a motion offense, using the 5-Out set often provides the most space for your team.
The term “5-Out” references the fact that all offensive players on the floor are starting outside the three-point line. Typically, the setup features one player at the top, two on the wings, and two in the corners.
The 5 Out alignment can be a base for any motion offense. All five positions are interchangeable but can be set up to match locations with player skills.
This “position-less” offense relies on floor spacing and a set of basic movement that assist players to determine actions.
The basic concept for 5-Out Motion features an easy-to-understand set up: cut and replace. Each of the five spaces along the perimeter should be occupied by an offensive player.
When one player cuts, his teammates shift along the perimeter in corresponding fashion. If too many players end up on one side, the coach could call to “balance the floor” from the sideline.
A good way to start teaching 5-Out Motion on a pass is to have the passer cut to the basket with everyone rotating to replace the open slot. The only exception to this rule is a pass from the corner.
If you coach a K-8th grade team, we have hundreds of resources. All laid out in an easy-to-follow, step-by-step system to save you time and money. Check out coachingyouthhoops.com today!
As the sun sets on summer and the echoes of bouncing basketballs fill the crisp autumn air, it’s that time of the year again – youth basketball tryouts. The anticipation is palpable, both for the young athletes vying for their spot on the team and for the dedicated coaches who will guide them through this pivotal journey.
In this blog post, we’re lacing up our sneakers to dive into the art of preparing for and conducting youth basketball tryouts. From crafting a well-structured evaluation plan to fostering a positive and inclusive atmosphere, we’ll explore the essential strategies that will help you identify the diamond-in-the-rough players and build a team that thrives both on and off the court.
Preparing for Youth Basketball Tryouts
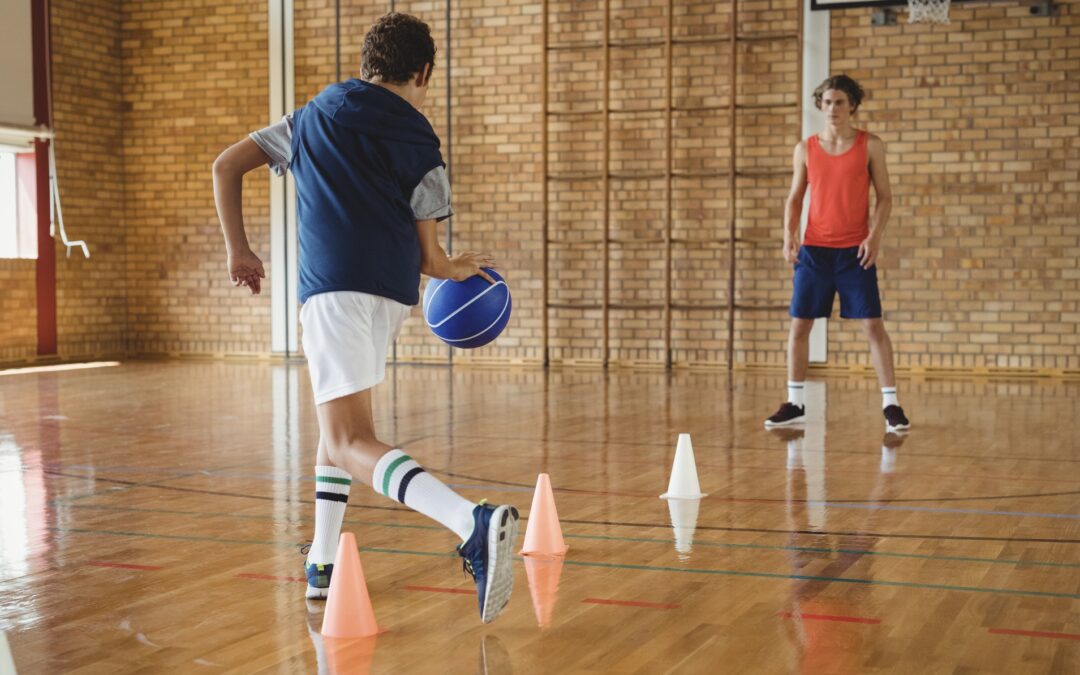
The first question any coach needs to ask themself is: what type of team will you have? The answer to this question will largely influence the types of drills you select. These drills will be staples of any practice plan, but they’ll also be valuable evaluation tools during tryouts.
The first thing to consider is athleticism. Coaches need to implement some sort of transition drill into any effective tryout. Players need to demonstrate how well they run and what type of shape they’re in. From there, higher level transition drills can evaluate decision making skills as well.
Beyond transition drills, coaches should definitely include station work as well. This is particularly useful with multiple coaches on staff. But even if you’re working alone as a coach, being able to have the players rotate through stations will give you a glimpse at their skill level. These stations can include ball handling, form shooting and free throws, among other things.
Small game groups also provides the coach with a good read of the players during tryouts. Having the players play 3-on-3, 2-on-2, or even 1-on-1 brings together several of the evaluation elements you need to consider. In these small group environments, it’s harder for players to “hide.”
Another effective practice during basketball tryouts might be to teach a new drill or offensive set. This forces the players to pay attention for a long stretch of time. It also provides coaches with a look at who the most engaged athletes are. Coaches also get a sense of who the most “coachable” players are during these teaching moments.
Finally, adding some element of communication and teamwork remains incredibly important and valuable. These drills or situations can shine a light on players with leadership potential. They also provide players with an opportunity to stand out among the others.
What to Look For In Players
Assembling a roster can often be a difficult task. But the first thing a coach should consider, especially when working off a roster that has returning players, is, which of these new talents can fill a specific role.
Of these potential new players, are there any that clearly make the team better? Which of the player will the team community? What positions might these new players fill?
Coaches should always look for specific elements as well. Among those elements:
If you coach a K-8th grade team, we have hundreds of resources. All laid out in an easy-to-follow, step-by-step system to save you time and money. Check out coachingyouthhoops.com today!
In this post, we’re diving into a fundamental skill that can shape the success of young players on the court – rebounding.
Rebounding, often hailed as the “hidden key” to basketball victory, is a skill that transcends age and experience levels. It’s not just about grabbing the ball off the rim; it’s about seizing control, shifting momentum, and creating valuable opportunities for your team. At its core, rebounding embodies the tenacity and determination that are the heartbeats of basketball.
In the following discussion, we’ll explore a collection of youth basketball rebounding drills designed to instill this critical skill from an early age. From understanding box-out techniques to enhancing positioning and fostering the right mindset, these drills go beyond the surface, nurturing players who contribute dynamically on both ends of the court. So, join us as we delve into the world of youth basketball rebounding, unlocking the techniques that can define a player’s journey from the paint to the scoreboard.
Youth Basketball Rebounding Drills: Defensive Position
Precise timing for your jump holds significance in rebounding, but it’s your positioning that ultimately places you advantageously to seize a rebound. Employing boxing-out techniques is crucial as you employ your body to fend off opponents while striving for the rebound.
For this drill, all you require is one or more partners, with one designated shooter. Ideally, the offensive and defensive players should be evenly matched in number. The defensive players position themselves around the free-throw area, while the offensive players stand slightly beyond the key. Upon the shot’s release, defensive players locate the closest offensive player, utilizing their body to box them out and prevent the rebound.
The drill’s objective for defensive players is to let the ball bounce after the shot, while the offensive players strive to secure the rebound. This drill significantly underscores the significance of sound body positioning on the defensive side. Once every offensive player has taken a shot, switch roles and repeat the process.
Youth Basketball Rebounding Drills: Timing
In this drill, the first person initiates by self-passing off the backboard, securing the rebound with a strong two-handed grip. After gaining control, pivot and pass to the next player, who replicates the drill.
This cultivates comfort in grabbing the ball, practicing pivoting, and passing post-rebound. Repetition is required. While optimal for team practice, you can adapt it for just one partner.
Youth Basketball Rebounding Drills: Hustle
The cliche many coaches acknowledge says rebounding is 20 percent skill and 80 percent hustle. The last of these youth basketball rebounding drills hones the significance of resolute ball retrieval or thwarting your partner’s attempt.
For this, you’ll need one or more partners and a ball. If possible, match sizes and positions. There will be an offensive and a defensive player. A ball is placed a few feet away.
From the defensive stance, the objective is to box out and prevent the offensive player from reaching the ball for five seconds. This drill effectively simulates the unwavering determination required to excel as a great rebounder.
If you coach a K-8th grade team, we have hundreds of resources. All laid out in an easy-to-follow, step-by-step system to save you time and money. Check out coachingyouthhoops.com today!
In the dynamic world of youth basketball, defensive strategies play a pivotal role in determining the outcome of games. One such strategy that has gained significant attention and recognition is the “Pack Line Defense.” This defensive approach has revolutionized the way teams thwart opponents’ attacks and create opportunities for success on the court.
In this series of articles, we will take an in-depth look at the Pack Line Defense – its principles, tactics, and the reasoning behind its effectiveness. Whether you’re a seasoned coach aiming to refine your defensive playbook or a newcomer eager to grasp the nuances of basketball strategies, our exploration of this strategy will equip you with valuable insights to enhance your coaching prowess. Let’s embark on this journey to unravel the layers of this strategic gem and understand how it can transform your team’s defensive game.
Pros of the Pack Line Defense
1. Enhanced Rebound Positioning
With off-ball defenders positioned closer to the basket compared to conventional man-to-man defenses, securing rebounds off missed shots becomes notably advantageous. Crucially, each player must execute effective boxing-out techniques against their opponents, preventing them from securing second-chance scoring opportunities.
2. Reinforced Defense for Post Players
The dominance of post players can present formidable challenges for defenses, particularly in high school basketball. The compact structure of the pack line defense offers valuable nearby support to defenders contending with taller and more robust offensive counterparts in the post position.
3. Restriction of Interior Penetration
Shots attempted from within the key tend to yield higher field goal percentages. The pack line defense counteracts this by crowding the interior. This dissuades agile ball handlers from attempting to drive into the key. Consequently, the offensive team is coerced into settling for more challenging outside shots, shifting the dynamics of shot selection.
Cons of the Pack Line Defense
1. Hinges on Patience
The efficacy of the pack line defense hinges on cultivating unyielding patience and disciplined play within the team. Straying too far from the pack line in pursuit of a steal could lead to players finding themselves out of position or vulnerable to backdoor cuts.
This attribute of patience becomes especially critical in leagues without shot clocks. Offensive teams can exploit the lack of time pressure to probe until the defensive rotations break down.
2. Vulnerable to Outside Sharpshooters
The evolution of basketball has redefined the significance of the three-point shot. A shift towards perimeter shooting and ball rotation has rendered the pack line less effective against teams equipped with proficient outside shooters.
The rise of improved jump shots among players across different levels of play has contributed to the waning utility of the pack line defense.
3. Susceptibilityagainst Pick-and-Roll Offense
This defense’s vulnerability is most apparent when confronted with the pick-and-roll offensive. The pick originates from the offensive post player, who sets a screen on the on-ball defender, effectively blocking their path.
If the on-ball defender fails to maneuver through the screen, the screener gains advantageous positioning. He can proceed to roll toward the basket unimpeded. Inadequate communication and a lack of robust help defense can expose the pack line defense to significant damage caused by pick-and-roll plays executed by the opposing offense.
If you coach a K-8th grade team, we have hundreds of resources. All laid out in an easy-to-follow, step-by-step system to save you time and money. Check out coachingyouthhoops.com today!
In the dynamic world of youth basketball, defensive strategies play a pivotal role in determining the outcome of games. One such strategy that has gained significant attention and recognition is the “Pack Line Defense.” This defensive approach has revolutionized the way teams thwart opponents’ attacks and create opportunities for success on the court.
In this series of articles, we will take an in-depth look at the Pack Line Defense – its principles, tactics, and the reasoning behind its effectiveness. Whether you’re a seasoned coach aiming to refine your defensive playbook or a newcomer eager to grasp the nuances of basketball strategies, our exploration of the Pack Line Defense will equip you with valuable insights to enhance your coaching prowess. Let’s embark on this journey to unravel the layers of this strategic gem and understand how it can transform your team’s defensive game.
What is The Pack Line Defense?
The Pack Line Defense stands as a distinctive half-court strategy in basketball that centers on limiting dribble penetration into the key area. Unlike the conventional man-to-man defense approach, which hinges on a lone defender pressuring the ball handler, with additional defenders safeguarding passing avenues to the wings, the pack line defense diverges significantly.
Within the pack line system, all designated “help defenders” maintain their positioning along an imaginary line situated roughly sixteen feet away from the hoop. This demarcation corresponds to the curvature of the three-point line. By establishing this defensive perimeter stretching from the free-throw line to the baseline, this cohesive defensive formation coerces point guards or other offensive players into settling for jump shots instead of exploiting open layup opportunities.
In effect, the pack line defense prioritizes containment and obstruction, utilizing a collective defensive stance that discourages easy access to the key area. This strategy seeks to disrupt offensive flow, hinder dribble penetration, and ultimately prompt opponents into less efficient shot selections, thereby bolstering the defensive team’s overall effectiveness on the court.
3 Basic Principles of the Pack Line Defense
Here’s a look at three fundamental principles of the Pack Line Defense.
1. Deny the Post Player
In the realm of post defense, thwarting offensive players who position themselves in the low post at the bottom block of the key is crucial. The defender must prevent incoming passes from the wing to the post player. To successfully front the post player, the defender shifts their position slightly between the post player and the ball handler.
Employing high hands and maintaining a solid base helps retain this position, but it’s essential not to overcommit. Overcommitting could lead to an open path to the hoop through a well-placed lob pass. In cases of mismatches, effective communication with high-side or weak-side defenders can facilitate double-teaming when the assigned player receives the ball inside.
2. Balancing On-Ball and Off-Ball Pressure
The defender marking the player with the ball must execute tight and assertive defensive techniques. However, it’s vital to avoid excessive aggression and reaching for steals, which could result in fouls or the dribbler bypassing the defender. Should the on-ball defender be beaten, a cascading rotation of assignments within the team defense ensues until the on-ball defender regains position.
Off-ball defenders maintain their positions close to the pack line until their designated assignments receive the ball. Once possession is gained, an off-ball defender abandons the pack line and enforces pressure defense with a controlled and rapid closeout.
3. Preventing Transition Plays
While the Pack Line Defense excels against deliberate half-court offenses, it might prove less effective against fast-paced transition offenses. Counteracting this, the point guard and at least one wing player should position themselves near the top of the key. Meanwhile, two to three teammates crash the boards for offensive rebounds.
Swiftly transitioning from an offensive role to the first line of defense, these players curb the fast break. Executing a pack line transition defense necessitates a strategic retreat. Defenders sprint to regroup in the pack line formation before addressing their individual assignments once again.
If you coach a K-8th grade team, we have hundreds of resources. All laid out in an easy-to-follow, step-by-step system to save you time and money. Check out coachingyouthhoops.com today!
A well-conditioned team is one poised for significant triumph on the basketball court. Yet, achieving such a level of readiness demands a dedicated focus on basketball conditioning drills. This can be particularly useful in the preseason. Numerous approaches exist for achieving this: including sprints, distance training, rigorous drills targeting in-game stamina, or a blend of the aforementioned methods.
In our training regimen, extended distance running receives the least emphasis. This choice is grounded in the understanding that basketball primarily involves bursts of energy rather than prolonged jogging or running. Instead, our preference leans towards incorporating conditioning through dynamic wind sprints and specialized drills engineered to enhance overall endurance.
Basketball Conditioning Drills: Defensive Slides
This is a great drill for working on different defensive movements and can be used as a warm-up drill. Players will work on many defensive fundamentals: defensive slides, back-pedalling, close-outs, drop-steps, and sprinting.
A line of players begins behind the baseline on one side of the key. If available, place d-men or cones on the elbows so that players have a visual to close-out to. No basketballs are needed for this drill.
Players should complete the course as quick as they can while still in control of their body. Pay attention to the footwork of the players. Players must be closing out with short steps and get one hand up. They must stay on-balance during this. Some variations include increasing the distance and flipping to the opposite side of the floor.
Basketball Conditioning Drills: The Riley Test
This is a conditioning test from the Xavier Newsletter #198. This is a great conditioning exercise because it is tough but achievable for players to accomplish.
The Riley Test is five “down and back” runs. The players start on the baseline and must run those five down and back sprints. It is best to group your players by position. After each set the players get a 2:30 break.
The goal for high school boys has always been anywhere from 1:05-1:10 per set and for the girls has been 1:10-1:20. This can decrease as you go throughout the season or get more conditioned. We always started with 3 sets but never did more than 6 sets.
Basketball Conditioning Drills: Champion Runs
This is a run that I ran in my high school under my coach Andy Elkins. It is a long sprint where if you don’t give 100 percent effort, it is impossible to complete.
The Champion Run consists of the following: 1 valley (see note in intro paragraph) followed by 5 full court touches (full court touch= start at 1 baseline and sprint to opposite baseline is 1). Coach Elkins always said the beauty of the Champion Run is that you will end up on the opposite baseline from where you started, so you might as well run two Champion Runs!
We do these runs when we don’t make free throws like we should, commit too many turnovers, or for just some good old-fashioned conditioning. We time these. Boys, especially guards and wings, should complete a Champion Run in the 1:00-1:07 range. Girl basketball players should complete a Champion Run in the 1:10-1:16 range.
If you coach a K-8th grade team, we have hundreds of resources. All laid out in an easy-to-follow, step-by-step system to save you time and money. Check out coachingyouthhoops.com today!
Basketball coaches frequently strategize diverse methods to overcome the top-ranked team in their matchups. A significant portion of these strategies revolves around defensive tactics. For coaches aiming to optimize their training sessions and enhance the effectiveness of their guidance, the solution lies in embracing the Funnel Down Defense.
The Funnel Down Defense methodology offers coaches a proven defensive system that controls the tempo of the game and fosters the creation of turnovers.
What is the Funnel Down Defense?
The Funnel Down Defense taps into an often overlooked element of many basketball courts: the volleyball lines. This defensive strategy revolves around compacting the court’s effective area for the opposing team’s offense, achieved by pushing ball handlers beyond a specific key section of the court. The primary objective of Funnel Down Defense is to hinder the utilization of around 60 percent of the court, compelling offensive play to operate within a condensed 40 percent perimeter.
The central idea is to confine ball movement to one side of the court, inducing a faster pace in the opposing offense which, in turn, tends to result in errors and missteps. Moreover, this tactic reduces the available space that the offense can effectively utilize.
Funnel Down Defense is meticulously crafted to disrupt the customary rhythm and flow of opposing offenses, leading to turnovers and forcing unfavorable, hurried shots. Its efficacy is particularly pronounced in games with a shot clock, as the offensive team is forced to dedicate more time to escape the trapping zones.
3 Key Concepts of the Funnel Down Defense
Pin the ball on the sideline
Funnel the ball to the baseline
Trap and Rotate in the short corner
The design of this defense borrows its terminology from bowling. The task of the defense remains to “funnel” the ball along the “gutter” of the court to the baseline, where a trap awaits in the “strike zone.” Funnel Down seeks to keep the ball out of the “alley,” which is the main stretch of center court inside the volleyball lines. The traps occur in “strike zones” positioned at the short corners.
Ideally, defenders pressure the ball into the gutters, avoiding the centering pass. This is called a “pin.” This tactic overplays the ball handler away from the middle so that the ball can’t be swung. Defenders stay ahead of the ball handlers by sprinting, not sliding, trying to stay half a body width ahead of the dribbler. This discourages penetration and funnels the ball toward the trap areas.
The defender “up the line” covers a man below the ball level on the court. This defender needs to remain between his man and the ball in order to help. The defenders continue to “funnel” the ball along the sideline, encouraging the dribblers to head toward the baseline. Once the ball enters the “strike zone” in the short corner, that triggers a trap and weak side rotation.
For more on how to implement this game-changing defensive system, Click Below for the Limited Time Funnel Down Defense Offer!
If you coach a K-8th grade team, we have hundreds of resources. All laid out in an easy-to-follow, step-by-step system to save you time and money. Check out coachingyouthhoops.com today!
As coaches, we are always looking for ways to give our team and program any sort of slight edge. Coaches are also educators and looking to put their players in a better position after being in their program than when they came into their program. In basketball leadership skills help in that regard. As coaches and educators, we want to set up our athletes to be successful when they stop bouncing the basketball. There is one program that I feel has checked both of those boxes for our program for the last five years and that program is Lead ‘Em Up.
Lead ‘Em Up is a Leadership Program that was created from Adam Bradley and his team that is designed to be dynamic and engaging for athletes to develop the skills for leaders that are needed to win. In my opinion, that “win” component means much more wins in the victory column during the season. Those “wins” are preparing young people with the needed skills to become successful employees, spouses, parents, etc.
Basketball Leadership Ideas
Lead ‘Em Up has 8 thoughts they believe in:
When the leader improves, everybody wins.
Leadership is a skill and like any skill, it needs practice in order to improve.
Great leaders can make the “uncool” into the new “cool”
Leadership isn’t sometimes, it’s all the time.
Better people make better athletes
Leading by example is not enough; there needs to be more.
The more you pour into your players, the more they have to give.
We want players as excited about leadership development as they are about skill development.
The program provides weekly exercises that the coach leads that work on different skills like engagement, focus, self-discipline, and many, many more. When coaches become members, they gain access to the lessons that are easy to follow and implement.
In addition to the great lessons, the Lead ‘Em Up team does an interactive video session either with the coaching staff or entire program to kick off the season on the right footing. We have elected to do the session with our entire program to really help build up some of the initial skills that are necessary.
Any question you have about the Lead ‘Em Up program can be found at their website. As they say at the end of every lesson: Have Fun, Lead ‘Em Up and Build Green!
Kyle Brasher | Gibson Southern High School
Lady Titans Basketball Coach
If you coach a K-8th grade team, we have hundreds of resources. All laid out in an easy-to-follow, step-by-step system to save you time and money. Check out coachingyouthhoops.com today!
As youth basketball coaches, we understand the immense significance of preparing our young athletes to excel in high-stakes moments during the game. Whether it’s hitting a game-winning shot, nailing crucial free throws, or effectively managing the clock, end-of-game situations can often determine the outcome of a match. In our latest blog post, we present a comprehensive practice plan tailored to help young players develop the skills, decision-making, and composure needed to thrive in these pressure-filled moments.
Join us as we dive into a specific practice plan with drills that simulate game scenarios, designed to instill confidence, teamwork, and strategic thinking in our youth basketball team. With a structured progression and targeted exercises, we aim to empower both players and coaches to master end-of-game situations and turn them into game-changing opportunities for success on the court. Let’s lead our young athletes towards greatness in the most critical moments of the game!
Practice Plan: End-of-Game Situations
Objective: The goal of this practice plan is to develop the youth basketball team’s skills, decision-making, and composure in end-of-game situations. By incorporating specific drills that simulate game-like scenarios, the players will gain the confidence and ability to excel in pressure-filled moments during real games.
Timing: 90 minutes
Warm-up (10 minutes):
Begin with a dynamic warm-up, including light jogging, dynamic stretches, and agility drills to get players physically and mentally prepared for the practice.
Drill 1: “Game-Winning Shot” (15 minutes):
Set up a game-like situation where the team is trailing by two points with 15 seconds left on the game clock.
Divide the team into two groups and run controlled scrimmages, focusing on executing plays to get an open shot opportunity.
The defense should apply pressure to simulate real-game conditions.
Rationale: This drill allows players to practice making game-winning shots under pressure and improves their ability to execute plays effectively in tight game situations.
Drill 2: “Free-Throw Pressure” (10 minutes):
Players pair up, and each player takes turns shooting a pair of free throws.
Add consequences for missed free throws, such as doing push-ups or a short sprint.
Increase the pressure by making the players complete a physical activity before attempting the free throws.
Rationale: Practicing free throws under pressure helps players build confidence and composure when facing crucial moments at the free-throw line during real games.
Implement your go-to play for End-of-Game, End-of-Quarter, or End-of-Half situations. If you don’t have one, be sure to view the clip below for a good one!
Run several repetitions with varying scenarios, such as different scores, time remaining, and defenders applying pressure.
Conclude the practice with a cooldown that includes static stretches to prevent injuries and promote recovery.
Review the key takeaways from the practice and provide constructive feedback to the players on their performance.
Progression: As the team becomes more proficient in handling end-of-game situations, gradually increase the difficulty by shortening the time available, adding defensive pressure, or incorporating multiple scoring options in plays.
By following this practice plan and incorporating specific drills for end-of-game situations, the youth basketball team will develop essential skills and strategies to succeed in high-pressure moments. Repeated practice in these scenarios will instill confidence, composure, and cohesion among the players, ultimately translating into improved performance during real games.
If you coach a K-8th grade team, we have hundreds of resources. All laid out in an easy-to-follow, step-by-step system to save you time and money. Check out coachingyouthhoops.com today!
When practicing for end-of-game situations in youth basketball, it’s essential to focus on drills that simulate game-like scenarios and help players develop the necessary skills and decision-making abilities. Having practice drills specific for End-of-Game situations will help develop your team’s confidence in those key moments.
Here are some good youth basketball drills to run for end-of-game situations:
Practice Drills for End-of-Game Scenarios
1. Scrimmages with Time Constraints: Divide the team into two groups and play controlled scrimmages with specific time constraints, such as 1 minute or 30 seconds left on the game clock. Emphasize executing plays, managing the clock, and making quick decisions under pressure.
2. Free-Throw Pressure: Create pressure situations in free-throw shooting drills, where players have to make critical shots with the game on the line. Add consequences for missed free throws to increase the pressure.
3. Quick Transition Offense and Defense: Practice transitioning from defense to offense and vice versa quickly. Emphasize making fast decisions, passing, and attacking in transition to capitalize on opportunities.
4. Defensive Stops Drill: Set up scenarios where the defensive team needs to make consecutive stops to win the game. The offensive team tries to score, and the defensive team must secure rebounds and prevent scoring to succeed.
5. Decision-Making Scenarios: Design drills that force players to make quick decisions based on the game situation, such as whether to hold for the last shot, take an open shot, or pass to a teammate.
6. Clock Management Drill: Run scenarios where the team must manage the clock effectively, making deliberate decisions to use or save timeouts and control the pace of the game.
7. Simulated Game Endings: Recreate actual end-of-game situations from previous games or popular basketball moments. Have the team watch footage and discuss the strategies used, then try to replicate those scenarios in practice.
If you coach a K-8th grade team, we have hundreds of resources. All laid out in an easy-to-follow, step-by-step system to save you time and money. Check out coachingyouthhoops.com today!
As a seasoned basketball coach with years of experience on the court, I firmly believe in the power of precise execution during critical moments. The end of each quarter presents a golden opportunity to make a significant impact on the game’s momentum, and that’s where this “End-of-Quarter Quick Hitter” comes into play.
In this post, I’ll be sharing valuable insights into this strategic offensive play, tailored specifically for youth basketball teams. Mastering the art of the end-of-quarter quick hitter can give your team the edge they need to finish quarters on a high note, gain momentum, and seize control of the game. So, let’s dive into the intricacies of this tactical gem and empower your young athletes with a game-changing tool that will elevate their performance to new heights.
End-of-Quarter Quick Hitter
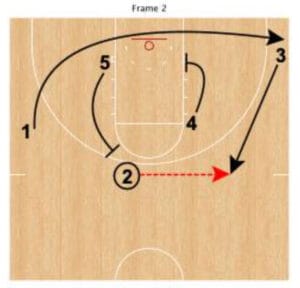
This play begins with using the 1-4 High set.
1 starts with a dribble entry to the wing. As 1 makes his way to the wing, 2 imitates a zipper or loop cut.
2 cuts down and loops around 5, who provides the down screen.
As that action is taking place, 3 cuts to the corner as a decoy action.
This initial action might get an open look for 2 at the top of the key.
Any defensive overplay might result in a dump down pass to 5 for a layup.
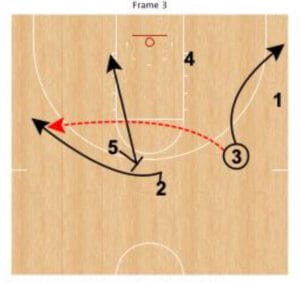
3 pops up from the corner to receive a pass on the wing.
1, meanwhile, cuts from the opposite wing to the strong side corner. He cuts along the baseline, receiving a screen from 4 at the block to free him.
2 reverses the ball to 3 on the wing. Once that pass has happened, 5 provides a flare screen for 2.
This action might get an open shot for 3. It might also get an open shot for 1 in the corner, or 4 on the block.
The final sequence of this play sees 3 make the decisions. He might be open, or 1 in the corner, or 4 on the block.
3 can also skip pass to 2, whose flair screen might see him open on the opposite side. Depending on how the defense plays it, 5 might slip the screen for an open layup as well.
The value of a play like this one remains the pressure-release aspect. If a defense overplays or denies certain passes, preventing a team from initiating a continuity offense, then a set like this one provides a useful counter attack.
If you coach a K-8th grade team, we have hundreds of resources. All laid out in an easy-to-follow, step-by-step system to save you time and money. Check out coachingyouthhoops.com today!
As a veteran basketball coach who has witnessed countless thrilling finishes and heart-wrenching losses, I understand the immense value of preparing young athletes for the intense pressure and critical decision-making that accompanies end-of-game situations.
These nail-biting moments can define the outcome of a basketball game, making them an essential aspect to address during practice sessions. In this post, I will delve into seven compelling reasons why youth basketball coaches should prioritize practicing end-of-game situations with their teams.
From fostering composure under pressure to enhancing strategic thinking, these reasons highlight the significant impact that targeted practice in these scenarios can have on the development and success of young players. So, let’s explore the crucial reasons why dedicating time and effort to practicing end-of-game situations is vital for the growth and achievement of our youth basketball teams.
7 Reasons to Practice End-of-Game Situations
As a veteran coach, I can emphasize the crucial importance of practicing end-of-game situations for a youth basketball team. Here are several reasons why practicing these scenarios is essential:
1. Building Confidence
End-of-game situations can be high-pressure moments that require composure and decision-making under stress.
By practicing these scenarios, players become more comfortable and confident in executing their roles and responsibilities when the game is on the line. This confidence translates into better performance and reduced anxiety during real-game situations.
2. Enhancing Execution
End-of-game situations often involve specific plays, strategies, and tactics.
By practicing these scenarios, players learn how to execute these plays effectively, make precise passes, set screens correctly, and execute scoring opportunities. Regular practice allows players to refine their skills and improve their execution in critical moments.
3. Developing Decision-Making Skills
End-of-game situations require players to make quick and smart decisions based on the game’s context.
Practicing these scenarios allows players to develop their basketball IQ, understand the importance of time management, shot selection, and reading the defense. It helps them become more knowledgeable and skilled in making intelligent decisions in pressure-filled situations.
4. Team Cohesion and Communication
End-of-game situations require seamless coordination and communication among teammates.
By practicing these scenarios, players develop a better understanding of each other’s strengths, tendencies, and preferred plays. They learn to communicate effectively, anticipate each other’s moves, and make collective decisions that can lead to successful outcomes.
5. Minimizing Mistakes
End-of-game situations can be unforgiving, and even small mistakes can have significant consequences.
By practicing these scenarios, players become more aware of potential errors and develop strategies to avoid them. This includes minimizing turnovers, making solid passes, executing plays correctly, and maintaining focus until the final buzzer.
6. Instilling a Winning Mindset
Practicing end-of-game situations instills a winning mindset in young players. It teaches them to never give up, fight until the end, and believe in their abilities.
By rehearsing these scenarios repeatedly, players understand that victory is achievable in challenging situations, boosting their motivation and competitive spirit.
7. Preparedness for Real Games
Youth basketball teams often face close games where end-of-game situations become decisive.
By practicing these scenarios regularly, players are better prepared to handle the pressure and execute their roles effectively. They can enter real games with the confidence and skills necessary to succeed in critical moments.
Overall, practicing end-of-game situations is invaluable for a youth basketball team. It not only enhances their basketball skills and decision-making abilities but also fosters team cohesion, confidence, and a winning mindset. These skills and qualities extend beyond basketball and can positively impact players’ lives both on and off the court.
If you coach a K-8th grade team, we have hundreds of resources. All laid out in an easy-to-follow, step-by-step system to save you time and money. Check out coachingyouthhoops.com today!
As a veteran coach with years of experience on the basketball court, I firmly believe that preparation is key to success in any sport. As Benjamin Franklin famously said: “By failing to prepare, you are preparing to fail.” When it comes to basketball, there’s one aspect that often separates the winners from the losers—the ability to navigate and excel in basketball end-of-game scenarios.
These critical moments can make or break a team’s chances of victory, and as coaches of youth basketball teams, it’s our responsibility to ensure our players are well-equipped to handle the pressure and make the right decisions. In this post, we’ll explore five essential questions every coach should ask before diving into those nail-biting, adrenaline-pumping end-of-game situations. By addressing these questions, we can empower our young athletes to face these moments with confidence, poise, and a strategic mindset, ultimately increasing their chances of triumph. So, let’s dive in and unlock the secrets to mastering basketball end-of-game scenarios!
Basketball End-of-Game Scenarios: 5 Questions to Answer
As a coach, you and your staff need to know the answers to the following questions ahead of any basketball season to prep for those end-of-game scenarios.
Question 1: Should you foul or go for a steal/turnover if your team is behind? If fouling, whom and when?
Rationale: This question addresses the strategy of whether to intentionally foul the opposing team to stop the clock and extend the game or to go for a steal or turnover to regain possession quickly.
Possible Answers: It depends on the time remaining, the score difference, and the defensive capabilities of your team. If there is sufficient time, fouling the opponent’s weakest free-throw shooter or the player with the ball can increase your team’s chances of getting the ball back. However, if your team excels at creating turnovers, going for a steal or trap might be a viable option.
Question 2: Should you foul when your team is up by 3 points to avoid a potential 3-pointer? If so, when?
Rationale: This question addresses the decision of whether to foul the opponent intentionally to prevent them from attempting a game-tying 3-pointer.
Possible Answers: It depends on the time remaining, the defensive capabilities of your team, and the likelihood of the opponent making a 3-pointer. Foul only when the opposing team is attempting a 3-pointer, ideally before the shot is released, to prevent them from tying the game.
Question 3: What should your team do after getting a rebound/turnover or after a made shot? Should you call an immediate timeout, push the ball up and call a timeout, or disregard the timeout and go for a score?
Rationale: This question addresses the decision of whether to call a timeout immediately, push the ball up the court and then call a timeout, or play through without a timeout to capitalize on the momentum.
Possible Answers: It depends on the game situation, time remaining, and the need for a strategic adjustment. If your team needs to regroup, set up a play, or make substitutions, calling an immediate timeout might be appropriate. However, if there’s an opportunity for a quick score in transition, pushing the ball up the court and then calling a timeout can catch the defense off guard. In some cases, if the flow of the game is favorable and momentum is on your team’s side, it might be best to let the players play and go for a score without using a timeout.
Question 4: Should your team hold for the last shot or take the first good scoring opportunity when trailing by 1, 2, or tied?
Rationale: This question explores the strategy of whether to be patient and hold the ball for the last shot to ensure your team has the final possession or to take the first good scoring opportunity available.
Possible Answers: It depends on the time remaining, the offensive strengths of your team, and the quality of the available shot. If time allows, it might be wise to run a well-executed play and look for the best possible shot rather than rushing. However, if there’s a clear and open opportunity early in the possession, taking the shot might be a suitable option.
Question 5: Do you have plays prepared for various locations on the court, considering the time left in the game?
Rationale: This question emphasizes the importance of having well-rehearsed plays from different areas of the court, taking into account the time remaining in the game.
Possible Answers: Yes, it is crucial to have a variety of plays designed for different scenarios, such as sideline inbounds, baseline inbounds, and half-court sets. These plays should consider the time remaining and provide options for quick scores, perimeter shots, or set plays to exploit defensive weaknesses. Having a diverse playbook allows your team to adjust and execute effectively, regardless of the location and time left on the clock.
If you coach a K-8th grade team, we have hundreds of resources. All laid out in an easy-to-follow, step-by-step system to save you time and money. Check out coachingyouthhoops.com today!
Basketball End of Game situations refer to the specific scenarios and strategies that teams employ in the closing moments of a basketball game when the score is close and every possession becomes critical. These situations typically involve various tactics aimed at maximizing scoring opportunities, managing the clock, and maintaining or gaining a competitive advantage.
It’s important to note that end-of-game situations can vary depending on the specific rules and regulations of different basketball leagues and organizations. Coaches and players often develop unique strategies and adjustments based on their team’s strengths, the opponent’s weaknesses, and the game’s context.
Here’s a look at seven elements basketball coaches should consider when dealing with End of Game situations.
7 Elements to Consider During Basketball End of Game Situations
Game-Winning/Go-Ahead Possession: When a team is trailing by a small margin or tied, they have the opportunity to execute a play to score and take the lead or win the game.
Clock Management: Teams need to be mindful of the game clock and shot clock in order to maximize their possessions and prevent the opposing team from having enough time for a comeback. This may involve intentionally fouling to stop the clock, strategic timeouts, or using quick fouls to send the opponent to the free-throw line and conserve time.
Free-Throw Strategies: Depending on the score and time remaining, teams may employ different strategies when shooting free throws or defending against them. This can include intentionally missing a free throw to create an opportunity for an offensive rebound or committing intentional fouls to prevent the opposing team from attempting a potential game-tying or game-winning shot.
Inbound Plays: Out-of-bounds situations, especially when the offensive team is near their basket with limited time, require well-designed plays to create open scoring opportunities. These plays often involve screens, cuts, and decoy movements to confuse the defense.
Three-Point Shooting: With the increased value of three-pointers, teams may strategically seek three-point shots to quickly close a scoring gap or take the lead.
Defensive Strategies: Teams may employ specific defensive strategies, such as full-court pressure, double-teaming star players, or denying certain passes, to disrupt the opposing team’s offensive flow and force turnovers.
Overtime Strategies: When a game is tied at the end of regulation, teams enter an overtime period with additional time to determine the winner. Overtime basketball strategies are similar to end of game situations, but teams need to adapt and adjust their approach based on the game’s flow and player fouls.
Prepping for Basketball End of Game Situations
Preparing for end of game situations are crucial for basketball coaches at any level. Often times, however, this remains overlooked when developing their practice plans. Coaches continually drill aspects of an offensive set or a defensive approach, but sometimes forget those end-of-game scenarios.
Competitive practice games stand as one useful tool. These drills inject energy into practice that’s usually reserved for game nights. Competitive games, especially ones where the losing team feels the consequences, allow coaches to bring a high-level of energy to the practice floor.
Another thing basketball coaches should consider is developing specific in-practice scenarios to prepare for those end of game situations. These scenarios might play out during a controlled scrimmage. But adding specific elements like time and score will aid in that preparation. Something like, asking a team to hold a single-digit lead for three minutes. Or maybe the “best” player is not available due to foul trouble. Options are only limited by the coach’s creativity.
Check out the YouTube link below for a specific discussion between coaches on how to deal with end of game situations. In this segment, coaches use real game footage to talk through the options available.
If you coach a K-8th grade team, we have hundreds of resources. All laid out in an easy-to-follow, step-by-step system to save you time and money. Check out coachingyouthhoops.com today!
In this post, we will focus on two critical aspects of the game: defense and rebounding. Although developing offensive skills is usually preferred by young players, as the cliché goes, defense wins championships. By incorporating effective youth basketball defensive drills and rebounding techniques, you can empower your players to become defensive forces and control the boards.
These drills are designed to improve their fundamental skills, boost performance, and foster their love for the game. Whether you are a seasoned coach or just starting, incorporating these drills into your practice plans will greatly benefit your players’ growth and development. Let’s dive into some essential youth basketball defensive drills and rebounding techniques that will elevate your team’s defensive prowess and rebounding abilities.
Defensive Drills
Defense is the backbone of any successful basketball team. By instilling solid defensive fundamentals and practicing specific drills, you can strengthen your players’ defensive skills and teamwork.
Here are three defensive drills to incorporate into your practice sessions:
1. Defensive Slides Drill
The defensive slides drill is a fundamental exercise that focuses on lateral quickness, footwork, and defensive stance. Have players start in a low defensive stance, feet shoulder-width apart. Instruct them to slide laterally from one side of the court to the other while maintaining a low posture.
Encourage players to keep their hands active, maintain balance, and stay in front of an imaginary offensive player. This drill improves agility, defensive positioning, and the ability to guard opponents effectively.
2. Closeout Drill
The closeout drill helps players develop the skills needed to close out on an offensive player and contest shots effectively. Set up cones or markers at various spots around the perimeter. Players start near the basket and, upon a coach’s signal, sprint out to the designated spot and close out on the offensive player.
Emphasize proper technique, such as getting low, chopping the feet, and extending hands to challenge the shot without fouling. This drill enhances defensive awareness, closeout speed, and shot-contesting ability.
3. 1-on-1 Defensive Drill
The 1-on-1 defensive drill is an excellent way for players to work on their individual defensive skills and competitive spirit. In a controlled setting, have two players face each other on the court. The offensive player tries to score while the defender’s objective is to prevent a basket.
Emphasize proper defensive positioning, staying in front of the offensive player, and contesting shots without fouling. This drill improves defensive instincts, on-ball defense, and the ability to guard opponents effectively.
Rebounding Drills
Rebounding is an essential aspect of the game that can significantly impact possession and create scoring opportunities. By practicing specific rebounding drills, you can teach your players the importance of positioning, timing, and boxing out.
Here are three effective rebounding drills to incorporate into your practice sessions:
1. Box Out Drill
The box out drill emphasizes the importance of securing rebounds by effectively boxing out opponents. Divide your players into pairs, with one player designated as the defender and the other as the rebounder. Instruct the defender to maintain contact with the rebounder and establish a solid position between them and the basket. The rebounder’s goal is to gain inside position and secure the rebound.
Encourage proper technique, such as using the lower body to establish leverage and arms to create space. This drill improves rebounding fundamentals, positioning, and physicality.
2. Tip Drill
The tip drill helps players develop their ability to tip missed shots and rebounds to themselves or teammates, extending possessions and creating scoring opportunities. Start by having players pair up under the basket. One player attempts a shot while the other player tries to tip the ball before it reaches the rim.
Encourage players to time their jumps, extend their arms, and redirect the ball towards themselves or their teammate. This drill improves coordination, timing, and second-chance opportunities.
3. Team Rebounding Drill
The team rebounding drill simulates game-like rebounding scenarios and emphasizes teamwork and communication. Divide the players into two teams, with one team designated as the offense and the other as the defense. The coach initiates a shot, and both teams compete for the rebound.
Encourage players to communicate, establish box-out positions, and fight for the ball. This drill enhances rebounding in a competitive setting, teamwork, and the ability to secure rebounds amidst traffic.
Youth Basketball Defensive Drills and Rebounding Techniques
In conclusion, incorporating youth basketball defensive drills and rebounding techniques into your coaching repertoire can significantly elevate your team’s performance on the court. By focusing on developing solid defensive fundamentals, such as lateral quickness, closeout techniques, and individual defensive skills, your players will become formidable defenders.
Additionally, teaching proper rebounding techniques, including boxing out, tipping, and team rebounding, will enhance their ability to control the boards and create second-chance opportunities.
Remember, mastering these skills requires consistent practice, patience, and a commitment to improvement. As a coach, your guidance and expertise play a crucial role in shaping young athletes into well-rounded basketball players. By emphasizing the importance of defense and rebounding through purposeful drills, you can instill a strong foundation that will benefit your players both on and off the court.
So, don’t underestimate the impact of youth basketball defensive drills and rebounding techniques. Incorporate them into your practice plans, foster a culture of hard work and determination, and watch your team grow into a formidable force. Together, let’s empower our players to excel in all facets of the game and embrace the challenges that come their way.
If you coach a K-8th grade team, we have hundreds of resources. All laid out in an easy-to-follow, step-by-step system to save you time and money. Check out coachingyouthhoops.com today!
In this post, we will delve into the essential skill development drills for youth basketball players on the offensive side of the ball. These drills are designed to improve their fundamental skills, boost performance, and foster their love for the game. Whether you are a seasoned coach or just starting, incorporating these drills into your practice plans will greatly benefit your players’ growth and development.
Dribbling Drills
Dribbling is a fundamental skill that every young basketball player must master. By focusing on proper dribbling techniques and ball control, players can become more confident and effective on the court.
Here are three dribbling drills to incorporate into your practice sessions:
1. Stationary Dribbling Drill
This drill helps players improve their ball-handling skills while standing in one place. Instruct your players to dribble the ball using both hands, focusing on maintaining control and keeping the ball at waist height.
Encourage them to use their fingertips, stay low, and alternate between dribbling with their right and left hand. This drill promotes coordination and helps players develop a feel for the ball.
2. Zigzag Dribbling Drill
The zigzag dribbling drill is an excellent way to work on change of direction, speed, and ball protection. Set up cones or use defenders spaced apart in a zigzag pattern. Instruct players to dribble through the course, weaving in and out of the obstacles while maintaining control of the ball.
Emphasize the importance of staying low, using quick crossovers, and protecting the ball from defenders. This drill enhances agility, quickness, and dribbling under pressure.
3. Two-Ball Dribbling Drill
The two-ball dribbling drill is a challenging exercise that enhances coordination and ambidexterity. Each player uses both hands simultaneously to dribble two basketballs.
This drill helps players develop their weak hand while improving overall ball-handling skills. Encourage players to start with simple dribbling patterns and gradually progress to more complex moves. It’s important to emphasize control, coordination, and rhythm while dribbling with both hands.
Shooting Drills
Shooting is a fundamental skill that every player wants to excel at. By incorporating specific shooting drills into your practices, you can help your players improve their shooting technique, accuracy, and confidence.
Here are three shooting drills that focus on different aspects of shooting:
1. Form Shooting Drill
The form shooting drill is a fundamental exercise that emphasizes proper shooting mechanics. Start close to the basket and have players focus on their shooting form: feet shoulder-width apart, knees slightly bent, elbow aligned with the shooting hand, and eyes on the target.
Encourage them to shoot with a smooth motion, using their legs for power. Gradually move players farther from the basket as they improve their form. This drill reinforces muscle memory and builds a solid shooting foundation.
2. Spot Shooting Drill
Spot shooting drills simulate game-like situations where players shoot from specific spots on the court. This drill helps players develop accuracy and confidence in shooting from various locations. Choose five to seven spots around the perimeter or key areas and have players take shots from each spot.
Encourage proper footwork, balance, and quick release. This drill also improves players’ ability to read the court and find open spots for shooting.
3. Catch and Shoot Drill
In games, players often need to quickly catch the ball and shoot. The catch and shoot drill focuses on receiving a pass and shooting with minimal hesitation. Have players pair up, with one player passing and the other shooting. The passer should deliver accurate passes to simulate game situations.
Emphasize quick footwork, being ready to shoot upon receiving the pass, and proper shooting technique. This drill improves players’ ability to shoot under pressure and in a dynamic setting.
Passing Drills
Passing is a vital skill in basketball that enables players to move the ball effectively, create scoring opportunities, and foster teamwork.
Here are three passing drills to incorporate into your practices:
1. Two-Person Chest Pass Drill
The two-person chest pass drill helps players develop accuracy and technique in their chest passes. Have players pair up and face each other at a moderate distance. Instruct them to use both hands, push the ball from their chest with a quick release, and aim for their partner’s chest.
Encourage players to maintain proper form, follow through with their wrists, and work on passing with crispness and precision. This drill reinforces the importance of strong and accurate chest passes in game situations.
2. Circle Passing Drill
The circle passing drill is an excellent exercise to enhance passing skills under pressure and from various angles. Form a circle with your players, spaced a few feet apart. Start with one player passing the ball to a teammate and continue the pattern around the circle. Vary the passing techniques, such as chest passes, bounce passes, and overhead passes.
Encourage players to communicate, focus on accurate passes, and adjust to different receiving positions. This drill improves passing accuracy, decision-making, and adaptability.
3. Outlet Passing Drill
Outlet passing is crucial for fast breaks and quick transition offense. In this drill, players practice long-distance, accurate passes to initiate the fast break. Set up two lines, one near the baseline and the other near midcourt. The first player in the baseline line rebounds the ball and throws an outlet pass to a teammate in the midcourt line.
Emphasize the importance of accurate and quick passes, leading the receiver, and maintaining good spacing. This drill enhances passing vision, accuracy, and decision-making in fast-paced situations.
If you coach a K-8th grade team, we have hundreds of resources. All laid out in an easy-to-follow, step-by-step system to save you time and money. Check out coachingyouthhoops.com today!
Dribbling is one of the most important skills in basketball. A good dribbler can create open shots for themselves and their teammates, and can also help to break down the defense. If you’re a youth basketball coach, you know that it’s important to help your players develop their skills and sometimes, the best way to do that is with a series of dribbling drills.
In this blog post, I’ll share 5 dribbling drills that you can use to help your players improve their skills. These drills are designed to help players develop their speed, control, and ball-handling skills.
Dribbling Drills: Figure 8
This drill is designed to help players develop their ball-handling skills in tight spaces. It forces players to change directions and pivot while dribbling, which can be difficult to do in a small space.
Set up two cones about 10 feet apart.
Start with the ball in your dominant hand at the midpoint between the cones.
Dribble the ball in a figure 8 pattern around the cones, keeping your head up and your eyes on the cones.
Repeat the drill on the other side.
Difficulty progression:
As you get better, move the cones closer together.
Once you can dribble the ball in a figure 8 pattern around cones that are spaced about 2 feet apart, you can start adding a defender.
Dribbling Drills: Pound
This drill is designed to help players develop their speed and control while dribbling. Pounding the ball into the ground helps players develop the strength and coordination necessary to dribble quickly and smoothly.
Stand with the ball in your dominant hand in front of you.
Dribble the ball down the court, pounding the ball into the ground with each dribble.
Keep your head up and your eyes on the court.
Repeat the drill.
Difficulty progression:
As you get better, increase your speed.
Once you can dribble the ball down the court at full speed while pounding the ball into the ground, you can start adding a defender.
Dribbling Drills: Hesitation
This drill is designed to help players develop their ability to change direction while dribbling. Hesitating before changing direction can help players fool defenders and create open shots.
Stand with the ball in your dominant hand in front of you.
Dribble the ball down the court, and then hesitate for a moment before changing direction.
Change direction and continue dribbling.
Repeat the drill.
Difficulty progression:
As you get better, make your hesitations more pronounced.
Once you can dribble the ball down the court and change direction quickly and smoothly, you can start adding a defender.
Dribbling Drills: Crossover
This drill is designed to help players develop their ability to crossover while dribbling. Crossovers can be used to change direction quickly and create open shots.
Stand with the ball in your dominant hand in front of you.
Dribble the ball down the court, and then crossover to your other hand.
Continue dribbling with your other hand.
Repeat the drill.
Difficulty progression:
As you get better, make your crossovers more pronounced.
Once you can dribble the ball down the court and crossover quickly and smoothly, you can start adding a defender.
Dribbling Drills: Behind-the-Back
This drill is designed to help players develop their ability to dribble behind their back. Dribbling behind the back can be used to create separation from defenders and create open shots.
Stand with the ball in your dominant hand in front of you.
Dribble the ball down the court, and then dribble behind your back to your other hand.
Continue dribbling with your other hand.
Repeat the drill.
Difficulty progression:
As you get better, make your dribbles behind your back more pronounced.
Once you can dribble the ball down the court and dribble behind your back quickly and smoothly, you can start adding a defender.
These are just a few dribbling drills that you can use to help your players improve their skills. By regularly practicing these drills, your players will develop the speed, control, and ball-handling skills they need to be successful on the court.
If you coach a K-8th grade team, we have hundreds of resources. All laid out in an easy-to-follow, step-by-step system to save you time and money. Check out coachingyouthhoops.com today!
Last month’s article dealt with the installation of various Point Motion sets. What I want to focus on in this month’s article are some drills to help install and get your players shots out of these various looks. We all know that as coaches we want todevelop the needed muscle memory, footwork, and confidence from the spots on the court where the shots will come from.
Below I will describe 3 different shooting drills with diagrams attached to help get shots for players in the spots they will shoot from.
Point Motion Shooting Drills
Drill 1: Need 2 lines. 1 line in the left pinch area where the 5 will usually receive the ball and a line on the right wing. You also need a coach/manager in the right pinch area with a ball.
The line of players with a ball will pass their ball to the right wing and immediately set a ball screen. The player on the right wing will receive the ball and drive for a layup. The player that sets the screen will pop and receive a pass from the coach/manager for a shot.
Switch lines after each rep to work both actions.
Drill 2: Same setup as Drill 1. The ball line will dribble and do a handoff with the other line. The lin without the ball to start will take that handoff and drive for a layup.
After the handoff, the player that started with the ball and shape up for a shot attempt from a pass from the coach/manager.
Switch lines after each rep to work both actions.
Drill 3: This drill needs 2 lines, 1 on the right wing and 1 on the left wing. The line on the right wing will start with balls. They will drive down to the baseline, attacking the paint. The other line will move from the left wing to the left corner.
Once the player with the ball gets to the baseline area, they will hit their teammate in the opposite corner. The player willreceive the pass in the left corner and take a shot.
Switch lines after each rep to work both actions.
Kyle Brasher | Gibson Southern High School
Lady Titans Basketball Coach
If you coach a K-8th grade team, we have hundreds of resources. All laid out in an easy-to-follow, step-by-step system to save you time and money. Check out coachingyouthhoops.com today!
Defense is a critical component of basketball success, and in this blog, we will provide you with valuable insights and effective drills to enhance your players’ defensive skills. From mastering defensive stance and closing out to excelling in rebounding and pressure defense, we have curated a collection of individual defensive drills to help your team elevate their game.
Whether you’re a coach looking to sharpen your coaching strategies or a player seeking to improve your defensive prowess, our blog is your go-to resource. Let’s dive into the world of individual defensive drills for better basketball performance!
Essential Individual Defensive Drills for Better Basketball
To maximize our practice time, it’s crucial to allocate the first 3-5 minutes to warm up our athletes mentally and physically while focusing on fundamental techniques. By repeatedly executing and reviewing the basics throughout the season, we can build a solid foundation for continuous skill development. Here are the skills I plan to emphasize during these individual defensive drills:
Stance
Closing out
Chinning a rebound followed by a good outlet pass
For the initial week and a half to two weeks, I’ll prioritize these drills daily. Building upon the previous segment, let’s move on to the next set of drills:
Defensive Drill: 1-on-1 Box Out
Coach starts with the ball on the wing, offense on the opposite wing, and defense in helpside.
The coach shoots, and the defense boxes out, pursues the ball, and rotates to offense. Intensity increases gradually as defense improves.
Defensive Drill: 1-on-1 Full Court – Force Sideline
Start in the baseline/sideline corner, with the ballhandler attempting to beat the defender to the middle of the court.
The defender’s task is to stay on the inside hip of the ball handler, forcing them up the sideline. Proper positioning is vital.
Defensive Drill: 1-on-1 Pressure the Passer
Offensive and defensive players positioned on wings, with the remaining players forming lines on the blocks.
Defense applies pressure without fouling for 5 seconds as the offense holds the ball. The offense then attempts an entry pass into the post while the defense aims for a deflection.
Defensive Drill: 1-on-1 Jump to the Ball
Offensive and defensive players start on each wing, with a coach at the top of the key. The offense passes to the coach, and the defense jumps towards the ball.
The offense then V-cuts down to the block while the defense prevents them from cutting in front of their face. Intensity increases progressively.
By incorporating these individual defensive drills into your practice routine, you’ll lay the groundwork for better basketball performance. Remember to focus on technique, gradually increase intensity, and provide feedback to enhance your players’ defensive abilities. Stay tuned for more valuable basketball insights and drills!
If you coach a K-8th grade team, we have hundreds of resources. All laid out in an easy-to-follow, step-by-step system to save you time and money. Check out coachingyouthhoops.com today!

 “Return of the King” starts out by chronicling the start of LeBron James’ career with the Cleveland Cavaliers from 2003-2010. It moves on to the “The Decision” that lead him to the Miami Heat. The book then goes over James’ time with the Heat and the success LeBron had in Miami. This is where the book gets really interesting and starts to get in depth.
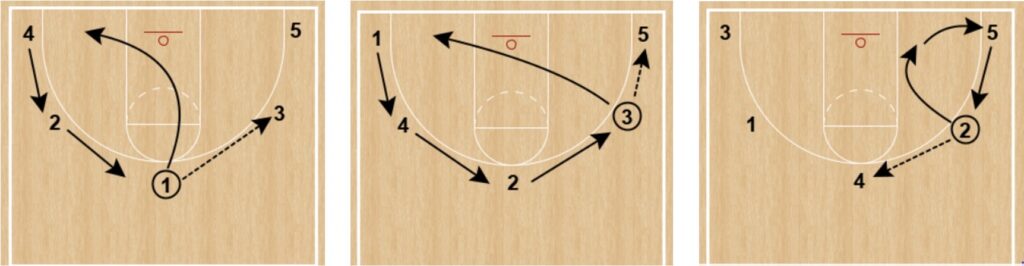
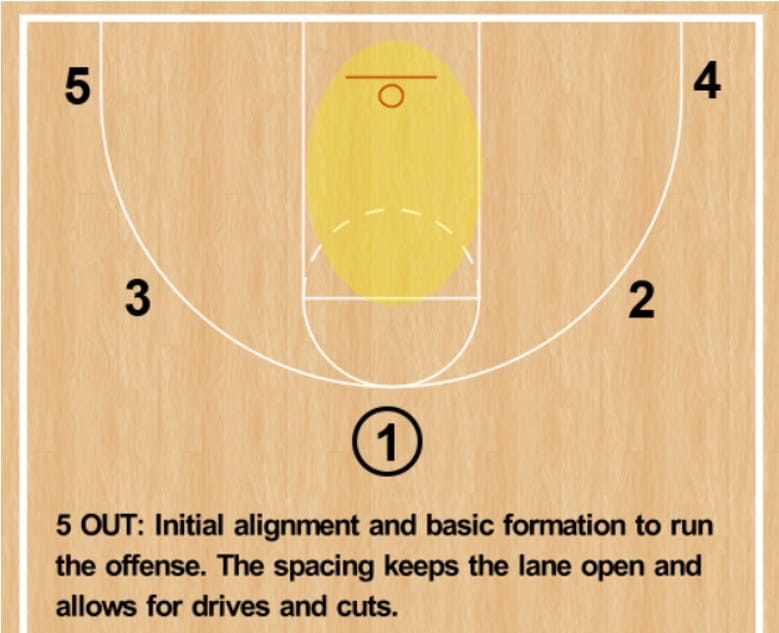
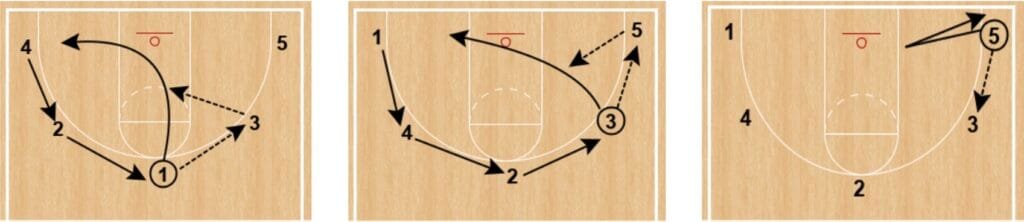
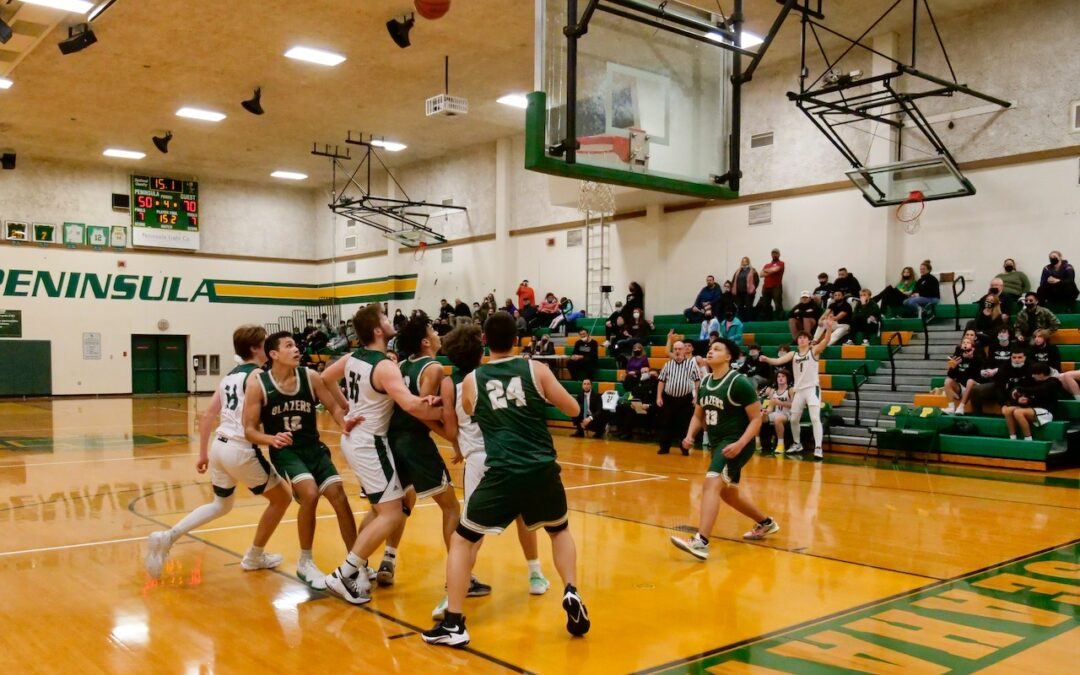
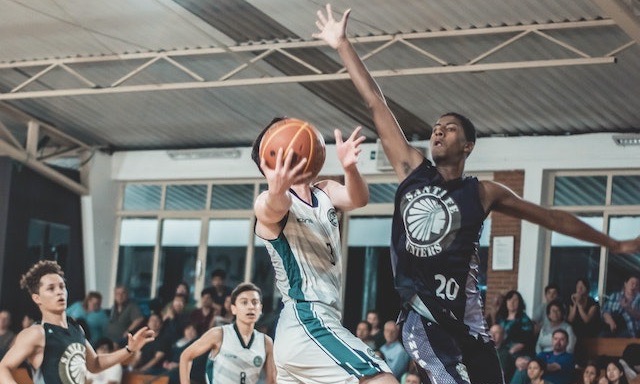
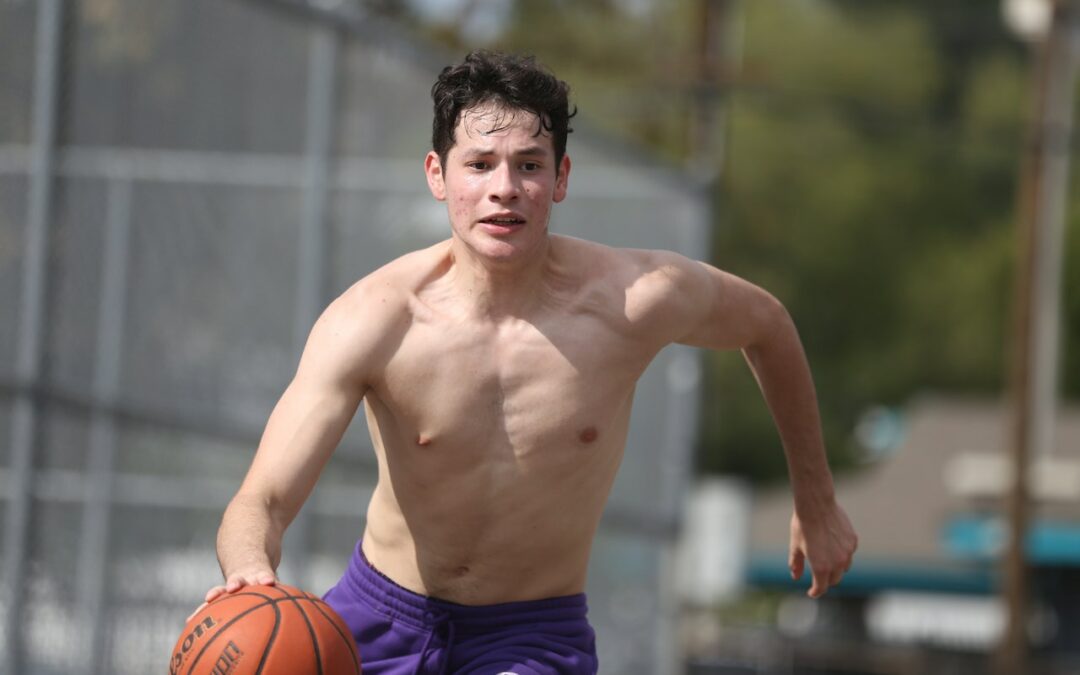
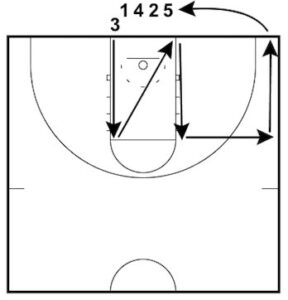 This is a great drill for working on different defensive movements and can be used as a warm-up drill. Players will work on many defensive fundamentals: defensive slides, back-pedalling, close-outs, drop-steps, and sprinting.
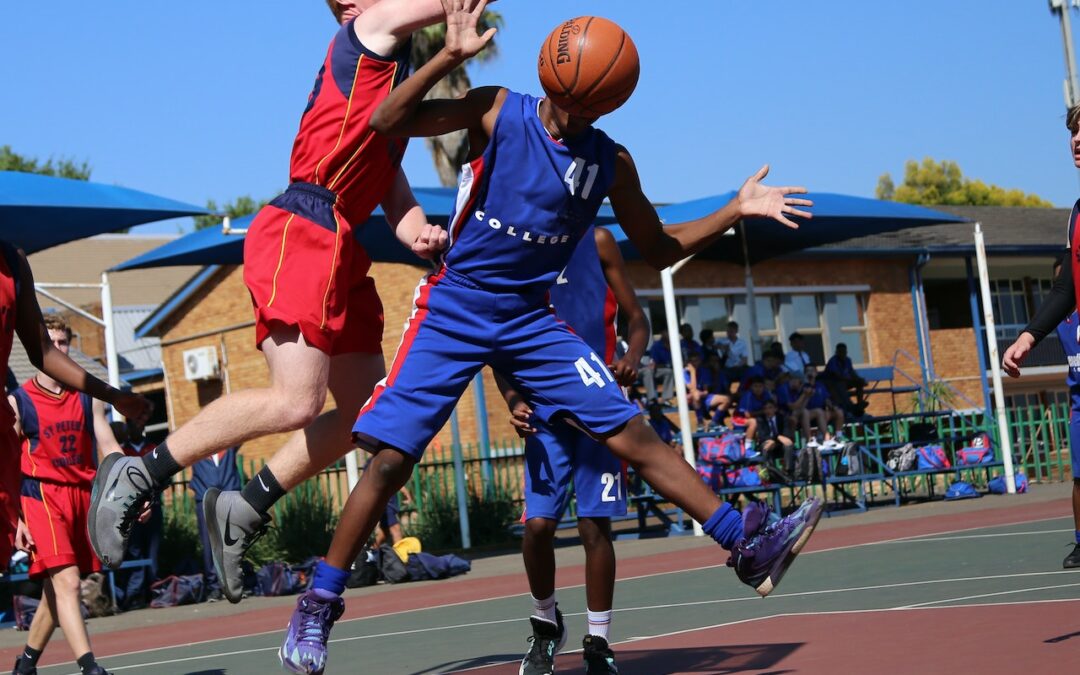
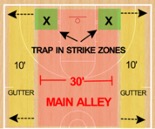 Pin the ball on the sideline
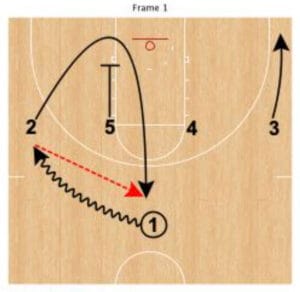 This play begins with using the 1-4 High set.