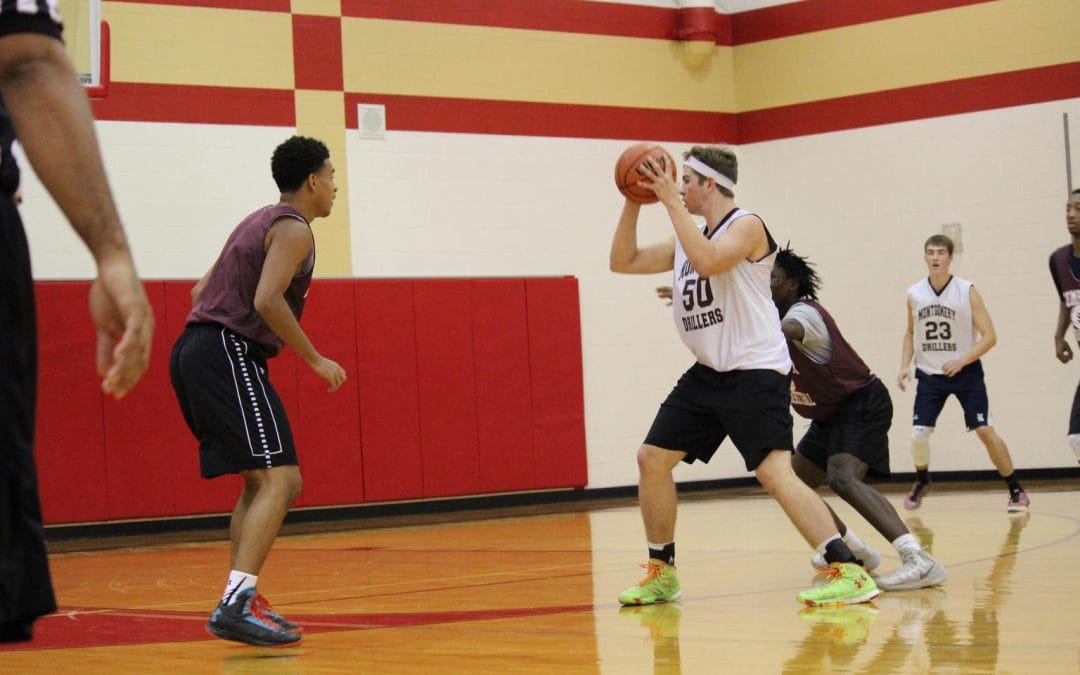
If you want to punish aggressive defenses and create easy scoring opportunities, the back door cut drill needs to be a staple in your practice plan. This simple but powerful concept teaches players how to read defenders, time their cuts, and finish at the rim, skills that translate directly into game situations.
Let’s break down how to teach it effectively and get the most out of your players.
Why the Back Door Cut Drill Matters
The back door cut drill is all about reading defensive pressure. When a defender overplays the passing lane, your offensive player must react instantly, cutting hard to the basket for a high-percentage shot. This drill develops:
Court awareness and basketball IQ
Timing between passer and cutter
Explosive first steps and decisive movement
Finishing ability at the rim
In short, it turns defensive pressure into offensive advantage.
How to Set Up the Back Door Cut Drill
Start simple and emphasize spacing and communication.
Basic Setup:
One passer at the top or wing
One offensive player on the wing
A defender applying pressure (optional at first)
Execution:
The offensive player begins on the wing.
The defender slightly overplays the passing lane.
The offensive player “pins” or steps toward the ball to sell the pass.
Once the defender commits, the player cuts backdoor hard.
The passer delivers a quick, accurate pass “down the line.”
The cutter finishes at the rim.
Key Teaching Points from the Drill
Here are several coaching cues that are critical to success:
1. Read the Overplay
Players must recognize when the defender is denying the pass. That’s the trigger.
“She reads the overplay… she goes backdoor.”
Train your players to react, not think, when they see that pressure.
2. Timing Is Everything
One of the biggest mistakes is cutting too early.
“Too soon, too soon… that’s okay.”
Reinforce patience. The cut should happen after the defender commits.
3. Sell the Initial Action
Players should step toward the ball before cutting.
“You’re getting in the teeth… she’s going slightly up the cut line…”
This small movement forces the defender to lean, creating the backdoor opportunity.
4. Pass on a Line
The passer must deliver the ball quickly and directly.
“You are gonna pass it right down the line.”
No lobs. No hesitation. The pass should lead the cutter to the basket.
5. Cut Hard—No Jogging
Effort matters. Lazy cuts kill the drill.
“You guys gotta cut harder… my grandmother’s guarding that!”
Demand game-speed cuts every rep.
6. Finish with Purpose
Encourage players to finish strong, using either hand when appropriate.
“Drop it off to the left hand…”
This adds realism and builds finishing versatility.
Common Mistakes to Watch For
Even experienced players struggle with this drill if details slip. Watch for:
Cutting too early before the defender commits
Floating passes instead of sharp, direct feeds
Slow or rounded cuts instead of straight-line attacks
Poor spacing that clogs the lane
Correct these immediately to keep the drill sharp and effective.
Progressions to Level Up the Drill
Once your team understands the basics, increase the challenge:
Add live defenders to force real reads
Incorporate a dribble drive before the pass
Add a help defender to simulate game pressure
Track finishes to build accountability
These progressions turn a simple drill into a game-ready skill builder.
Final Thoughts
The back door cut drill is one of the most efficient ways to teach players how to exploit defensive pressure. When executed correctly, it builds chemistry, improves decision-making, and creates easy buckets.
If your team struggles against aggressive defenses, start here. Drill it consistently, demand precision, and you’ll see the results show up on game night.
If you want a strong defensive team, it starts with coaching defensive mindset. Defense isn’t just stance, slides, or rotations. It’s habits, communication, and how players respond when things break down.
In a conversation on the Coaching Youth Hoops podcast, Coach Bill Flitter spoke with former college coach Hannah Howard about what actually creates great defensive teams. Their discussion kept circling back to a few practical ideas youth coaches can use right away.
Coaching Defensive Mindset Starts with Communication
Coach Howard’s first answer to youth coaches was simple: communication. The best defensive teams talk constantly. Players warn teammates about screens, call out cutters, and let each other know when help is coming.
Strong defensive communication usually includes:
All five players talking, not just one leader
Early calls on screens and cuts
Clear, short instructions (“help,” “switch,” “left”)
Teammates coaching each other during possessions
When players communicate well, the defense starts solving problems on the floor without waiting for the coach.
Let Your Defense Fit Your Team
Every roster is different. One team might thrive pressing full court. Another might defend best by protecting the paint. Instead of forcing a system, coaches should ask:
What are our players good at defensively?
Can we pressure the ball, or do we need to contain?
Are we better in man, zone, or a mix of both?
Many strong defensive teams discover their identity during the season. Good coaches stay flexible and lean into what works.
Culture Shows Up in Small Habits
“Culture” gets talked about a lot in sports, but players usually notice it in simple things. Culture is built through daily habits such as: how players enter the gym, whether they are ready when practice starts, body language after mistakes, and how teammates respond to coaching, among other things.
If a coach consistently reinforces these habits, players begin to carry them into games.
Use Adversity as a Teaching Moment
Practice rarely goes perfectly, and that’s actually useful for coaches. When a drill falls apart or players get frustrated, it creates an opportunity to teach. Instead of moving on immediately, coaches can:
Repeat the situation until players solve it
Address poor communication on the spot
Teach players how to support teammates under pressure
Games include plenty of difficult moments. Practice should prepare players for them.
Build Defensive Confidence
Young players sometimes apologize after making mistakes. That usually means they think they disappointed the coach. A better message is simple: mistakes are part of learning.
Players improve when they stay engaged after errors, listen to feedback, and try again on the next possession. Confident defenders recover quickly and keep playing.
Youth Basketball Needs More Development
Coach Howard also noted that youth basketball often prioritizes games over development. Players sometimes compete in dozens of games but spend little time reflecting or improving skills.
Coaches can help by spending more time on fundamentals in practice, creating space for players to reflect after games, and emphasizing improvement instead of just results. Growth happens when players have time to process and learn.
Final Thought
Coaching defensive mindset means teaching players to work together. Communication, accountability, and resilience matter just as much as technique. When a team begins to: talk on defense, help teammates, recover after mistakes, and compete every possession, the defense improves naturally.
And more importantly, players learn habits that last well beyond the season.
If you want to develop better basketball players, the best place to start is with the one-on-one basketball drill. Many coaches jump straight into five-on-five scrimmages, but great player development begins with small-sided games that teach individual responsibility, decision-making, and defensive accountability.
At TeachHoops.com, we believe in building skills step-by-step. Hall-of-Fame coach Steve Collins often emphasizes that basketball is a simple game when broken down properly. By focusing on one-on-one, two-on-two, and three-on-three situations, players learn the core elements of the game that actually show up during real competition.
If you’re looking for a simple but powerful basketball practice drill, this one-on-one progression can help develop both offensive attackers and defensive stoppers.
Why One-on-One Basketball Drills Matter
Many young players can disappear during five-on-five drills. They might stand in the corner, avoid the ball, or rely on stronger teammates to carry the play. That doesn’t happen in one-on-one basketball drills.
When players compete one-on-one:
They can’t hide
They must attack or defend
Their strengths and weaknesses become obvious
Coaches can evaluate players honestly
This is especially useful during basketball tryouts, when coaches need to separate the “haves” from the “have-nots.” A player might survive in a scrimmage, but in a one-on-one setting, their skill level becomes clear. Even at the highest levels of basketball, the game often becomes a two- or three-man game. Teaching players to succeed in these smaller situations prepares them for real game scenarios.
The One-on-One Advantage Drill
This drill is designed to teach offensive aggression and defensive recovery. Setup:
Two lines at half court
One basketball
One offensive player
One defensive player
A chair or marker to create a starting point
The offense begins with a one-step advantage, forcing the defense to react and recover.
Phase 1: Defensive Disadvantage
In the first progression, the defense starts behind the offensive player. The goal for the offense is to attack the basket quickly and finish. For the defense it’s to slow the offensive player down and attempt to get in front.
Key defensive teaching points:
Sprint to recover
Avoid fouling
Get in front of the offensive player
Try to take a charge or force a tough shot
In this phase, the defender is simply trying to recover from a disadvantage.
Phase 2: Even Start
Next, both players begin even with each other. Now the expectations change. The defensive objective becomes clear:
The offense should NOT get a shot in the paint.
This forces defenders to:
Stay in front
Cut off driving lanes
Use proper defensive positioning
If the offensive player reaches the paint for a clean shot, the defense has failed the drill.
Phase 3: Defensive Advantage
In the final progression, the defender starts in front of the offensive player. At this stage, the defender should be in full control. The expectation becomes:
No easy drives
No paint shots
Strong defensive positioning
If the offense scores easily here, it highlights a defensive breakdown that coaches can immediately correct.
Why This Drill Works
This drill works because it mirrors real game situations. Players constantly face scenarios where they must:
Recover defensively
Attack with a slight advantage
Defend an isolation drive
By practicing these situations repeatedly, players build the instincts needed for real competition. The drill also allows coaches to teach critical defensive concepts:
Transition recovery
Getting in front of the ball
Protecting the paint
Defending without fouling
A Great Tool for Basketball Tryouts
One-on-one drills are one of the best ways to evaluate players. In five-on-five scrimmages, weaker players can hide. In one-on-one situations, every player must compete. You quickly learn:
Who can score
Who can defend
Who competes
Who avoids the challenge
This makes the drill extremely valuable during basketball tryouts and early practices.
Final Thoughts
Basketball is a simple game when it’s taught the right way. By using one-on-one basketball drills like this advantage drill, coaches can develop aggressive scorers, disciplined defenders, and smarter players. Small-sided games reveal the truth about your players and accelerate their development.
And when you consistently teach the fundamentals in these situations, the results will show up when it matters most.
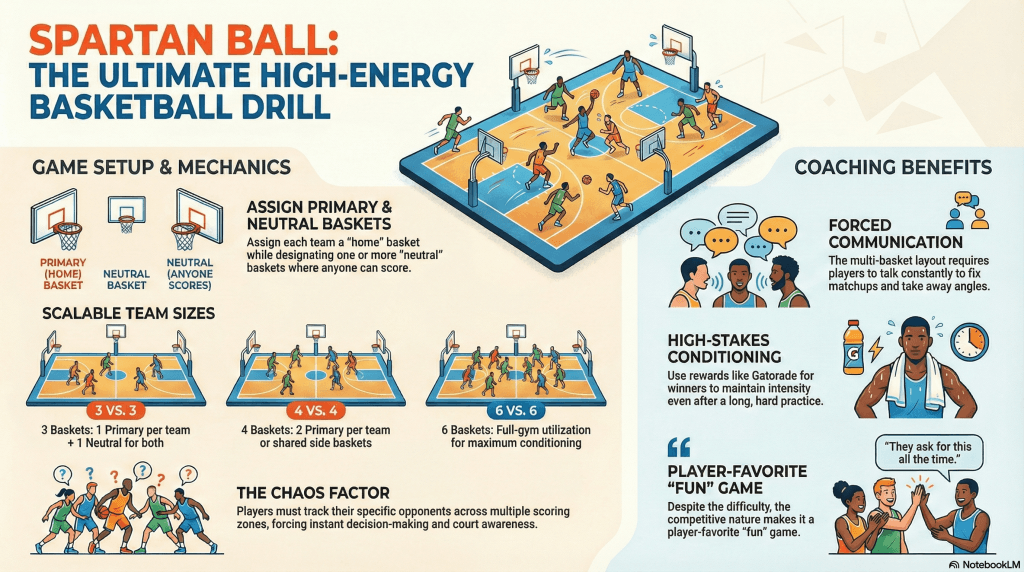
If you are looking for a competitive basketball practice drill that players genuinely enjoy while still building key skills, Spartan Ball is one of the best options you can add to your practice plan. After more than three decades of coaching, including state championships and working with players who reached the professional level, I have learned that practices must combine intensity with engagement. When players compete, communicate, and think on the fly, improvement happens quickly.
Spartan Ball is a fast-paced competitive basketball practice drill that creates chaos in a controlled way. It forces players to communicate, react, and find defensive matchups while the offense looks for scoring opportunities. The drill feels like a game to the players, which is why they constantly ask to play it again after tough practices.
Spartan Ball: A Competitive Basketball Practice Drill Players Love
Spartan Ball is played three on three, but the court setup is what makes it unique. Instead of one offensive direction, teams have multiple baskets available depending on how the drill is organized.
One team begins with the ball after the coach tosses it in. Each team has a primary basket they are supposed to attack. At the same time, there may be additional baskets that either team can use depending on how the drill is structured.
For example:
Blue team attacks one end of the court
White team attacks the opposite end
A middle basket can be used by either team
As soon as the ball is tipped or thrown into play, chaos begins. Players sprint, turn, and communicate as they figure out where the ball is going and who they should guard.
At first it looks disorganized. That is part of the point. Eventually players learn they must talk to each other, identify matchups quickly, and cut off driving angles before the offense finds an easy scoring opportunity.
Why This Competitive Basketball Practice Drill Works
Many drills isolate a single skill. Spartan Ball challenges several skills at the same time, which makes it extremely valuable late in practice when players need to stay engaged.
The biggest benefit is communication. Because the action changes direction quickly, players must talk to teammates to organize their defense. Without communication, open shots appear immediately.
Players also learn how to:
Identify defensive assignments quickly
Take away driving angles
Recover in transition situations
Move without the ball offensively
Another advantage is energy. This drill naturally raises the intensity level because players view it as a game instead of a drill.
After a demanding practice, teams often ask to play Spartan Ball. Many coaches even add a winner’s court element where the winning team stays on the floor while challengers rotate in.
Adjusting the Drill for Your Gym
The flexibility of Spartan Ball makes it easy to run in almost any gym setup. If you only have two baskets, the drill can still work with each team attacking opposite ends. If your gym has side baskets, the drill becomes even more chaotic and competitive.
Some coaches adjust the drill based on the number of baskets available:
Two baskets: standard three on three format
Four baskets: multiple scoring options for both teams
Additional baskets: larger team formats such as four on four
The number of baskets often determines how many players participate at once. One word of caution. If you have six baskets and try six on six, the gym can become complete chaos for this competitive practice drill.
Bringing Competition Into Every Practice
The best practices include moments where players forget they are doing a drill. That is exactly what happens with Spartan Ball. The competitive environment forces players to react, communicate, and compete.
A competitive basketball practice drill like Spartan Ball can break up the structure of practice while still teaching important concepts. It also keeps players mentally engaged when fatigue sets in late in the workout.
If you are searching for drills that combine fun with real player development, Spartan Ball is worth adding to your next practice plan.
Final Thoughts
Great coaches understand that improvement happens when players compete. A well-designed competitive basketball practice drill creates situations where players must think, communicate, and react under pressure. Spartan Ball accomplishes all of those goals while keeping players energized and motivated.
If you want more drills, practice planning strategies, and coaching resources, visit TeachHoops.com. It was built by coaches for coaches who want to get better every day.
If you are searching for basketball press break concepts that translate directly into game success, the key is understanding spacing, timing, and decision making under pressure. Many youth basketball teams struggle against full court pressure because they rely on memorized plays instead of movement concepts. When players understand where to move, how to cut, and how to create space, breaking pressure becomes far more consistent.
This blog post covers practical basketball press break concepts, plus coaching ideas for inbound situations, rebounding principles, and defensive adjustments drawn from real coaching conversations with TeachHoops.com members.
Why Spacing Is the Foundation of Every Press Break
The biggest reason press breaks fail is poor spacing. Players often start too close together, which allows defenders to deny passing lanes and trap quickly. A simple adjustment can help immediately:
Move your bigs closer to half court and give guards more room to operate. When cutters have space to accelerate, defenders must react instead of dictate.
Players know where they are going. Defenders do not. That advantage creates separation.
Let Your Point Guard Inbound Against Heavy Pressure
One of the effective basketball press break concepts is an adjustment against aggressive denial. Have your point guard throw the ball in.
This works because defenders can deny a player on the court more easily than an inbounder. After passing, the point guard can cut off a screen and receive the ball back in motion. It also reduces early traps near the sideline.
Small tactical choices like this often make a major difference against pressure defenses.
A Simple Press Break Concept That Gets Your Best Player the Ball
One of the most reliable basketball press break concepts involves using a big as a release valve near half court. The movement works like this:
Guards begin near the sideline areas
Bigs start higher toward half court
A guard screens to create confusion
A big cuts hard toward the ball
The pass goes to the big
The point guard curls back to receive the return pass
The big is difficult to deny because he is moving downhill. Once the ball is secured, the guard knows exactly where the return pass is coming from. The defender is reacting instead of anticipating.
Using X-Cuts to Beat Denial Pressure
Another strong basketball press break concept is crossing guards off a stationary big near the free throw line area. The tight crossing action creates confusion and forces defenders to communicate quickly.
Spacing is critical. When the court is spread, one of the cutters will usually have an advantage. Even if the first option is denied, the second guard can read space and adjust.
Teaching players to recognize open space is more valuable than teaching a specific route.
End of Game Inbound Strategy for Free Throw Situations
Late game situations require intentional planning, especially when you need the ball in the hands of your best free throw shooter.
A strong approach is to have two players screen for each other while deep players stretch the defense. After screening, the screener rolls back toward the ball. This creates multiple passing options and large space in the backcourt.
The inbounder should always have several reads available. Predictability helps the defense.
A Detail That Improves Sideline Out of Bounds Plays
One adjustment that many coaches overlook is what happens after a player sets a screen.
Screeners should roll back toward the ball after contact. When defenders help on cutters, the screener often becomes open. This also creates another passing lane for the inbounder.
Giving the passer multiple options increases success rates dramatically.
Rebounding Out of a 1-3-1 Alignment
Teams running a 1-3-1 offense often worry about rebounding balance. The solution comes from teaching responsibility based on shot location.
Players opposite the shot should crash hardest. Coaches can teach this by creating a target area near the blocks and emphasizing contact with opponents instead of just chasing the ball.
Rebounding success comes from anticipation and physical positioning.
How to Slow Down a High Scoring Guard
When facing a player capable of scoring 30 or more points, the focus shifts to disruption and fatigue.
Rotating multiple defenders onto that player throughout the game can help. Picking the player up full court forces constant effort. Special defenses such as box and one or diamond and one may also be necessary.
The goal is to reduce efficiency over time by making every possession difficult.
Teaching Players to Move Away From the Ball
Across all situations, one concept appears repeatedly. Players you want open should have teammates moving away from them. This creates misdirection and forces defenders to shift their attention.
Coaches who emphasize movement without the ball see better results against pressure defenses.
Final Thoughts on Basketball Press Break Concepts
The best basketball press break drills focus on decision making, spacing, and timing rather than memorization. When players understand how to create space and anticipate movement, they gain confidence against pressure.
If you want more practice plans, systems, and coaching resources, TeachHoops.com was built for coaches who want to improve and help their players succeed.
If you coach long enough, you know pressure is inevitable. Whether it’s a full-court press, aggressive traps late in games, or opponents trying to speed you up when you’re ahead, your team must be ready to handle chaos. That’s why basketball pressure drills should be a consistent part of your practice plan, not something you only work on before playing a pressing opponent.
In this article, we’ll break down a package of chaos-based drills that simulate real defensive pressure, improve decision-making, and help players stay composed when the game speeds up.
Why Basketball Pressure Drills Must Be Done Year-Round
Many coaches only focus on pressure when they know it’s coming. The reality is:
Players must make decisions while tired and stressed
You also want to prepare for the moments when you need to create pressure defensively.
Another key coaching point: fundamentals don’t always need to come first. Instead of doing pivoting or passing drills at the beginning of practice, you can revisit them after live play, when players understand why those skills matter. Context increases retention.
Drill 1: Two to the Ball (3-on-3)
This is one of the simplest and most effective basketball pressure drills you can run.
Setup:
3-on-3 half court
Every pass triggers two defenders attacking the ball
No defensive safety sitting back
Coaching Points:
Eyes up immediately after catching
Maintain spacing to create passing angles
Attack advantages quickly
Make fast decisions, not perfect ones
This drill simulates aggressive trapping teams even if you don’t have enough athletes to replicate that pressure physically. Run about 30 repetitions for strong learning.
Drill 2: Two to the Ball (4-on-4 Game Version)
Now we add more realism and spacing.
Setup:
4-on-4 live play
Two defenders trap the ball on every pass
Players read and react freely
Why It Works:
Offense learns to create chaos opportunities
Defense practices emergency trapping situations
Players develop instincts instead of memorized patterns
This is excellent preparation for late-game scenarios when you need a turnover quickly.
Drill 3: 4-on-4-on-4 Continuous Pressure
This drill combines conditioning, transition, and decision-making.
Setup:
Three teams of four players (12 total)
One team waiting on opposite end
Continuous play after rebounds or scores
Two defenders always attack the ball
Optional addition:
Teams can pressure in the backcourt until half court
You’ll see mistakes. That’s part of the learning. For example, throwing a pass toward midcourt often leads to a dunk the other way. Those are great teaching moments players remember.
Drill 4: Wild Transition Chaos Drill
This is where basketball pressure drills become truly game-like. Traditional transition drills add defenders after the ball crosses half court. Instead, we create chaos immediately.
Setup:
Transition situation begins
As soon as the shot goes up, an extra defender sprints into the play
Defense attacks aggressively right away
The goal is pure chaos.
Players must:
Keep their head on a swivel
Identify double teams early
Communicate constantly
Make quick reads under pressure
Yes, it will look messy at first. That’s a good thing.
Why Chaos Basketball Pressure Drills Work
Many practices are too controlled and predictable.
Chaos drills develop:
Faster decision-making
Court awareness
Confidence under stress
Offensive spacing instincts
Defensive aggressiveness
Transition recognition
Most importantly, players stop panicking in games because they’ve already experienced chaos in practice.
Final Thoughts
The teams that handle pressure best aren’t always the most talented, they’re the most prepared. By incorporating basketball pressure drills like Two-to-the-Ball, continuous pressure games, and wild transition chaos scenarios, you train players to stay calm and make good decisions when the game speeds up.
If you’re looking for more practice plans, drills, and a complete roadmap to becoming a better coach, make sure you check out TeachHoops.com, built by coaches, for coaches who want to get better.
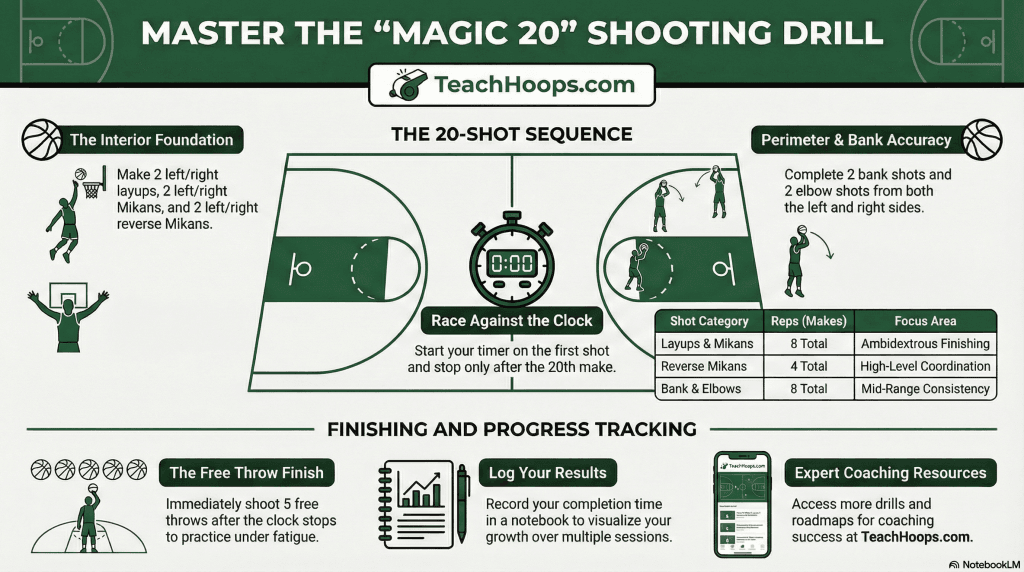
Are you looking for a structured way to improve your finishing and shooting consistency? Whether you are a player looking to level up your game or a coach searching for effective practice plans, the Magic 20 drill is a high-repetition, timed shooting drill designed to sharpen your skills under pressure. This drill focuses on essential shots, from layups to elbow jumpers, requiring you to make every shot before you finish the clock.
What is the Magic 20 Timed Shooting Drill?
The Magic 20 is a timed shooting drill where a player must complete a circuit of 20 made shots. The goal is to finish the circuit as quickly as possible, allowing players to record their times in a notebook and track their improvement over weeks and months.
For younger players or shorter practice segments, you can also run a “Magic 10” version, where you make one of each shot instead of two.
The Magic 20 Shot List
To complete the full Magic 20, you must make two of each of the following shots:
Right-Handed Layups: Don’t just stand under the rim; drive in to simulate game speed.
Left-Handed Layups: Focus on proper footwork and finishing with your off-hand.
Right-Handed Mikan Drill: High-repetition finishing near the rim.
Left-Handed Mikan Drill: Developing touch on the left side.
Reverse Right-Handed Mikans: Improving your ability to finish on the opposite side of the rim.
Reverse Left-Handed Mikans: A great challenge for younger players to develop coordination.
Right-Side Bank Shots: Shoot from approximately 8 to 9 feet out, using the glass.
Left-Side Bank Shots: Mirror the right side to ensure balanced scoring ability.
Right Elbow Shots: Step out to the high post for a mid-range jumper.
Left Elbow Shots: Complete the circuit with shots from the opposite elbow.
How to Run the Drill Successfully
The beauty of the Magic 20 is its simplicity. Here is how to execute it:
Make to Move On: You cannot move to the next shot until you have successfully made the required number of baskets for your current station.
Stay Focused: Because the drill is timed, it forces you to maintain your shooting form even as you get tired.
The Finishing Touch: Once you have completed all 20 shots, head to the charity stripe and shoot five free throws to finish the workout.
Why Track Your Time?
Coach Collins emphasizes the importance of writing down your results. By keeping a record of your best times, you create a “roadmap” for your development. If it takes you four minutes today, your goal should be three minutes and fifty seconds next week. This “beat the clock” mentality simulates the pressure of a real game.
Take Your Coaching to the Next Level
If you found the Magic 20 drill helpful, there are many more resources available to help you become a better basketball coach. From comprehensive practice plans to 1-on-1 mentoring, checking out specialized coaching platforms like TeachHoops.com can provide the tools you need to lead your team to a state title.
If your players shy away from contact in the paint, they’re going to struggle on game night. Finishing through contact is a skill that has to be taught, emphasized, and repped at game speed. This low-post finishing drill does exactly that, forcing offensive players to score while absorbing real, physical pressure from a defender.
It’s simple to run, highly competitive, and translates immediately to live play.
What Is the Finishing Through Contact Drill?
The Finishing through Contact drill is a controlled 1-on-1 low post drill where an offensive player catches near the block and must finish at the rim while a defender applies physical contact. The defender plays straight up, using body and chest, not swiping, to simulate real in-game resistance.
The goal isn’t just to score. The goal is to:
Stay balanced through contact
Finish strong with touch
Keep eyes up and play through bumps
Drill Setup
Setup:
One offensive player on the low block
One defender behind or on the side
Coach or passer on the perimeter
Ball starts with the coach
Execution:
Coach feeds the post.
Defender applies immediate body contact.
Offensive player finishes through the contact.
Rotate after the rep.
You can run this on both blocks simultaneously to keep reps high.
Key Coaching Points for Finishing Through Contact
This drill works best when you’re clear about how players should finish.
Emphasize:
Strong base and wide feet
Chin the ball on the catch
Finish high off the glass
Play through contact, not around it
No bailing out or fading away
Remind players: contact is coming whether they expect it or not. Teach them to welcome it.
Defender Rules (Important)
To keep the drill safe and effective:
Defender plays physical but controlled
No hacking or swiping down
Hands straight up on the finish
Focus on body contact, not blocks
This keeps the drill competitive without turning it into chaos.
Variations to Level It Up
Once players are comfortable, you can add progressions:
Scoring Constraint
Must score with the off-hand
Must use a power finish
Must finish in two seconds or less
Live Rebound Finish
Missed shot stays live
Offense must re-finish through contact
Competitive Scoring
Play to 5 makes
Loser runs or stays on defense
Competition increases toughness fast.
Why This Drill Works
The Finishing through Contact drill:
Builds confidence in the paint
Prepares players for physical defenders
Improves balance and body control
Translates directly to game situations
Develops mental and physical toughness
Players who are comfortable with contact don’t panic when games get physical, they thrive.
Final Coaching Thought
You don’t get tough in games, you get tough in practice. If you want players who can score in traffic, finish through defenders, and embrace physical play, this Finishing through Contact drill needs to be a regular part of your practice plan.
One of the hardest things for players to do defensively isn’t guarding the ball, it’s communicating and matching up when things change. That’s where the Basketball switch drill comes in. This simple, high-impact drill forces players to transition instantly from offense to defense, find a new assignment, and talk through the chaos. Best of all, you can run it with a small group or scale it up to full-court, five-on-five action.
What Is the Basketball Switch Drill?
The Basketball switch drill is a live transition and communication drill where players are forced to switch from offense to defense the moment the coach calls out “switch.” When the command is given, the ball is dropped, players reverse roles, and everyone must find a different player to guard immediately.
The drill creates confusion by design. That confusion is what teaches players to talk, react, and defend under pressure.
How to Set Up the Basketball Switch Drill
Basic Setup (2-on-2 or 3-on-3):
Start in the half court
One ball in play
Offense plays normally until the coach calls “switch”
On “Switch”:
The ball is dropped or kicked aside
Players immediately transition from offense to defense
Each defender must guard a different offensive player
Play continues with a new pass from the coach
This version is perfect for teaching the concept without overwhelming younger or less experienced players.
Progressions and Variations
Once players understand the basics, the Basketball switch drill becomes even more powerful when you scale it up.
Full-Court Version (4-on-4 or 5-on-5)
Two teams are set
On “switch,” the ball is dropped
A coach at half court feeds a new ball
Teams go the opposite direction
If players don’t communicate and match up quickly, it’s an automatic layup for the other team. That consequence reinforces urgency and accountability.
Scoring Variation
Keep score to 7 or 10
Award points for stops
Penalize missed matchups or silent possessions
Competition raises the intensity and keeps players locked in.
Key Coaching Emphasis: Communication
The real purpose of the Basketball switch drill is talking. You can’t play defense in a quiet gym.
Players must:
Call out matchups
Communicate switches
Talk early and loudly
One effective teaching moment is stopping the drill when the gym goes silent. Ask players how they expect to defend in a packed gym if they can’t communicate now. The drill exposes that weakness fast and gives you a way to fix it.
Even at 2-on-2, players struggle. That’s the point. By the time you reach 5-on-5 full court, they’ve built the awareness and communication skills they need to survive defensively.
Final Coaching Tip
Start small. Teach it in the half court. Then layer in chaos. When players can switch, talk, and match up under pressure, your team defense improves across the board, transition defense, help defense, and late-game execution all benefit.
If you’re looking for a simple but demanding shooting workout that builds rhythm, focus, and toughness, the 5-shot drill needs to be in your practice toolbox. This drill is a staple for developing shooters at any level because it combines repetition, accountability, and game-like pressure. All without overcomplicating things.
The beauty of the 5-shot drill is its flexibility. You can scale it up or down depending on age, skill level, and point in the season, making it just as effective for middle school players as it is for varsity athletes.
What Is the 5-Shot Drill?
At its core, the 5-shot drill uses five shooting spots around the floor:
Right corner (baseline)
Right wing
Top of the key
Left wing
Left corner (baseline)
Players shoot from one spot at a time before progressing around the arc. Shots can be mid-range, three-point, or even post-based, depending on your emphasis for the day.
This structure allows players to find their rhythm while constantly resetting their focus as they move from spot to spot—exactly what happens in real games.
How to Run the 5-Shot Drill
Here’s a progression that works extremely well in practice:
Round 1: 5-for-7
The shooter stays at one spot until they make 5 out of 7 shots.
Once they hit the requirement, they move to the next spot.
Continue until all five spots are completed.
This round emphasizes volume shooting and confidence.
Round 2: 3-for-4
Same five spots, but now the shooter must make 3 out of 4 before moving on.
Misses force the player to stay put, creating pressure.
This is where focus starts to matter.
Round 3: 2-for-2 (or More)
Players must make 2 consecutive shots at each spot.
If they miss, the count resets.
For older or more advanced players, increase the demand to 3-for-3, 4-for-4, or even 5-for-5.
Why the 5-Shot Drill Works
The 5-shot drill is more than just “getting shots up.” When run correctly, it builds:
Mental stamina – Players must lock in shot after shot.
Game-speed mechanics – Sprint between spots, square up quickly, and shoot on balance.
Conditioning feedback – Coaches can spot breakdowns in form when legs get heavy.
It’s especially valuable during the mid-season grind, when fatigue starts to affect consistency.
Variations to Increase Difficulty
One of the biggest strengths of the 5-shot drill is how easy it is to modify:
Add shot fakes or pass fakes before every attempt
Require a dribble move into the shot
Use inside-foot pivots or pro turns to square up
Call out shot locations randomly
Track makes on a shooting chart for accountability
Small tweaks keep the drill fresh while maintaining its core purpose.
Partner-Based Accountability
The 5-shot drill is most effective with a rebounder and passer.
The passer should use target hands and call out the shooter’s name.
The shooter focuses on quick, clean catch-and-shoot mechanics.
Coaches can chart results by spot to identify weak areas on the floor.
Over a few weeks, this data-driven approach turns a basic drill into a competitive development tool.
Final Thoughts
The 5-shot drill proves that great shooting workouts don’t need to be complicated. By demanding focus, consistency, and effort, this drill helps build confident shot-makers who can perform under pressure.
Use it daily, adjust the standards as your players improve, and don’t be afraid to challenge them. Simple drills, when done with purpose, create real results.
If you’re looking for more proven drills, practice plans, and coaching resources, make sure you check out TeachHoops.com, built by coaches, for coaches.
If you’re looking for pressure shooting drills that translate directly to game situations, the 3-2-1 Shooting Drill is a must-add to your practice plan. This drill doesn’t just work on mechanics. It forces players to perform while tired, focused, and under pressure. That’s exactly what happens late in games and that’s why pressure shooting drills like this one are so valuable for player development.
Below, I’ll break down how the 3-2-1 Shooting Drill works, why it’s one of my favorite pressure shooting drills, and how you can easily plug it into your next practice.
Why Pressure Shooting Drills Matter
Too many shooting drills reward volume without consequences. In games, shots aren’t taken in a vacuum. There’s fatigue, expectations, and the fear of missing. Pressure shooting drills recreate those moments by attaching consequences to misses and momentum to makes.
The 3-2-1 Shooting Drill does exactly that. Players feel the pressure increase at every stage, and one mistake can send them right back to the beginning. That emotional response? That’s game-like.
How the 3-2-1 Shooting Drill Works
This is a simple setup with powerful results, perfect for individual workouts, small groups, or stations during team practice.
Setup:
Five shooting spots around the perimeter
One shooter
One rebounder
The shooter starts in the corner and progresses through all five spots.
Phase One: Make 3 at Each Spot
The first phase eases players into rhythm while still demanding focus.
The shooter must make three shots at each spot
The shots do not need to be consecutive
Once three makes are recorded at a spot, the shooter moves on
By the time the player finishes all five spots, they’ve made 15 total shots. This phase builds confidence and consistency before the pressure ramps up.
Phase Two: Make 2 in a Row at Each Spot
Now the drill shifts into true pressure shooting drill territory.
The shooter must make two shots in a row at each spot
Misses reset the count at that spot
Once two consecutive makes are completed, the shooter advances
This is where players start to feel it. Consecutive makes demand focus, and misses bring frustration—exactly what happens in games.
Phase Three: Make 5 in a Row Around the Arc
This final phase is where the pressure peaks.
The shooter must make one shot at each of the five spots in a row
That’s five straight makes total
Any miss sends the shooter back to the beginning
There’s no hiding here. Players know what’s on the line, and every shot feels heavier. That’s why this is one of the most effective pressure shooting drills you can run.
Coaching Points for Pressure Shooting Drills
To get the most out of this drill, emphasize:
Game-speed shots (no casual reps)
Next-play mentality after misses
Consistent routines before each shot
You’ll quickly see which players can handle pressure—and which ones need more reps in drills like this.
Why This Is One of My Favorite Pressure Shooting Drills
The 3-2-1 Shooting Drill checks every box:
Simple to teach
No extra equipment
Scales pressure naturally
Builds mental toughness
Most importantly, it prepares players for real moments, not just empty-gym shooting.
If you’re serious about developing confident shooters, pressure shooting drills like this one need to be part of your regular practice routine.
If you want more pressure shooting drills, complete practice plans, and coaching resources built by coaches for coaches, make sure you check out TeachHoops.com. It’s the one-stop shop I built to help you get better every single season.
One of the most overlooked skills in youth basketball is how to play without the ball, especially under pressure. This Full-Court No-Dribble drill is a simple but powerful way to teach players spacing, angles, and decision-making while reinforcing toughness against defensive pressure.
This drill forces players to think the game instead of relying on speed or dribbling. It’s a great fit for youth, middle school, and even high school programs looking to clean up press offense fundamentals.
Why the Full-Court No-Dribble Drill Matters
When players are allowed to dribble, they often default to habits instead of reading the floor. Taking the dribble away:
Offense must advance the ball up the floor using passes only
Objective: Get the ball from baseline to baseline without dribbling, turnovers, or poor spacing.
Coaching Emphasis Points
This drill works best when you are very intentional with your teaching cues.
1. Eliminate Diagonal Cuts
Players naturally want to drift diagonally toward the ball. That shrinks spacing and invites steals.
Coach it hard:
Sprint wide and straight
Fill lanes parallel to the sidelines
Maintain clear passing windows
2. Teach Pass-and-Move Habits
After every pass:
Relocate
Fill open space
Create the next passing angle
Standing still kills this drill.
3. Stress Ball Security Under Pressure
Once defenders are live:
Two-hand, strong passes
No lazy floats
Pass fake → move the defense → deliver
This is where players learn what real pressure feels like.
Progressions to Increase Difficulty
Once players understand the concept, layer in challenges:
Time limit (e.g., 8–10 seconds to cross half court)
Limited catches (no holding longer than 2 seconds)
Score the drill (1 point for success, defense gets a point for a turnover)
Advantage defense (5 offense vs. 6 defenders)
These progressions simulate late-game and press situations without running full sets.
Common Mistakes to Watch For
Players bunching toward the ball
Overpassing instead of advancing
Poor spacing after the first pass
Panicking when trapped near the sideline
Stop the drill early if needed. Teach first, then play.
Why This Drill Belongs in Your Practice Plan
This is a high-return, low-setup drill that fits easily into:
Press offense days
Early-season fundamentals
Practice segments focused on decision-making
Best of all, it translates directly to games. Players who can move the ball without dribbling are far harder to press and far more confident late in games.
Final Thought
Great teams don’t rely on the dribble to solve every problem. They rely on spacing, movement, and smart decisions. The Full-Court No-Dribble drill is a simple way to build all three, while making your players tougher and more composed under pressure.
If you want more drills like this, plus full practice plans and coaching clinics, make sure you’re plugged into TeachHoops.com.
One of the easiest ways to start practice with energy is a short, high-engagement passing drill. This passing warm-up drill is designed to get players moving, talking, and thinking right away, without eating up valuable practice time. The goal is flow, communication, and readiness.
Why This Passing Drill Works
This drill is ideal at the very beginning of practice because it checks multiple boxes at once:
Gets players physically warm in under a minute
Reinforces verbal and non-verbal communication
Encourages constant movement after the pass
Builds focus without over-coaching
Because it’s quick and simple, players can jump right in and start competing against the clock or against themselves.
How to Run the Passing Warm-up Drill
Start with players spread out in a defined space (half court works well).
Begin with two basketballs.
Players pass and immediately move to a new open space.
Every pass should be called out: name, target hand, or simple cues like “ball” or “here.”
The key is continuous motion. No standing. No holding the ball. Pass, move, communicate.
This drill should only last 30–40 seconds at a time. That’s intentional.
Longer than that, and the quality drops. Short bursts keep the pace high and the communication loud. You can always bring it back later in practice if you want another quick reset.
Progression: Add More Basketballs
Once your team gets comfortable:
Move from two balls to three
Eventually build up to four or even five basketballs
More balls force:
Faster decision-making
Better spacing
Clearer communication
If the drill breaks down, that’s okay. Reset, reduce the number of balls, and go again.
Coaching Emphasis
While the drill is running, focus on just a few cues:
“Talk early”
“Move after you pass”
“See the floor”
Avoid stopping the drill to lecture. Let the reps teach.
Final Thought
This passing warm-up drill is simple, fast, and effective. It’s perfect for youth teams and older players alike because it builds habits you want all season: communication, movement, and awareness. Short. Sharp. Purposeful.
If you’re looking for more warm-up ideas, practice structures, and game-ready drills, that’s exactly why TeachHoops.com exists, to help coaches make every minute of practice count.
The 5-man weave drill is one of the most recognizable drills in basketball. Nearly every coach has run it, watched it, or at least debated its value at some point. In youth basketball especially, the drill tends to spark strong opinions. Some coaches swear by it as a fundamental passing warm-up, while others see it as outdated and disconnected from real game situations. Like most things in coaching, the truth sits somewhere in the middle.
This post takes an honest look at the 5-man weave drill, where it falls short, and where it can still make sense when used intentionally.
Why Coaches Question the 5-Man Weave Drill
The biggest criticism of the 5-man weave drill is simple: it is not very game-like. Players rarely pass, cut behind two teammates, and run straight lanes with no defenders during live action. For youth players, this often creates confusion rather than clarity.
Common issues coaches run into include:
Players struggling with the sequence of pass, cut, and spacing
Too much practice time spent explaining instead of playing
Limited transfer to real transition decision-making
At the youth level, where practices may only be an hour long a few days a week, spending 10–15 minutes just teaching the structure of the 5-man weave drill can feel inefficient. Many coaches find they can teach passing, timing, and finishing through more game-relevant drills.
When the 5-Man Weave Drill Can Be Useful
While the 5-man weave drill may not belong in the core of your practice plan, it can still serve a purpose in short, controlled doses. One effective use is as a bridge into live transition play. For example:
Start with a 5-man weave down the court
Flow immediately into 3-on-2 on the way back
Continue into 2-on-1, then 1-on-1
In this setup, the weave is not the focus. It simply gets players moving and naturally creates communication. The passer and shooter become defenders, forcing players to talk, react, and identify who is getting back. The real value comes from the advantage and disadvantage situations that follow.
Used this way, the 5-man weave drill becomes a quick entry point rather than the main event.
Another practical place for the drill is during shortpre-game warmups, especially when you only have half a court.
A simple progression might look like this:
Three-man or 5-man weave into a layup
Coach provides light contact at the rim
The other players space out and shoot perimeter shots
This creates multiple shots at once, keeps players active, and avoids long lines. Again, the drill works because it is brief and purposeful, not because it perfectly mirrors game play.
Game-Like Alternatives Coaches Prefer
Many experienced coaches eventually replace the 5-man weave drill with transition drills that show up directly on film. One example is a pinch-and-tip transition drill, where defenders attack the ball from behind, force turnovers, and immediately flow into numbers advantages going the other way.
These drills emphasize:
Ball pressure from behind
Communication in transition
Finishing under contact
Playing both advantage and disadvantage situations
Unlike the 5-man weave drill, these concepts appear repeatedly in real games and can scale with players as they grow into higher levels of basketball.
The Bottom Line on the 5-Man Weave Drill
The 5-man weave drill is not useless, but it is often overused. It works best as a tool, not a foundation. Short bursts, clear purpose, and quick transitions into live play are where it can still fit.
If a drill eats up valuable practice time without clear game transfer, it is worth rethinking. Youth players benefit most from activities that mirror what they will actually see on the court, now and in the future.
If you are looking for ready-to-use practice plans, game-like drills, and a clear structure for maximizing limited gym time, that is exactly why TeachHoops exists. Everything is organized so you can spend less time guessing and more time coaching.
Coaching is about choosing what matters most. Use the 5-man weave drill wisely, or replace it with something that better serves your players.
When youth coaches talk defense, the conversation usually turns into man versus zone. But there’s another option that often gets overlooked or misunderstood: combination defenses for youth basketball. Used correctly, they can be an effective change-up that disrupts opponents, protects young players, and teaches valuable defensive concepts without overwhelming kids.
The key is understanding when and why to use them, not just copying what you see at higher levels.
Start With Your Mission as a Coach
Before choosing any defense, youth coaches need to be clear about their mission. Are you coaching to win every weekend tournament, or are you focused on long-term player development?
That answer matters. Coaches who prioritize development should lean heavily on man-to-man principles early. Man defense teaches on-ball positioning, help-side awareness, communication, and recovery. Those skills transfer to every level of basketball.
If a youth coach could only pick one defense, man-to-man should be the choice. The principles of man defense translate cleanly into zone concepts later. The reverse is not always true.
Man defense teaches:
On-ball containment and stance
Help line positioning
Communication on screens and cutters
Defensive footwork and balance
Once players understand those ideas, zones and combinations become easier to teach and more effective when used.
Where Combination Defenses Fit In
Combination defenses blend man and zone principles. Common examples include:
The goal is simple: take away the opponent’s best player or two and force others to beat you.
At the youth level, this can be extremely effective in short stretches. Many teams rely heavily on one dominant scorer, often due to size, strength, or skill mismatches. A well-timed combination defense can frustrate that player, disrupt rhythm, and shift momentum.
The key is moderation. Combination defenses are most effective in spurts, not as a full-game solution.
Combination defenses for youth basketball tend to work best when:
One player is clearly dominating the game
The opposing team struggles to adjust or space the floor
You need to change tempo or rhythm
You want to protect players from constant post mismatches
Switching defensive looks forces young players to think, communicate, and adapt. Even a short delay while the offense figures things out can swing a game.
Changing Defenses to Control Rhythm
One underrated benefit of combination defenses is how they slow opponents down. Most teams spend far more practice time preparing for man defense than for zones or hybrids.
Changing defenses mid-game forces the offense to pause, identify matchups, and reorganize. That hesitation alone can lead to rushed shots, poor spacing, or turnovers.
Many coaches use a simple rule like switching defenses after every third score. The goal isn’t confusion for confusion’s sake, but rhythm disruption.
Keep the Teaching Simple
Youth players thrive on clarity. Successful defensive programs rely on simple rules, visual cues, and trigger words. Instead of complex terminology, many coaches use:
Visual spacing rules for help defense
Simple numbers or phrases to reinforce positioning
Clear trapping zones or no-trap areas
This approach keeps players confident and engaged while still executing advanced concepts.
Zone vs. Man Is the Wrong Debate
The real question isn’t man or zone. It’s timing and purpose. Man defense builds habits. Zone and combination defenses provide solutions. When coaches understand both, they can adjust based on opponents, game flow, and player needs.
Combination defenses are not shortcuts. They are tools. When used intentionally and taught clearly, they can help young teams compete while still developing the skills players need long-term.
Final Takeaway
Are combination defenses effective in youth basketball? Yes, when used in the right moments and built on a foundation of man-to-man principles.
Teach man first. Add zone concepts next. Sprinkle in combination defenses when the situation calls for it. That balance gives youth players the best chance to grow, compete, and understand the game at a deeper level.
For coaches looking to explore structured defensive systems, TeachHoops.com offers detailed resources, including proven defensive frameworks designed specifically for youth and high school players.
Teaching defense at the youth level starts with effort, movement, and repetition. A well-designed Youth Basketball closeout drill helps young players learn how to sprint, stop under control, and contest shots without fouling. It also sets the tone early in practice by getting players active and focused right away.
This drill works as a quick warm-up or as a competitive defensive segment later in practice. Either way, it reinforces a simple truth young players need to hear often: defense wins championships.
How the Youth Basketball Closeout Drill Works
Place two or more basketballs on the floor to represent offensive players or shooting spots. On the whistle, defenders sprint to the ball and close out under control. The goal is effort first. Young players don’t need perfect footwork immediately. They need to move, stop their momentum, and stay balanced.
Run the drill for 30 to 40 seconds. Keep it short and intense. This helps players build conditioning while reinforcing proper defensive effort.
Why This Drill Is Great for Youth Players
Youth players often struggle with closeouts because they either run past the shooter or stop too early. This Youth Basketball closeout drill teaches them how to cover ground quickly while staying disciplined.
It also introduces game-like pressure without overwhelming them. As players get tired, they must stay focused and engaged, which mirrors real-game situations late in a half or quarter.
Key Coaching Points to Emphasize
Sprint first, then break down under control
Hands up to contest without jumping into the shooter
Stay low and balanced
Talk on defense and call out the closeout
Keep your teaching cues simple and consistent. Repetition is what builds confidence at this age.
As players improve, you can add layers to the drill:
Require a rebound after each closeout
Add a pass and secondary closeout
Turn it into a stop-to-score challenge
These small progressions help youth players connect practice habits to real games.
Final Thought on this Youth Basketball Closeout Drill
Great youth defenses are built on effort and fundamentals. A consistent Youth Basketball closeout drill gives young players a clear standard for how hard and how smart they must play on defense. Keep it simple, demand effort, and let the habits grow over time.
For more youth basketball drills and practice ideas, TeachHoops is here to help coaches at every level.
The first week of youth basketball practice sets the tone for the entire season. This is when players learn what you value, how hard they’re expected to compete, and what standards matter most. It’s also when coaches have the best opportunity to evaluate skill, effort, and basketball IQ before habits are formed.
Rather than cramming in plays or running long scrimmages, the most effective first week of youth basketball practice focuses on structure, defense, and small-sided games that reveal who can really help your team.
Start With a Plan, Not Just Drills
Before the season begins, map out your calendar. Know how many practices you have before the first game and what absolutely must be introduced early. In youth basketball practice, organization matters just as much as energy, so develop a practice plan. Label each practice and decide:
Even if everything isn’t perfect by the first game, players should at least be familiar with what’s coming.
Emphasize Defense Early in Youth Basketball Practice
During the first week, defense should be the priority. Offense will show itself naturally in games, but defense must be taught, emphasized, and reinforced. In early youth basketball practice sessions, limit offensive instruction and focus on:
This allows you to see which players compete, listen, and adjust.
Warm Up With Purpose
Keep warm-ups simple and efficient. Use this time to get players moving while you handle quick logistics. The faster you can get into meaningful basketball actions, the more you’ll learn.
The goal of the first week of youth basketball practice isn’t conditioning. It’s evaluation and teaching.
One of the best ways to start practice is with closeout drills. Use short, high-rep segments:
Three-line closeouts to emphasize urgency
Two-line closeouts that add one or two dribbles
Focus on balance, bent knees, active hands, and taking away open threes. These habits carry over immediately into games.
From there, move into ball containment drills that force defenders to stay in front and communicate when help is needed. This is one of the clearest ways to separate players who understand team defense from those who don’t.
Use One-on-One With Constraints
One-on-one play is essential in youth basketball practice, but it needs structure. Change the advantage:
Defense starts ahead
Even positioning
Offense starts with the edge
Limit dribbles and rotate matchups often. This shows who can score efficiently, who can defend without fouling, and who adapts when conditions change.
Build With Small-Sided Games
Small-sided games are the backbone of an effective first week of youth basketball practice. Progress through:
2-on-2 with no dribbles to emphasize movement
Add limited dribbles to test decision-making
3-on-3 with constraints
4-on-3 to evaluate spacing and help defense
These games expose strengths and weaknesses quickly. Players can’t hide, and coaches get clear answers.
Don’t Avoid Contact
Include post play and physical matchups, even at the youth level. Controlled contact teaches toughness, balance, and positioning. Simple one-on-one post drills show:
Who fights for position
Who handles contact well
Who stays engaged when tired
These moments matter more than made shots.
Finish With 5-on-5, But Keep Perspective
End practice with short 5-on-5 segments for flow and confidence, but don’t overvalue them. Most evaluation should already be done through small-sided games and defensive work.
In the first week of youth basketball practice, the goal isn’t perfection. It’s clarity.
Why This Approach Works
A well-structured first week of youth basketball practice:
Establishes defensive habits
Encourages communication
Maximizes repetitions
Gives coaches real evaluation data
When you shrink the game, raise the intensity, and emphasize fundamentals, players improve faster and teams come together sooner.
If you want more drills, practice ideas, or one-on-one support, or if you need help installing a shooting workout with your team, explore everything on TeachHoops.com. With a 14-day free trial, one-on-one mentoring, and a library of proven practice tools, it’s one of the best places for coaches who want to take the next step.
If you’ve coached long enough, you know this feeling. The opponent cranks up the pressure, your players get trapped, and suddenly everything you worked on in practice disappears. The problem usually isn’t effort. It’s panic.
Good basketball press breaking is not about memorizing five different plays. It’s about teaching players simple rules that travel from a 1-2-2 to a 1-3-1 to any run-and-jump look they see during the season. When players understand spacing, movement, and decision-making under pressure, traps turn from a problem into an advantage.
Below are the core basketball press breaking principles every team needs when facing aggressive pressure.
1. Start With Rules, Not Plays
The biggest mistake teams make against pressure is trying to out-scheme it. You can’t prepare for every press variation. You can prepare your players to recognize space and make the defense pay.
Press breaking works best when players know:
Where the outlets should be
How many passing options the ball must have
What to do when they feel a double coming
Once those rules are clear, the exact alignment becomes secondary.
2. The Three Passing Lanes Rule
Any time the ball is pressured, the offense must give the ball three passing lanes.
That means:
One outlet behind or safety
One release flashing into space
One deep or diagonal option to stretch the floor
A trap can only take away one or two options. It can never take away three if players are moving with purpose. The key word is moving. Standing and waiting kills press breaking.
Teach your players that if they are being trapped, it’s not a crisis. It’s an opportunity. Someone is open.
3. Breaking the 1-2-2 Halfcourt Trap Without a High Post
Most teams automatically place a player in the high post against a 1-2-2. Against an aggressive trap, that often helps the defense. The middle defender can sit in between passing lanes and play two people at once.
A better solution is to move that player down to the short elbow or short corner on the ball side.
This forces the middle defender to make a real choice:
Stay high and give up a pass behind the trap
Drop down and leave a flasher open
When that decision point exists, the trap breaks itself. The pass behind the trap becomes available, and the defense cannot recover in time.
4. Same Concept vs a 1-3-1 Press
The good news is you don’t need a new system for a 1-3-1. The same principles apply.
In fact, the flash behind the trap is often more open against a 1-3-1. The middle defender is usually a bigger player taught to protect the paint and deny the middle. When a guard flashes behind the trap, that recovery is almost impossible.
Teach your players this clearly. Against pressure, they are not looking to dribble through it. They are looking to move defenders and attack the gaps they create.
5. North-South Passing, Not East-West
One simple rule cleans up a lot of turnovers: Pass north-south, not east-west.
Sideways passes against pressure lead directly to runouts and layups the other way. Vertical passes advance the ball and force defenders to turn their hips. Even if the pass doesn’t lead to a basket, it buys time and space.
This rule should be part of your daily language in practice.
If players are allowed to dribble under pressure in practice, they will rely on it in games. That’s when panic sets in.
One of the fastest ways to teach press breaking habits is a no-dribble rule until the ball crosses the three-point line or half court.
Without the dribble:
Players must cut with urgency
Passing angles improve
Spacing becomes non-negotiable
Players quickly learn that standing still is the same as being guarded.
7. Use the Disadvantage Drill to Eliminate Lazy Cuts
A powerful way to reinforce these ideas is a disadvantage drill.
Set up:
Five offensive players
Six defenders
No dribbling
The only way the offense advances the ball is by cutting hard across the floor and creating new passing lanes. Curl cuts and jogging won’t work. Strong downhill cuts will.
This drill exposes bad habits fast and teaches players how to move with a purpose under pressure.
8. Teaching Bigs Not to Panic When Doubled
Bigs often struggle the most against pressure because they aren’t used to being doubled immediately.
You have to train that moment.
Simulate it:
Throw the ball off the backboard
Have the big secure the rebound
Immediately double them
Teach the big to:
Stay strong with the ball
Use pass fakes above the shoulders
Understand that sometimes the best play is simply protecting the ball
A bad pass out of a double is worse than a held ball. That mindset alone can save multiple possessions.
9. Attack the Trap Mentality
One of the most important cultural shifts you can make is how your team feels about pressure.
When your best player gets trapped, the other four should be excited, not anxious. Traps mean numbers. Numbers mean advantage.
Teach your players:
Three passing lanes
Immediate cuts
Attack once the ball is released
Pressure usually comes from a team that is trying to change momentum. Make them pay for it.
10. Press Breaking Is Built in Practice, Not During the Game
If players haven’t experienced pressure in practice, they won’t handle it in games. Press breaking should not live in one drill at the end of practice.
Build it in:
Early, while legs are fresh
With constraints like no dribbles
With disadvantage situations that force decision-making
The first few drills of practice set the tone. If you value spacing, cutting, and confidence under pressure, your practice should reflect it.
Final Thought
Basketball press breaking is not about surviving pressure. It’s about attacking it with confidence and clarity. When players know the rules, trust their spacing, and move with purpose, aggressive pressure becomes a gift.
Teach principles first. Reps second. Diagrams last. That’s how you turn chaos into control.
If you want more drills, practice ideas, or one-on-one support, or if you need help installing a shooting workout with your team, explore everything on TeachHoops.com. With a 14-day free trial, one-on-one mentoring, and a library of proven practice tools, it’s one of the best places for coaches who want to take the next step.
If Teach Basketball Pressing the Right Way Part 1 explained the why behind pressure, then Part 2 digs into the part every coach cares about most: the actual drills and teaching progressions that make a press work.
This section moves from philosophy to execution, showing you how to build cutting angles, trap timing, scramble rotations, and seamless transitions from press to halfcourt defense. Whether you run man, 2-2-1, or 1-2-1-1, these core drills give your players the habits and communication skills they need to press with purpose.
Core Drills to Teach Basketball Pressing
Here are the bread-and-butter drills these coaches use to build their pressing system.
1. Zigzag (with a twist)
They start zigzag in the middle of the floor, not on the sideline. It gives the offense more space and makes it harder for the defender.
Teaching points:
Force the ball to the outside.
Turn the dribbler at least once or twice.
Vary the tempo:
First trip at 50 percent for footwork and stance.
Second at full speed.
Third trip, allow the offense to beat the defender, and practice sprinting ahead of the ball, getting nose on the ball, and turning it again.
Variations include:
Hands behind the back or holding a towel/tennis balls to emphasize feet and body.
A “help” version where if the defender yells “help” when beaten, the offense must stop and a teammate rotates over. This builds communication and trust.
2. 1-on-1 Cut Drill
This one is used almost every day.
Offense starts halfway between block and free throw line on the left side.
Defense is a step or two ahead, slightly top side.
The offensive player must dribble toward the corner. The defender’s job is to cut them off before they reach the corner, never allow a straight-line middle drive, then recover back to the high shoulder to funnel them down the sideline.
This drill teaches:
No-middle defense.
Trusting the help that will be there later.
Conditioning, since it is basically a 94-foot sprint in a stance.
3. 2-on-1 Cut & Trap
Now you add a second defender to the 1-on-1 cut.
One defender cuts the ball handler.
The second defender arrives to seal the trap.
The biggest mistake you will see and must correct:
The second defender overruns the trap and gets split.
Or both defenders chase from the same angle and give up a straight line.
You want the dribbler cut, the second defender breaking down and sealing the outside hip, and no daylight between them.
4. 2-on-2 “Rugby” Drill
This is where it gets fun.
Rules:
The ball can only be advanced by the dribble, just like running in rugby.
All passes must be backward.
Defenders are still using the cut and trap principles from the previous drills.
Once the offense gets the ball inside the three-point line and kicks it back out, it becomes live 2-on-2 to a finish. This drill:
Teaches spacing and movement under pressure.
Forces the ball handler to make decisions while being cut and bumped.
Shows defenders how to stay in the press, then “seamlessly” get back into halfcourt man.
5. 3-on-3 Rugby
Same concept, now with three attackers and three defenders. You can:
Face guard one player.
Use a “center fielder” in the back.
Emphasize taking away the middle and trapping the sideline.
This builds toward fullcourt man run-and-jump concepts and tests communication as more bodies enter the action.
6. 3-on-4 Halfcourt Rotation Drill
This is a staple for teaching scramble rotations.
Setup:
Three defenders start with their backs to the coach.
Four offensive players are spaced on the perimeter.
Coach throws the ball to any offensive player.
Rules:
On the catch, one defender must take the ball, one must protect the basket, and one must take backside.
Defenders may never guard consecutive passes. If you guard the first pass, you cannot close out on the next one.
This becomes a frenzy drill where the “right” defender is simply the one who gets there first on airtime.
They often run this as a shooting drill, too. For example, if the offense hits two threes before the defense gets three stops, the defense runs.
7. 4-on-4 Fullcourt Rotation
To connect the press to the halfcourt:
Play 4-on-4 fullcourt with press rules.
One offensive and one defensive player must stay in the backcourt until the ball crosses half court so you do not just give away a layup.
You can flow from press into halfcourt man, then immediately go the other way in transition. This helps your players understand that pressing is not a separate sport. It is just an extension of your halfcourt identity.
Pressing Game Management: Fouls, Layups, and Gambles
A few more nuggets from the conversation that matter when you teach basketball pressing:
Fouling negates hustle. There is nothing worse than pressing hard, rotating, and then bailing the ball handler out with a cheap reach.
Can you live with a layup? If you are going to press, you will give some up. You and your staff have to be honest about when that is acceptable and when it is not.
Late-game gambles are dangerous. They referenced Bill Self breaking down film where Duke gambled and gave up a big three late. In the last 10 seconds, solid defense often beats hero steals.
Players think pressing is only fullcourt. You may need a call like “Cheetah” or similar to remind them you can press in the halfcourt too by getting into passing lanes and denying catches.
Conclusion
Teaching a press isn’t about memorizing alignments. It’s about building instincts, communication, and confidence through daily, deliberate reps. The drills in Part 2 give your players a foundation they can rely on when the game speeds up, whether you’re trapping fullcourt or flowing back into halfcourt man.
Start simple, stay consistent, and let the habits stack. Your press will grow with your team.
If you want more drills, practice ideas, or one-on-one support, or if you need help installing a shooting workout with your team, explore everything on TeachHoops.com. With a 14-day free trial, one-on-one mentoring, and a library of proven practice tools, it’s one of the best places for coaches who want to take the next step.
If you want your players to grow into confident, versatile scorers, your practice time has to be intentional. The best basketball practice skill work keeps energy high, touches frequent, and corrections simple. This session highlights how to layer shooting, footwork, ball handling, and finishing into a fast-paced practice that builds real game habits.
This workout models how to develop every player on your roster, whether they’re a guard learning to attack off the bounce or a six-foot post who still needs to shoot from the perimeter to compete at the next level.
Quick-Hop Shooting Series
Practice opens with a jump-turn series built around clean footwork and quick decisions. Everything is off the hop, and players must keep “sticky fingers” as they get into their shot.
Key points include:
Hold the follow-through until the ball returns.
Keep the pace high; players shoot for a number (seven makes), and they run if they miss the target.
This sequence produces a lot of reps in a short window, which is the heart of efficient basketball practice skill work.
One-Step Power Finishes
The practice moves next into a classic drill. Players take one step, power up, keep the ball high off the shoulder, and rebound their own miss. Details matter here:
Eyes stay on the rim or backboard.
Every rep is explosive.
No wasted movement or talking. The pace drives the development.
This segment reinforces strong finishing habits for players of every position.
Inside-Foot Layup Series
Every player must be able to score with both hands, so this drill pushes left-hand and right-hand finishing from the inside foot. Coaches cue pace and physicality. Players lean the shoulder, stay tight to their line, and finish with strength.
This is where you build the layup consistency your team needs when games get tight.
A quick timeout in practice teaches players how to sweep the ball, load the hips, and attack without hesitation. The rip-and-go drill is essential because most players are never explicitly taught the footwork required to beat the first defender.
Points of emphasis:
Low hips and shoulders
Big first step
Cover ground in one bounce
Power hop when finishing
Ball Handling: Inside-Out and Push Dribble
To prepare for pressure, players learn two key moves: the inside-out dribble and the push dribble.
What the drill reinforces:
Get low and shift the defender.
Push the ball out with purpose.
Make your move at the chair (defender) with speed.
Even bigs handle the ball; everyone must be press-ready.
Three-Point Work: Olympic Shooting
“Olympic shooting” is the team’s core perimeter drill. Players communicate, locate perimeter shooters, and chase rebounds with urgency. The group shoots for a target (eight makes in a minute).
Why it works:
Game-like spacing
Game-like tempo
Constant communication
Players learn to relocate and catch ready
Tall players shoot here too. The goal is to develop basketball players, not just positional specialists.
Post Development: Seal-In Series
To balance perimeter skill work, players shift to the block for a one-minute seal-in circuit. The drill includes four post moves:
Jump hook
Up-and-under
High-low option
Strong seal to the target hand
Guards and posts rotate through because toughness, footwork, and leverage matter across the roster.
Competitive One-on-One: Yale Hand Box
Every practice needs live competition. The Yale Hand Box drill forces players to attack, rebound, and block out while the clock runs. The defender can keep scoring until the rebounder secures the ball, so players must fight on every rep.
This is where effort, accountability, and competitive spirit surface. The drill shows coaches exactly what their players are made of.
Fast-Break System: Three-Trips and 21-Second Work
The practice closes with the team’s fast-break system, built on the rule of getting a shot within seven seconds. Players flow into three-trips action:
First option: rack attack
Second option: inside-out
Third option: wing three
If players fail to crash the boards or slow the pace, coaches correct instantly. The standard stays high.
Final Thoughts
This practice is designed for pace, accountability, and repetition. The session offers dozens of touches, lots of “read it and do it” coaching, and clear expectations for how each skill translates to real competition. When your basketball practice skill work is intentional, players learn to play faster, stronger, and smarter.
If you want more drills, practice ideas, or one-on-one support, or if you need help installing a shooting workout with your team, explore everything on TeachHoops.com. With a 14-day free trial, one-on-one mentoring, and a library of proven practice tools, it’s one of the best places for coaches who want to take the next step.
Every coach wants players who can score in multiple ways. Training a true 3-level scorer in youth basketball takes a focused plan, clear teaching points, and consistent reps. This simple progression gives players a chance to build confidence from the three-point line, the mid-range, and the paint while working at a pace that mirrors real game action.
The 3-Level Scoring Progression
This drill guides players through five key shooting spots: corner, wing, top of the key, opposite wing, and opposite corner. At each spot, the player completes three scoring actions that help shape a complete offensive skill set.
At every station, the sequence is the same:
Catch-and-shoot three: The passer delivers the ball to the corner. The player catches cleanly and shoots in rhythm to stretch the defense.
One-dribble pull-up: The second pass triggers a rip-through and a controlled one-dribble mid-range jumper.
Two-dribble floater: The third pass sends the player downhill into the lane for a soft two-dribble floater over an imaginary defender.
Once the player finishes all three shots, they rotate to the next spot and continue around the arc. The pattern builds repetition, rhythm, and shot versatility in a way young players understand.
Becoming a 3-level scorer in youth basketball is about more than making shots. This drill teaches players how to create space, stay balanced, and score in different situations. The catch-and-shoot builds range. The pull-up teaches pace. The floater gives players a way to finish over length without forcing contact.
Coaches appreciate how efficient the drill is and how easy it is to repeat throughout the season. It fits neatly into a short practice segment while still delivering high-value skill work.
Final Thoughts for Coaches
There is nothing better than watching a young player grow into a confident, versatile scorer. If you want more drills, practice ideas, or one-on-one support, or if you need help installing a shooting workout with your team, explore everything on TeachHoops.com. With a 14-day free trial, one-on-one mentoring, and a library of proven practice tools, it’s one of the best places for coaches who want to take the next step.
If you’re looking for a quick, structured way to help your players build confidence from multiple spots on the floor, this five-spot shooting workout is a great place to start. It gives athletes a repeatable routine that works catch-and-shoot threes, off-the-dribble footwork, pull-ups, and free throws in one sequence. You can run it in individual workouts, small-group sessions, or even as a warm-up during practice.
This drill uses five locations: both corners, both wings, and the top of the key. At each spot, the player takes the same five-shot progression before moving on.
The Five-Spot Shooting Workout Sequence
Players attempt five shots in this order:
Catch-and-shoot three The passer feeds the corner and the player steps into a clean catch-and-shoot three.
Escape dribble left into a three On the next pass, the player takes a quick escape dribble left to create space and fires again from deep.
Shot fake, escape dribble right into a three The player sells the shot fake, dribbles right, and hits a three off the bounce.
Pull-up jumper going left Now the player attacks with a one-dribble pull-up moving left for a mid-range shot.
Pull-up jumper going right Finish the sequence with the same pull-up going to the right.
After finishing the fifth shot, the player rotates to the next spot on the floor and repeats the progression.
Once all five locations are complete, the player heads to the line for five free throws. This adds a pressure element and reinforces good habits after fatigue sets in.
Scoring System
If you want to add competition or track improvement over time, score it this way:
Three-point makes: 3 points each
Pull-up jumpers: 2 points each
Free throws: 1 point each
A perfect workout totals 70 points.
Why This Drill Works
This routine mixes game-realistic shot types with movement in both directions, forcing players to develop balanced footwork and consistent mechanics. It also teaches them to shoot out of common actions they’ll see in games: catch-and-shoot, escape dribbles, shot fakes, and quick mid-range counters.
It’s efficient, it scales for all levels, and it gives coaches an easy way to track progress.
If you want more breakdowns like this, or if you need help installing a shooting workout with your team, explore everything on TeachHoops.com. With a 14-day free trial, one-on-one mentoring, and a library of proven practice tools, it’s one of the best places for coaches who want to take the next step.
If your players struggle to get meaningful reps on their own, a 20-minute basketball workout can be a game-changer. This routine comes straight from Coach Collins’ gym and shows how much skill work you can pack into a focused, high-energy session. It works for players of all ages and is perfect for anyone training without a rebounder.
Below is the full breakdown, along with teaching points you can use in practice or send home with your athletes.
https://youtu.be/XDGZIcGA-ts?si=UUFdu2w4SX8QUnqF
1. Form Warm-Up: Perfect Shots (1 minute)
The workout starts with feel and rhythm.
Shoot close-range form shots.
Aim for “no rim” makes.
Gradually move back as consistency improves.
This works like a putting green in golf—just settling into touch before things ramp up.
2. Mid-Range Baseline Series (1 minute)
Players shoot from 8–10 feet on both sides.
Never stay on one side for more than two shots.
Encourage purposeful footwork and soft finishes.
This is especially helpful when working solo because the ball naturally rebounds to the opposite side.
3. Bank Shot Work (1.5 minutes)
Start at 3–4 feet and hit consistent bank shots on both sides.
Why it matters:
It’s a shot players rarely practice.
Angles stay consistent regardless of gym.
It reinforces touch, balance, and vision.
4. Elbow Jumpers (30 seconds)
Quick catch-and-shoot footwork at both elbows.
5. Runners and Floaters (1.5 minutes)
Start at the college arc and attack the lane.
Players should:
Use both hands.
Work off both feet.
Experiment with different angles.
If players make every shot, they aren’t going fast enough. This part should push them outside their comfort zone.
This builds game-speed decision making while limiting unnecessary dribbling.
7. Block Work: Right and Left (1 minute each)
Even guards need this skill set.
Players practice:
Cross-step finishes
Up-and-unders
Fadeaways
Basic post moves using either hand
It also gives players a breather in the middle of the workout when fatigue starts to set in.
8. Baby Hooks (1 minute)
Soft hooks across both blocks.
Not every guard will use this in games, but adding it increases versatility and finishing confidence.
9. One-Dribble Pull-Ups Around the Key (2 minutes)
No fancy moves here—just pure scoring footwork.
This section turns into a conditioning drill as players chase their own rebounds and keep moving.
10. Creative One-Dribble Attacks (1.5 minutes)
Players choose their moves:
Spin jumpers
Hesitations
Crossovers
Fake crossovers
This is the “sandbox” portion of the workout where players experiment without overthinking.
11. Three-Point Shooting (2 minutes)
Shoot at the appropriate line for your level (HS, college, NBA).
The key teaching point: Shoot threes when tired. This simulates real late-game conditions.
12. One-Dribble Stepbacks (1.5 minutes)
Mid-range or deep—player’s choice.
Stepbacks help open the rest of a player’s scoring package because defenders must respect the space created.
13. Pick-and-Roll Simulation (1.5 minutes)
Use a chair, cone, or imaginary screen.
Players should vary:
Angle of attack
Number of dribbles
Finishes
This is where two-dribble attacks show up organically.
14. Deep Three-Pointers (1.5 minutes)
Shoot within your actual range.
If deep threes aren’t realistic, move in.
If they are, challenge yourself when fatigued.
This segment builds both confidence and shot tolerance.
15. Free-Throw Cooldown (goal-based)
Finish with made free throws, not minutes.
Examples:
Make 10 in a row
Make 8 of 10 twice
Make 20 total
Players should shoot them tired. That’s the whole point.
Why This 20-Minute Basketball Workout Works
This routine fits everything a player needs into one tight session: shooting touch, finishing, footwork, ball handling, and conditioning. It’s doable at the park, in an empty gym, or even during off-hours at practice. Players improve fastest when they can work consistently, and this workout makes that easy. Oo rebounder required.
Encourage your athletes to hit this daily, track their makes, and take pride in pushing through fatigue. Over time, you’ll see sharper decision-making, better balance, and more confidence in pressure moments.
If you want more breakdowns like this, or if you need help installing a full court press with your team, explore everything on TeachHoops.com. With a 14-day free trial, one-on-one mentoring, and a library of proven practice tools, it’s one of the best places for coaches who want to take the next step.
If your team struggles to apply ball pressure, rotate with purpose, or protect the paint against quick guards, working in full court press defense drills can transform your defensive identity. Pressing isn’t just about speed. It’s about angles, teamwork, and early help. That’s why the drill in this video breakdown is such a valuable teaching tool for youth and high school coaches.
Before we get to the drill, remember to subscribe to the TeachHoops YouTube channel and explore everything on TeachHoops.com. You’ll get one-on-one mentoring, office hours, and a 14-day free trial that helps coaches level up for less than a dollar a day.
Building the Foundation: Why the Gap Matters in a Full Court Press
Press defenses succeed when players understand help positioning, not just the first on-ball defender. Coach’s demonstration starts with a simple 2-on-2 alignment on the baseline, which reinforces the same rotations you need when teaching how to run a full court press in youth basketball.
Players learn two off-ball concepts:
Denial – jumping into passing lanes to disrupt quick guards
Gap defense – sagging into a support position to stop penetration
Most youth teams don’t have the quickness to deny everything. That’s where gap defense becomes essential. The goal is to force the offense to beat multiple defenders, not just the first one. In a press, this mentality keeps the ball on a string and buys time for the next line of help.
The 2-on-2 Gap Drill
This drill gives players a clear picture of how help defense works under pressure. It’s simple, repeatable, and fits perfectly into a full court press progression.
Setup:
Two offensive players start on the baseline.
Two defenders match up directly.
One defender pressures the ball.
The off-ball defender slides into the “gap,” staying between their man and the ball.
Execution:
The ball handler dribbles from the baseline toward midcourt.
The ball defender applies steady pressure without reaching.
The gap defender sees both man and ball, sliding into support whenever penetration occurs.
If the ball is passed, the gap defender closes out under control, then jumps back into the gap as the action continues.
The emphasis is simple: Be early with help. Stay connected to both players. Make ball pressure feel like a two-on-one.
This mirrors the support responsibility in every full court press. When the first defender is beaten, the next help must already be there.
This drill is the simplest way to train those habits. It teaches players to close out, slide into the gap, and support their teammate before the ball crosses half court. Once they master this, you can add a third defender to simulate trapping, stunts, and run-and-jump rotations.
Bringing It All Together
The gap drill is a great way to teach the early stages of how to run a full court press in youth basketball. It builds confidence, develops communication, and shows players that great team defense starts with great support.
If you want more breakdowns like this, or if you need help installing a full court press with your team, explore everything on TeachHoops.com. With a 14-day free trial, one-on-one mentoring, and a library of proven practice tools, it’s one of the best places for coaches who want to take the next step.