As a veteran youth basketball coach, one of the most crucial aspects of building a successful team is ensuring that your players can score efficiently. One of the best ways to improve your team’s ability to score is through focused shooting drills that replicate in-game scenarios. In this post, we’ll discuss a fantastic shooting drill for scoring that can help your players develop confidence, improve their accuracy, and enhance their competitiveness.
Why a Shooting Drill for Scoring is Essential
In youth basketball, players often lack consistent shooting reps, especially with the rise of shooting machines and less outdoor play. One effective way to combat this is by incorporating a shooting drill for scoring that encourages repetition and healthy competition.
This drill helps players learn how to shoot under pressure, replicate real-game situations, and develop an intuitive understanding of how to score.
The “Up Two” drill is a fun and competitive game that simulates the high-stakes environment of a basketball game. The drill involves players competing head-to-head to score points and outshoot each other.
By introducing this competitive element, you’re not only working on shooting skills but also building mental toughness and focus in your players. This drill can be modified throughout the season to add more challenges as players improve.
Setting Up the Shooting Drill for Scoring
The setup for this shooting drill for scoring is simple, yet highly effective. Begin by dividing the players into two even teams. Have each team line up at the elbow or another shooting spot, depending on the variation of the drill.
The goal is to score points faster than the opposing team. The rules are easy to understand:
The first team to score two points (or three points, if you prefer a more advanced challenge) wins the round.
Both teams shoot at the same time, competing to make their shots and earn points.
If one player makes their shot and the other misses, the shooting team scores one point.
This game-based approach keeps players engaged and encourages them to shoot under pressure. Players enjoy the competitiveness, and it pushes them to perform at their best, which can translate into more efficient scoring in games.
Join the TeachHoops Community
TeachHoops.com offers a unique platform for coaches to share experiences and gain new insights. Learn from others who have navigated similar challenges. It’s an invaluable resource for those looking to:
Modifications to Keep the Shooting Drill for Scoring Fresh
As your players develop their shooting skills, you can increase the difficulty of this drill. Consider moving to the “Up Three” version later in the season for a more challenging experience. The concept remains the same, but the players must now make three successful shots before they can win the round.
Additionally, you can modify the drill to incorporate various types of shots. Players can practice mid-range shots, three-pointers, or even corner shots. This allows you to target different aspects of their shooting game, ensuring they become well-rounded scorers.
One useful modification is to have players focus on specific shooting techniques. For example, you might emphasize the importance of proper form or teach them how to shoot off the dribble. By introducing these small changes, you can tailor the drill to address your team’s unique needs.
Why This Shooting Drill for Scoring Works
The reason why this shooting drill for scoring is so effective lies in its simplicity and competitiveness. First, it’s easy to understand and implement, making it a perfect drill for youth players. Second, the competitive aspect keeps players engaged and motivated to improve their shooting accuracy. Lastly, the drill teaches players how to handle pressure, making them more effective when it matters most in game situations.
As a coach, you can use this drill to break up monotonous practices and bring an element of fun to your training sessions. Players will look forward to it, and you’ll see improvements in their shooting efficiency over time.
Conclusion
If you’re looking for a shooting drill for scoring that encourages both skill development and competitiveness, the “Up Two” drill is an excellent choice. It’s versatile, fun, and can be adapted to suit the needs of your players as they grow and improve. Incorporate this drill into your practice routine, and you’ll see a noticeable difference in your team’s shooting abilities and overall scoring performance.
Let’s face it, shooting is one of the most important skills in basketball, and the more opportunities your players have to practice, the better they’ll become at scoring. Give the shooting drill for scoring a try today and watch your players become more confident, accurate, and competitive on the court.
June and July aren’t just for rest. They’re the most important months for basketball summer skill development. This is the time when players and coaches should focus on improving, not just maintaining.
If you’re still running isolated drills or relying on routines from five years ago, it’s time to update your plan. Summer is where habits are built, shots are refined, and smart decisions get hardwired into players’ games.
Add Decision-Making to Every Summer Drill
Summer workouts shouldn’t look like a layup line or cone gauntlet. Instead, design sessions around decision-making and in-game reads.
Here are a few ideas to build smarter players:
Toss the ball and ask: “Attack baseline or middle?”
Teach players how to read a hedge, switch, or trap on a ball screen.
Use small-sided games that mimic pressure, spacing, and timing issues.
These kinds of drills teach players to react, something isolated reps can’t do.
Basketball Summer Skill Development Must Include Rebounding
Rebounding often gets ignored in offseason workouts, but it needs attention. You don’t need a true center to rebound well, you need urgency, positioning, and consistent reminders.
Build rebounding into your summer development plan by:
Creating drills with consequences (missed box-out = team sprint).
Teaching angles and timing through controlled chaos.
Repeating the phrase: Find, Hit, Get.
Make it part of your culture, not just an afterthought. You don’t need a true center to dominate the glass, just a team that’s committed to it.
Join the TeachHoops Community
TeachHoops.com offers a unique platform for coaches to share experiences and gain new insights. Learn from others who have navigated similar challenges. It’s an invaluable resource for those looking to:
Summer is the best time to refine mechanics, reps, and confidence. But there’s a big difference between being a shooter and being a scorer.
A few summer goals for shooters:
Hit 60% of open threes in an empty gym consistently.
Practice movement shooting, not just spot-ups.
Learn to shoot after contact or closeouts.
Shooting improvement happens in workouts. Scoring shows up when the lights are on. Both start in the summer.
Don’t Forget On-Ball Defense in Your Summer Workouts
Too many coaches overlook ball pressure in their summer sessions. But staying in front of the ball is a skill that can be built—if you prioritize it.
Make sure your basketball summer skill development plan includes:
Lateral quickness drills with resistance or reaction components.
Daily work on closeouts and proper stance.
Reps where defenders must force a player to their weak hand.
Defense wins in the winter, but it’s built in the summer.
Build Game-Like Habits, Not Just Reps
You want players who think fast and adjust in real time. That doesn’t come from doing 100 perfect reps. It comes from 100 imperfect reps under game-like stress.
Here’s what to include in your summer sessions:
Game-speed, game-like reps with variable outcomes.
Partner or group work to simulate pressure.
Drills that include consequences and choices, not just movements.
Basketball summer skill development should feel like practice with a purpose, not a training video.
Final Word: Put in the Time, Build the Habit in Basketball Summer Skill Development
Skill development only works when it’s consistent. Set expectations, track progress, and encourage players to train with intent.
Whether you coach varsity, AAU, or a rising 6th-grade team, use the summer to build habits that translate to wins. And remember: the offseason is where players are made.t practice.
When people think of success on the basketball court, they often picture star players making flashy plays. But experienced coaches know the truth: games are often won or lost by the players beyond the starting five. Your bench matters. If you want consistent wins, you need a second unit that understands your system, executes under pressure, and contributes without disrupting chemistry. That starts with intentional, consistent basketball skill development.
In this post, we’ll break down proven ways to develop your bench into a dependable, game-ready unit. Every tip below is rooted in real coaching experiences and built for practical use with youth teams.
Shift the Focus of Basketball Skill Development
Many new or inexperienced coaches rely on static drills, things like stationary ball handling, one-handed passing, or cone zig-zags. These have value, but they don’t teach players how to think. Game performance is about reactions, not routines. So shift your focus toward decision-based drills. Give players scenarios where they must choose and act quickly.
Start with a “catch-and-react” drill. Have a player catch the ball at the short corner or wing. On the catch, give them 1–2 options: attack baseline or middle. Add a defender. Teach them to scan, decide, and go. From there, layer in additional reads: help defense rotation, post feed, or pull-up. Let the drill evolve based on game situations.
By repeating these reactive moments, players stop thinking and start playing instinctively. And that’s when development becomes game-real.
Use Small-Sided Games for Basketball Skill Development
Want your bench to get better? Let them play. But in controlled, competitive, small-sided settings. Small-sided games (2-on-2, 3-on-3, 4-on-4) speed up learning because they isolate key decision-making moments.
In a 5-on-5 setting, a bench player might go minutes without touching the ball. In a 3-on-3 setting, they’re involved constantly.
Add simple rules to shift the focus. Try 3-on-3 where players must pass within 2 seconds. Or 2-on-2 with no dribbles allowed. These rules force quicker thinking and better spacing. You can even run a 4-on-4 “advantage” game: defense starts with only three players, offense reads and attacks the gap.
Keep scores and rotate teams quickly to maintain pace and energy. Bench players thrive in these formats because they learn how to read defenders, use space, and make fast decisions.
Make Rebounding Part of Basketball Skill Development
Rebounding is often treated as a hustle stat. While effort is critical, it’s also a teachable skill. Especially for youth players, learning how to box out and read angles can be the difference between a rebound and a put-back bucket.
Teach “find, hit, get.” That’s your rebounding sequence. First, locate your assignment. Next, initiate contact. Finally, go get the ball. Simple, clear, and actionable.
One effective drill: position two players, one on the wing, one under the hoop. Toss a shot from the top. When the shot goes up, both players sprint to the ball. The one underneath works on boxing out; the wing player works on attacking the glass. Add consequences if the ball hits the floor. This raises intensity without needing to run extra sprints.
Another option: play 5-on-5 where a missed box-out equals a point for the other team. Now your team connects rebounding with winning.
Join the TeachHoops Community
TeachHoops.com offers a unique platform for coaches to share experiences and gain new insights. Learn from others who have navigated similar challenges. It’s an invaluable resource for those looking to:
Bench players won’t always get touches, but they can earn minutes with defense. And nothing gets a coach’s trust faster than strong on-ball pressure. But players must be taught how to defend, not just told to “stay in front.”
Drill footwork and angles in short bursts. Start with a “mirror drill.” Two players face each other: one on offense, one on defense. The offensive player can shuffle left or right, no ball, no fakes. The defender mirrors their movement. Focus on low hips, active hands, and short steps.
Then layer in a live ball. Let the offensive player attack with one dribble max. Defender focuses on forcing weak-hand drives and keeping their hips square. Rotate pairs every 30 seconds to keep energy high.
Don’t forget to emphasize help defense and recoveries too. Bench players often come in cold. They need to be mentally sharp and positionally aware to contribute defensively.
Every Player Should Learn to Shoot
Not every player will become a scorer, but every player should be able to shoot. It’s the most universal skill in basketball, and it travels to every level. Great shooters space the floor, force closeouts, and give your offense breathing room.
Teach consistent form. Repetition matters here. Require every player to make 50 form shots before practice or after. Use a shooting ladder in workouts: start short, move out, track makes. Teach players that shooting under pressure starts with shooting under control.
Here’s a challenge to give your team: in an empty gym, your shooters should hit 60% from three. If they can’t do that without a defender, they’ll struggle when a defender contests or bumps them. Help players understand that gym shooting and game shooting are not the same, but one builds the other.
Build Skill Through Repetition and Accountability
Skill doesn’t develop through variety alone. It develops through repetition, accountability, and purpose. As the coach, set a tone that the bench must meet the same expectations as the starters.
Start with accountability. If no one boxes out in a drill, stop the action. Explain the mistake. Reset. If your second unit turns the ball over, don’t ignore it. Teach the right choice and run it back.
Use a rotation that gives your bench group specific goals during scrimmages. For example: hold the other team to one shot, move the ball through all five players, or force two turnovers before rotating out. This gives structure and lets players connect effort to results.
Even when you’re not drilling specific skills, your culture is always developing. So make sure your bench players know they’re a vital part of it.
Final Thoughts on Basketball Skill Development
The best way to prepare players for games is by mimicking games. That means creating pressure, enforcing decision-making, and building habits they can rely on when things speed up. Your bench needs reps just like your starters. Let them play, make mistakes, and learn in controlled chaos.
When you focus on basketball skill development that builds thinking players, not just skilled ones, you develop a team that’s deep, confident, and ready for any moment.
If you’re coaching young players, teaching them to shoot in motion and rebound effectively is essential. One simple way to build both skills? Run a basketball shooting rebounding drill that combines conditioning, awareness, and finishing.
This approach develops habits that translate directly to game action. In this post, I’ll break down one of my favorite warm-up drills that blends shooting, movement, and rebounding into a fast-paced, competitive segment.
Why Use this Basketball Shooting Rebounding Drill?
Many young players can knock down shots from a stationary position. That’s not enough. Once defenders apply pressure, or they have to shoot on the move, their percentages drop. A good basketball shooting rebounding drill forces players to adjust. It also builds the kind of hustle habits coaches love.
Even better, you’re training rebounding instincts at the same time. Players are rewarded for following their shots and grabbing misses. As a coach, that’s a two-for-one deal you should take every day.
How This Drill Works
Start with two players—one shooter and one rebounder. After each shot, the shooter must relocate to a new spot. If the shot goes in, the rebounder passes it back out. If it misses, the rebounder puts it back up immediately. This keeps everyone engaged and builds both shooting rhythm and rebounding effort.
Players rotate after about 40 seconds. This keeps the drill competitive and high-energy. The real benefit? It mimics real basketball actions. Shooters learn to move after releasing the ball. Rebounders learn to react quickly and finish around the rim.
Join the TeachHoops Community
TeachHoops.com offers a unique platform for coaches to share experiences and gain new insights. Learn from others who have navigated similar challenges. It’s an invaluable resource for those looking to:
Instruct players not to bring the ball down after a rebound.
Encourage following the shot, especially for weaker shooters.
Keep the pace fast—this is also a conditioning tool.
As the drill progresses, you can expand it. Add cone screens for curl shots. Mix in pull-up jumpers or drives to the rim. Every variation keeps the basketball shooting rebounding drill fresh and challenging.
Why This Drill Matters
This isn’t just about mechanics—it’s about mindset. Players need to understand that every shot is a chance for a second effort. With this drill, they begin to see offensive rebounds as free points. That attitude change can win games.
Plus, your practices become more efficient. You’re covering shooting, rebounding, and conditioning—all in one drill. If you’re new to coaching, this kind of multitasking matters.
Conclusion: A basketball shooting rebounding drill like this builds more than technique. It builds toughness, awareness, and game-ready instincts. Try it at your next practice. Keep it short, intense, and focused. Your players will thank you later.
If you’re a coach looking to keep your players active and improving during the offseason, the Summer Basketball Shooting Drill known as the Magic 20 is a must-add to your training plan. It’s simple, competitive, and helps reinforce strong fundamentals. Better yet, it’s easy to run and track, which is exactly what youth basketball players need during the summer.
In this post, I’ll break down how to run the drill, what skills it develops, and how to make it part of your summer training routine.
Why Use the Magic 20 Summer Basketball Shooting Drill?
First of all, the Magic 20 is a fantastic way to build consistency. Secondly, it encourages accountability through a timed format. In other words, it’s a complete workout in just a few minutes. Players must complete 20 makes, hitting key shots from around the floor.
This Summer Basketball Shooting Drill develops:
Finishing with both hands
Touch around the basket
Bank shot accuracy
Elbow shooting consistency
Pressure free-throw shooting
Most importantly, it builds mental toughness through repetition and time-based pressure.
How to Run the Magic 20 Shooting Drill
Here’s how to set it up:
Start the clock — players will track how long it takes them to make all 20 shots.
Players must make each shot before moving on.
They finish with five free throws after the 20 makes.
The 20 required shots:
2 right-handed layups
2 left-handed layups
2 right-handed Mikan shots
2 left-handed Mikan shots
2 right-handed reverse Mikan shots
2 left-handed reverse Mikan shots
2 right-side bank shots
2 left-side bank shots
2 right elbow jumpers
2 left elbow jumpers
This challenge can be repeated daily. As a result, players can track improvement throughout the summer.
Join the TeachHoops Community
TeachHoops.com offers a unique platform for coaches to share experiences and gain new insights. Learn from others who have navigated similar challenges. It’s an invaluable resource for those looking to:
1. Focus on Form Before Speed Encourage players to focus on footwork, follow-through, and balance first. Speed comes with confidence and repetition.
2. Use Both Hands It’s tempting for younger players to favor one hand. However, this drill demands both sides of the body to be active.
3. Track Progress in a Notebook Have each player log their best times. This keeps them engaged and allows for measurable improvement.
4. Make it Competitive Use leaderboards in practice. For example, post the top three times on the gym wall each week.
5. Don’t Skip the Free Throws Finishing with five free throws simulates late-game pressure. Additionally, it reinforces the importance of free throw shooting when fatigued.
How to Integrate It into Your Summer Program
This Summer Basketball Shooting Drill is a great way to start or end a workout. You can also use it as a station in a skills circuit. Since it doesn’t require defenders or fancy equipment, players can even do it solo at a park or driveway hoop.
Looking for more summer workout ideas? Check out this great youth shooting workout at CoachingYouthHoops.com. And for coaches looking to level up their approach, I recommend the full training library at TeachHoops.com.
Final Thoughts
The offseason isn’t just about rest—it’s about smart reps. This Summer Basketball Shooting Drill gives players a tool to sharpen key skills without burnout. Run it regularly, track progress, and watch your players’ confidence grow shot by shot.
For more drills, mentoring, and complete summer planning resources, visit TeachHoops.com. And don’t forget to subscribe to their YouTube channel for fresh content posted almost daily.
When it comes to player development, consistency is everything. As a veteran youth basketball coach, I’ve seen firsthand how the best shooting drills help players gain confidence and accuracy. That’s why I use this structured daily plan for off-season workouts. It combines warm-ups, repetition, competition, and conditioning. In this post, I’ll break down each drill so you can easily implement them at your next practice.
4 Reasons Why Off-Season Workouts Matter for Youth Basketball Players
The off-season is where real growth happens. During the season, players focus on team systems and game prep. But in the off-season, they can focus on skill development.
Off-season shooting workouts help players:
Refine technique without game pressure
Build muscle memory through repetition
Improve conditioning and stamina
Develop confidence through self-paced progress
Even 30 minutes a day can make a huge difference. The players who improve the most aren’t always the most talented—they’re the most consistent. If you want results, the off-season is the time to commit to the best shooting drills and daily improvement.
Best Shooting Drills – Everyday Drills to Build Great Habits
Start with a 5-minute warm-up to get loose and locked in. Players begin with:
10 form shots from 8 feet
5 form shots from 15 feet
The Flip Series: 10 shots per side (8–20 feet)
Elbow-to-elbow shooting: 10 total shots
Coaching Tip: Encourage players to move with energy. These reps should produce a sweat.
Next is the Make 50 drill:
10 made 3’s from each of 5 core spots (corners, wings, top)
Partner rebounding and tracking
Goal: 80 total shots
This combination is one of the best shooting drills for building rhythm and consistency.
Pick 1 – Repetition Drills
After warm-up, choose one of the following repetition-focused partner drills:
1. 2 Minutes of 3’s Players shoot for 2 minutes, making as many 3’s as possible.
Can’t shoot from the same spot twice in a row
Goal: 20 makes This drill improves focus and shot variety under time pressure.
2. Beat the Pro Players compete against a fictional “pro.”
+1 for each make (no layups)
-2 or -3 for each miss, depending on range
First to 33 points wins Use this to simulate pressure and decision-making.
Both are among the best shooting drills to improve confidence and mental toughness.
Join the TeachHoops Community
TeachHoops.com offers a unique platform for coaches to share experiences and gain new insights. Learn from others who have navigated similar challenges. It’s an invaluable resource for those looking to:
Choose two drills from the list below. These are excellent for simulating in-game stress and physical fatigue.
Best Shooting Drills – Competitions (Partner Required)
Curry Drill
Pick 5 different spots
Keep shooting until you miss 2 in a row
Then move to the next spot
Goal: 100 total shots
Nuggets Drill
5 different spots
Make 3 in a row to move on
Miss 2 in a row = sprint to half court and back
Goal: 45 shots
Bird Drill
5 core spots
Must make 2 in a row to move
Finish with 2-minute timed shooting from top of the key
Goal: 10 made 3’s from the top
Best Shooting Drills – Conditioning (Partner Required)
Knicks Drill
Shoot 5 in a row, sprint to half court
Then shoot 4, sprint again, then 3, etc.
Switch with partner
Goal: 50 total shots
Star Shooting
Shoot in a star pattern across 5 spots
Make 2 in a row at each
Repeat the pattern 5 times
Goal: 30 makes
These drills combine competition, cardio, and shot repetition. They are some of the best shooting drills to simulate game-like fatigue and focus.
Final Thoughts
The key to development is structure. Use this plan to build consistent mechanics and competitive edge in your team. Whether it’s warm-ups or high-intensity competitions, these are the best shooting drills to help youth players thrive.
As a veteran basketball coach, I have seen firsthand the importance of developing solid shooting and dribbling skills in young players. Today, I want to share a highly effective practice method that can elevate your game: the 44 Shooting and Dribbling Drill. This drill not only improves ball handling but also enhances shooting accuracy, making it a must for any youth basketball training regimen.
What is the 44 Shooting and Dribbling Drill?
The 44 Shooting and Dribbling Drill is designed to challenge players by combining dribbling and shooting in a dynamic and engaging way. It involves five key spots on the court where players will dribble for 4 seconds at each spot before executing a series of dribble attacks. This drill helps players develop coordination, speed, and accuracy under pressure.
Setting Up the Drill
Identify Five Spots on the Court:
Select five spots around the court. These can be marked with cones or simply visualized by the player.
Dribble for 4 Seconds:
At each spot, the player will dribble creatively for 4 seconds. This part of the drill encourages ball-handling creativity and control.
Perform Dribble Attacks:
After the 4-second dribble, the player will perform a two-dribble attack with the right hand.
Next, perform a two-dribble attack with the left hand.
Then, execute a one-dribble attack with the right hand.
Finally, complete a one-dribble attack with the left hand.
Repeat at All Spots:
Move to the next spot and repeat the process until all five spots are covered.
Join the TeachHoops Community: Step into Enhanced Coaching
TeachHoops.comoffers a unique platform for coaches to share experiences and gain new insights. Learn from others who have navigated similar challenges. It’s an invaluable resource for those looking to:
Why the 44 Shooting and Dribbling Drill is Effective
This drill is particularly beneficial for youth players as it combines multiple skills into one practice session. Here are some key benefits:
Enhances Ball Handling:
The requirement to dribble for 4 seconds at each spot forces players to handle the ball with confidence and precision.
Improves Shooting Accuracy:
Transitioning from dribbling to shooting helps players get used to shooting under various conditions, improving their overall shooting accuracy.
Builds Game-Like Conditions:
By incorporating dribble attacks, the drill simulates game-like scenarios, preparing players for real-game situations.
Develops Both Hands:
The drill requires using both hands for dribble attacks, ensuring that players develop ambidextrous skills crucial for higher levels of play.
Tips for Coaches and Parents
To maximize the effectiveness of the 44 Shooting and Dribbling Drill, here are some tips:
Encourage Creativity:
Allow players to be creative with their dribbling during the 4-second intervals. This not only makes the drill fun but also improves their overall ball-handling skills.
Focus on Form:
Ensure that players maintain proper shooting form even after dribbling. Good habits during practice lead to better performance during games.
Consistency is Key:
Regular practice of the 44 Shooting and Dribbling Drill will yield the best results. Incorporate this drill into your training sessions consistently.
Positive Reinforcement:
Praise effort and improvement. Building confidence is crucial for young players’ development.
Conclusion
The 44 Shooting and Dribbling Drill is an excellent way to develop essential basketball skills in young players. By focusing on ball handling, shooting, and game-like scenarios, this drill prepares youth players for success on the court. Whether you are a parent helping your child practice or a new coach looking to improve your team’s skills, incorporating this drill into your routine will undoubtedly yield positive results. Remember, consistent practice and a positive attitude go a long way in youth basketball development.
Stay connected and join our community of like-minded coaches at teachhoops.com for more tips and strategies to improve your coaching and help your team succeed!
As a veteran basketball coach, I’ve seen firsthand the transformative power of well-designed drills. In the competitive world of basketball, the ability to perform under pressure is a critical skill that often separates good players from great ones. One drill that stands out for its effectiveness in building both skill and mental toughness is the “pressure shooting drill.” This drill not only challenges players physically but also conditions their minds to handle the intense pressure of game situations.
Whether you’re coaching beginners or seasoned players, incorporating this drill into your training sessions can be a game-changer. Let’s dive into how you can implement the pressure shooting drill and why it’s so beneficial for your team’s development.
Understanding the Pressure Shooting Drill
What is the Pressure Shooting Drill?
The pressure shooting drill is designed to simulate game-like conditions by adding a time constraint and the need for consecutive successful shots. This drill not only hones shooting accuracy but also builds resilience under pressure—a crucial skill for any basketball player.
The concept is simple: players must make two consecutive shots from each of five designated spots on the court within a two-minute timeframe. The catch is that if they miss a shot, they must continue shooting from that spot until they make two in a row.
Step-by-Step Guide to the Pressure Shooting Drill
Setup: Position players at five designated spots around the court. These spots typically include two corners, two wings, and the top of the key. Ensuring that players start from consistent locations helps them develop a sense of spatial awareness and improves their ability to shoot from different parts of the court.
Making Shots: Players must make two consecutive shots from each spot. If they miss, they must continue shooting from that spot until they make two in a row. This requirement adds a layer of difficulty, as players must not only focus on their shooting form but also manage the mental pressure of making consecutive successful shots.
Timing: The drill is timed for two minutes. The goal is to complete all ten successful shots within this timeframe. The time constraint adds an element of urgency, mimicking the pressure of game situations where players must perform under a ticking clock.
Flexibility for Skill Levels: Adjust the distance based on the player’s age and skill level. Younger players can start closer to the basket, which helps them build confidence and ensures proper shooting form. More advanced players should challenge themselves with longer distances, such as three-point range for high school and college athletes.
Competition and Improvement: Encourage players to track their progress and aim to beat their personal best each day. This not only fosters a competitive spirit but also drives continuous improvement. By setting daily goals, players are motivated to push themselves and develop a growth mindset.
Join the TeachHoops Community: Step into Enhanced Coaching
TeachHoops.comoffers a unique platform for coaches to share experiences and gain new insights. Learn from others who have navigated similar challenges. It’s an invaluable resource for those looking to:
Transitioning from understanding the basics to effectively implementing the drill requires some nuanced insights, especially for new and inexperienced coaches.
Start Simple: Begin with shorter distances for younger or less experienced players. This helps build confidence and ensures proper shooting form before increasing the difficulty.
Emphasize Rebounding: Since players must retrieve their own rebounds, it adds an element of conditioning and hustle. Reinforce the importance of quick rebounds and returning to the shooting spot promptly.
Positive Reinforcement: Encourage players consistently, especially when they struggle to make consecutive shots. Highlight effort and incremental improvements to keep morale high.
Use Assistants: If possible, involve assistant coaches or parents to help retrieve balls. This keeps the drill flowing smoothly and maintains the focus on shooting under pressure.
Track Progress: Maintain a visible chart of each player’s progress over time. This not only motivates individual players but also fosters a team culture of continuous improvement.
Conclusion
Incorporating the pressure shooting drill into your regular practice sessions can yield significant improvements in your players’ shooting accuracy and mental toughness. By simulating game-like pressure, this drill prepares them for the high-stakes moments they’ll face in actual games. Remember to adjust the drill to fit the skill level of your players and use it as a tool for fostering a competitive yet supportive team environment. With consistent practice and the right approach, your players will not only become better shooters but also more resilient athletes.
So, coaches, why not give the pressure shooting drill a try in your next practice? You might just find it becomes a staple in your training routine, leading to marked improvements in your team’s performance on the court.
Ray Allen, renowned as one of the greatest shooters in NBA history, exemplified the art of precision and consistency. Over his illustrious 18-year career, Allen amassed over 24,000 points and set the record for the most three-pointers made, a testament to his unparalleled shooting prowess. His dedication to perfecting his craft through relentless practice serves as an inspiration to basketball players and coaches alike. In this post, we’ll explore the Ray Allen shooting drill, a training technique designed to enhance shooting accuracy and speed, crucial for any player aiming to excel in the game.
The Ray Allen shooting drill is named after this legendary shooter to embody his approach to training: relentless practice, precision, and versatility. This drill is particularly valuable for developing players who aspire to shoot with the same consistency and confidence as Allen. By implementing this drill, coaches can instill these qualities in their players, helping them elevate their game to new heights.
The Ray Allen Shooting Drill: Overview
The Ray Allen shooting drill is a highly effective training exercise that focuses on improving a player’s shooting accuracy from various spots on the court. This drill mimics in-game shooting scenarios, requiring players to adapt quickly and maintain their form under pressure. The structure of the drill is simple yet demanding, making it suitable for players at different skill levels.
The drill involves taking a series of shots from five designated positions on the court: the two corners, two wings, and the top of the key. Starting at a close range, players gradually move further back with each successful shot, with the final shot from each spot being a three-pointer. This progressive approach helps players build confidence and consistency as they extend their shooting range.
Key elements of the Ray Allen shooting drill include:
Five Designated Spots: The drill covers the corners, wings, and top of the key, ensuring comprehensive coverage of key shooting areas on the court.
Progressive Shooting: Players start close to the basket and move back step-by-step after each made shot, simulating game-like scenarios where shooters often need to adjust their distance quickly.
Time Constraint: The goal is to make 25 shots within a two-minute timeframe, adding an element of urgency and focus that mirrors the pressure of actual game situations.
Implementing this drill in your practice sessions not only enhances shooting accuracy but also helps players develop a quick release and adaptability, essential traits for any successful shooter. The Ray Allen shooting drill is a testament to the fact that consistent practice and attention to detail can significantly improve a player’s performance on the court.
Join the TeachHoops Community: Step into Enhanced Coaching
TeachHoops.comoffers a unique platform for coaches to share experiences and gain new insights. Learn from others who have navigated similar challenges. It’s an invaluable resource for those looking to:
Setting up the Ray Allen shooting drill is straightforward. Begin by marking five key spots on the court: the corners, wings, and the top of the key. The player starts close to the basket and moves back one step after each made shot. Here’s a step-by-step breakdown:
Start at a close range.
Move back step-by-step after each successful shot.
Final shot at each spot is a three-pointer.
Five spots: corners, wings, and top of the key.
Footwork and Rebounding
Effective footwork is essential in the Ray Allen shooting drill. Players should focus on quick and precise movements to ensure they are always in the optimal shooting position. Rebounding is equally critical; having a dedicated rebounder ensures a continuous flow of shots. Key points include:
Quick execution of fundamentals.
Proper foot placement for balance and accuracy.
Rebounder assists to maintain drill pace.
Passing Focus: Enhancing Team Coordination
A unique aspect of this shooting drill is its dual function as a passing drill. Accurate passing is vital for successful shooting, and this drill emphasizes passing with the weak hand to develop ambidextrous skills. During the drill, ensure players:
Receive passes on time and in rhythm.
Use their weak hand for passing.
Communicate effectively for seamless execution.
Goals and Encouragement: Achieving Excellence
The primary goal of the Ray Allen shooting drill is to make 25 shots within two minutes. This goal challenges players to maintain focus and consistency under time pressure. Encouragement and constructive feedback are crucial during this process. Coaches should:
Set clear goals: 25 shots in 2 minutes.
Encourage players to stay focused and persistent.
Provide continuous feedback to enhance performance.
Conclusion
Incorporating the Ray Allen shooting drill into your training routine can significantly improve your team’s shooting accuracy and overall performance. This drill not only hones individual shooting skills but also fosters team coordination through its integrated passing focus. As you guide your players through this drill, remember to emphasize the importance of footwork, consistent practice, and effective communication. Embrace this drill as a fundamental part of your coaching toolkit and watch your team’s shooting prowess soar.
In the competitive world of basketball, honing your shooting skills can make all the difference. As a veteran basketball coach with over 30 years of experience, I’ve seen firsthand the transformative power of structured practice. Today, I want to introduce you to a highly effective timed shooting workout that I’ve used to develop precision and consistency in my players: the Magic 20 Shooting Drill.
The Magic 20 Timed Shooting Workout Sequence
The Magic 20 Shooting Drill is a comprehensive workout designed to improve various types of shots within a timed framework. Here’s a breakdown of the sequence:
Layups: Two left-handed layups and two right-handed layups.
Mikan Shots: Two right-handed Mikan shots and two left-handed Mikan shots.
Reverse Mikan Shots: Two reverse left-handed Mikan shots and two reverse right-handed Mikan shots.
Bank Shots: Two right-handed bank shots and two left-handed bank shots.
Elbow Shots: Two right-handed elbow shots and two left-handed elbow shots.
The goal is to complete all 20 shots as quickly as possible, making each one before moving on to the next. By timing this drill, players can track their progress and push themselves to improve.
Importance of Proper Shooting Form
Executing each shot with proper form is crucial for success in the Magic 20 Shooting Drill. Proper shooting form ensures that players develop consistent mechanics, which translates to better performance during games. Here are a few key points to remember:
Balance: Maintain a strong base with feet shoulder-width apart.
Hand Position: Place your shooting hand under the ball and your guide hand on the side.
Follow Through: Extend your arm fully and flick your wrist for a proper follow-through.
Focus: Keep your eyes on the target, whether it’s the rim or a specific spot on the backboard.
Emphasizing proper form during each shot helps in building muscle memory and reduces the likelihood of developing bad habits.
Join the TeachHoops Community: Step into Enhanced Coaching
TeachHoops.comoffers a unique platform for coaches to share experiences and gain new insights. Learn from others who have navigated similar challenges. It’s an invaluable resource for those looking to:
Timing yourself during the Magic 20 Shooting Drill is essential for measuring improvement. Here’s how to get the most out of this timed shooting workout:
Record Your Time: Use a stopwatch to track how long it takes to complete all 20 shots.
Track Progress: Maintain a notebook or a digital log to record your times and identify trends over time.
Repeat and Improve: Aim to complete the drill multiple times in a session, striving to beat your previous best time.
Free Throw Practice: After completing the Magic 20, shoot five free throws to simulate game-like pressure and improve your accuracy.
By regularly tracking and aiming to improve your times, players can stay motivated and see tangible progress in their shooting abilities.
Conclusion
The Magic 20 Shooting Drill is an excellent timed shooting workout for basketball players looking to enhance their shooting skills. By focusing on proper form and consistently tracking progress, players can develop the precision and consistency needed to excel on the court. Incorporate this drill into your regular practice routine, and watch as your shooting performance reaches new heights.
For more drills, tips, and a roadmap to becoming a nationally ranked coach, be sure to visit ts.com. Let’s continue to elevate our game, one shot at a time!
As a veteran basketball coach with over 30 years of experience, I’ve come to understand the importance of effective shooting drills in developing well-rounded, skilled players. In this post, I’ll share three valuable shooting drills that I’ve consistently used in my coaching clinics. These drills are designed to improve movement, accuracy, and offensive rebounding skills. Whether you’re a new or inexperienced coach, these valuable shooting drills will help you enhance your team’s performance on the court.
Valuable Shooting Drills #1: Shoot and Relocate
Objective: To improve shooting accuracy while teaching players the importance of movement and offensive rebounding.
Instructions:
Setup: Players start with a ball and a partner (the passer). Position them around the three-point line.
Execution:
The shooter takes a shot from a set position.
Immediately after the shot, the shooter relocates to a different spot on the floor.
If the shot is missed, the shooter retrieves the rebound and shoots again.
If the shot is made, the passer rebounds and passes back to the shooter at the new location.
Rebounding: Emphasize the importance of rebounding every shot, whether it’s made or missed. This teaches players to read the ball and react quickly.
Tips for Coaches:
Encourage constant movement. Players should not stand still after taking a shot.
Correct shooting form and ensure the ball is not brought below chest level to prevent steals from shorter defenders.
Run this drill for 35-40 seconds per player before switching roles.
Joining the TeachHoops Community: A Step Towards Enhanced Coaching
TeachHoops.comoffers a unique platform for coaches to share experiences and gain new insights. Learn from others who have navigated similar challenges. It’s an invaluable resource for those looking to:
Valuable Shooting Drills #2: Screen and Curl Shooting
Objective: To develop shooting skills off the dribble and from screens, simulating game-like situations.
Instructions:
Setup: Place a cone to act as a screen. Position a passer near the top of the key and the shooter near the wing.
Execution:
The shooter starts by moving off the cone (screen) and curling towards the basket.
The passer delivers the ball to the shooter, who then takes a jump shot.
If the shot is missed, the shooter rebounds and takes a follow-up shot.
Variation: Alternate between shooting off the curl, dribbling to the paint, and baseline shots to keep the drill dynamic.
Tips for Coaches:
Teach players the importance of reading the defense when coming off screens.
Discuss different theories on following shots – some players believe every shot will go in, while others should follow their shot to improve rebounding chances.
Encourage quick decision-making and fluid movements.
Valuable Shooting Drills #3: Conditioning and Shooting Combo
Objective: To combine conditioning with shooting practice, ensuring players can perform under fatigue.
Instructions:
Setup: Position a rebounder under the basket and the shooter at the free-throw line.
Execution:
The shooter runs from the free-throw line to the baseline and back.
Upon returning, the shooter receives a pass and takes a 15-foot jump shot.
Repeat this sequence, increasing the number of down-and-back runs each time (e.g., run once, shoot; run twice, shoot; run thrice, shoot).
Ensure the shooter rebounds their own shot if missed and quickly returns to the drill.
Tips for Coaches:
Focus on proper shooting form even when players are tired.
Use this drill to build endurance and simulate game-like conditions where players need to shoot accurately while fatigued.
Adjust the distance as well as number of runs based on the players’ fitness levels.
Conclusion
Incorporating these three shooting drills into your practice sessions will help your players improve their shooting accuracy, movement, and rebounding skills. And remember, consistency and repetition are key. Encourage your players to practice these drills regularly and watch their performance on the court soar. Also, for more coaching tips and resources, visit teachhoops.com and join our community of coaches dedicated to excellence.
In youth basketball coaching, the efficiency of practice is key to developing young players effectively. The challenge lies in creating drills that are both engaging and instructional, optimizing the limited time available for practice. The 4-minute basketball shooting drill I’m about to share is designed to maximize the engagement of young players by keeping them active and focused throughout the session. This drill works well as a quick warm-up or as a regular practice routine to improve shooting accuracy and speed.
The Importance of Proper Shooting Form
Before incorporating any shooting drill into practice, it’s critical to teach players the correct shooting mechanics. Proper form is the cornerstone of good shooting and includes several key components:
Stance: Teach players to position their feet shoulder-width apart with knees slightly bent. This stance provides balance and stability.
Grip: Players should learn to place the shooting hand under the ball and the non-shooting hand on the side as a guide. The fingers should be spread comfortably on the ball.
Alignment: Encourage players to align their elbow directly under the ball with the shooting eye forming a straight line to the hoop, which promotes accuracy.
Follow-Through: Stress the importance of a relaxed wrist and a follow-through where the fingers point downward toward the basket. The saying “cookie jar” is a useful metaphor to teach kids to reach into the jar on the follow-through.
Spending time correcting and refining these techniques during early practices will help young athletes develop muscle memory and increase their shooting consistency over time.
Joining the TeachHoops Community: A Step Towards Enhanced Coaching
TeachHoops.comoffers a unique platform for coaches to share experiences and gain new insights. Learn from others who have navigated similar challenges. It’s an invaluable resource for those looking to:
Practice Breakdown: The 4-Minute Basketball Shooting Drill
This drill is concise and designed to cover several fundamental shooting skills within a short period:
Mid-Range Shots (1 Minute)
Instruct players to begin shooting from various spots within the mid-range area. Use cones or marks to designate specific shooting spots around the key.
This segment should focus on quick, rhythmic shooting with immediate rebounds. Emphasize the importance of maintaining form even when moving fast and fatigued.
Free Throws (1 Minute)
After mid-range shots, players should proceed to the free throw line. This is an excellent opportunity to focus on mental toughness and shooting accuracy.
Coaches should monitor each player’s form and provide feedback, emphasizing the need to replicate their optimal free throw routine each time.
Three-Point Shots (1 Minute)
This segment is for more advanced players or older children. For younger players, adjust the distance to ensure they are not straining to make the shot, which can lead to bad habits.
Focus on maintaining good form from beyond the arc and encourage players to observe the differences in their shooting technique from long range.
Returning to Free Throws (1 Minute)
Revisiting free throws after shooting from the field tests players’ ability to maintain focus and accuracy while tired.
It’s beneficial to have players track their own shots during this drill to encourage personal responsibility and awareness of their performance.
Conclusion: The Value of Efficient Practice
Implementing this 4-minute drill in your practice sessions provides a structured method for players to improve their shooting skills while also enhancing their physical conditioning and mental focus. Encouraging players to track their shots using a simple spreadsheet not only helps in setting goals but also in monitoring improvements over time. This kind of structured, high-intensity practice is crucial for developing competitive skills in young basketball players. As a coach, your ability to provide concise, effective training sessions will greatly influence your team’s development and enthusiasm for the game.
Welcome, basketball enthusiasts and coaches, to an exclusive breakdown of a game-changing basketball shooting drill presented by Coach Shane Hennon from Hennon Workouts. In this article, we’ll delve into the intricacies of the “5-Shot Series Shooting Drill” – a dynamic drill designed to enhance shooting skills and elevate your game.
The 5-Shot Series Shooting Drill: Precision in Every Shot
Coach Shane kicks off the drill in the short corner, seamlessly transitioning to the deep corner, wing, catch and shoot three, and a challenging transition three. The grand finale involves drifting back to the corner, creating a comprehensive series that hones accuracy, agility, and shooting versatility.
Drill Instructions
Short Corner to Deep Corner (Shot 1): Start in the short corner and swiftly move to the deep corner for the first shot. Focus on a quick release and maintain balance throughout the motion.
Deep Corner to Wing (Shot 2): Progress to the wing after the first shot. Emphasize proper footwork and positioning, setting the stage for a fluid shot from the wing.
Catch and Shoot Three (Shot 3): Return to the wing for a catch and shoot three. Develop the ability to execute precise shots under varying conditions, simulating in-game scenarios.
Transition Three (Shot 4): Engage in a transition three, emphasizing speed and accuracy. This shot challenges players to seamlessly move from offense to defense while maintaining shooting precision.
Drifting Back to Corner (Shot 5): Conclude the series by drifting back to the corner for the final shot. This requires adaptability and showcases a player’s ability to maintain accuracy even in challenging situations.
Repeat the 5-Shot Series Shooting Drill for three trips, aiming to make as many shots as possible out of the 15 attempts.
Elevate the 5-Shot Series Shooting Drill Challenge
Why This Drill? The 5-Shot Series is strategically designed to enhance shooting skills from various positions on the court. It promotes quick decision-making, adaptability, and the ability to maintain accuracy under pressure – crucial aspects of a well-rounded player.
Variations to Increase Difficulty:
Time Constraints: Challenge players to complete the series within a specified time frame, simulating game scenarios with shot clocks.
Defensive Pressure: Introduce defensive players to add pressure during catch and shoot situations, enhancing players’ ability to shoot under defensive challenges.
Randomized Order: Mix up the order of shots in each trip, requiring players to stay mentally sharp and adapt to changing circumstances.
Conclusion
Incorporating the 5-Shot Series Shooting Drill into your training regimen can be a game-changer for both players and coaches. By focusing on precision, adaptability, and versatile shooting skills, this drill cultivates the essential qualities of a top-tier basketball player. Elevate your game, master the art of precision, and watch as your shooting proficiency reaches new heights. Don’t forget to subscribe to Coach Shane’s channel and stay tuned for more transformative drills on Hennon Workouts.
All of us, whether on the sidelines or right on the court, love a good challenge. Challenges keep us motivated, push us to improve, and help us set and achieve new goals. In the world of basketball, challenges can come in various forms – defensive challenges, team challenges, and of course, the ever-exciting shooting challenge.
Today, we’re diving deep into the world of shooting challenges and how they can transform not just your shooting skills but your entire game. The highlight of today’s discussion is the incredible 3-6-9-12-15 shooting drill, a favorite of Arkansas women’s basketball coach Mike Neighbors. This drill is not just about putting up shots; it’s about pushing your limits, both physically and mentally. With each round, you’ll take more shots, move across the court, and test your accuracy under pressure.
What to do with Shooting Challenges
All coaches and players love a great challenge. That challenge could be a defensive challenge, a team challenge, or in this day and age a shooting challenge. Coaches can do a variety of things with different a shooting challenge:
1. Post a leaderboard in your locker room
These leaderboards will allow all the players in your program to see now only how they currently rank for the season, but if you have an all-time leaderboard, it could motivate them to get one of the top scorers of all time. This could be a great motivator to keep encouraging your players to get shots up.
2. Discuss strengths and weaknesses with your players
If you have a player that thinks they are a great shooter, have them perform a certain shooting drill that you like. The key to the shooting drills is it must be measurable and something that can be completed fairly quickly.
3. Red-Yellow-Green Light System
Part of the discussion with your players could be the Red-Yellow-Green light system. Some coaches like having a system like this in place to give players a goal/something to shoot for to enhance their shooting opportunities on the court. The premise goes that a player with a Red Light can only shoot closer to the basket, yellow can shoot a 3 if it is in rhythm, and a green light can shooter has the most freedom to take the shots they choose.
3-6-9-12-15 Shooting Challenge
This is where the 3-6-9-12-15 shooting challenge comes into play. This is a great shooting drill from Arkansas women’s basketball coach Mike Neighbors. Players will shoot shots from the top of the key, right wing, and then left wing. There are 5 rounds. In round 1, a total of 3 shots are taken, round 2 a total of 6 shots, and all the way to round 5 with 15 total shots. Players start shooting at the top of the key, then move to the right wing, and then to the left wing.
After each round of 3-6-9-12-15, each player will shoot a free throw too. At the end of the drill, the player will have taken 50 total shots (45 3 point shots and 5 free throws).
Here is the catch though:
After every 3rd shot, the shooter (if they miss) will run around a set of cones on the other end of the court. If they miss 1 shot, they will run around the first cone, miss 2 shots around the second cone, and 3 shots around the 3rd cone.
So that means on the round of 6 shots, they could run around cones twice, 9 shots they could run around cones 3 times, and on and on until they complete the round of 15 shots. The first cone is just over half-court. The 2nd cone is right at the old 5 second line. And the 3rd cone is in the deep corner.
This is a great drill not only to get shot reps up but also for conditioning. We have learned a great score for a high school player is 32 or more. If they are able to make 32 or more in 6:30 or less, they would be in the green light status, 24-31 in the yellow light status, and 23 and below in the red light status.
This is a great drill that we have enjoyed implementing. Be sure to check out the visual that was attached with this article and the attached scorecard.
Appendix A (Scorecard for 3-6-9-12-15 Shooting Challenge)
Name:
Number of Shots
Number of Made Shots
Free Throw
3
6
9
12
15
Time:
Kyle Brasher | Gibson Southern High School
Lady Titans Basketball Coach
If you coach a K-8th grade team, we have hundreds of resources. All laid out in an easy-to-follow, step-by-step system to save you time and money. Check out coachingyouthhoops.com today!
In the world of basketball coaching, we know that nailing those shots is a game-changer. Whether you’re a seasoned coach or just starting out, we’ve got a lineup of the top 5 youth basketball shooting drills that will revolutionize your team’s accuracy and boost their confidence on the court.
Picture this: your players confidently sinking shots from all angles, their form impeccable and their focus unwavering. That’s the power of a well-practiced shooting routine, and that’s exactly what we’re here to help you achieve. We’ve curated a range of dynamic and engaging drills that target everything from catch and shoot finesse to mastering free throws under pressure.
In this blog post, we’ll walk you through the ins and outs of each drill, explaining their rationale, suggesting variations to increase the challenge, and highlighting the coaching points that will ensure your players develop solid shooting fundamentals. Plus, we’ve sprinkled in some invaluable tips on how to adapt these drills to suit different skill levels, keeping your players engaged and eager to improve.
5 Youth Basketball Shooting Drills
As coaches, we know that mastering the art of shooting is crucial for any youth basketball team. So, let’s gear up and explore the five best shooting drills that are not only effective but also fun and engaging for your players. These drills will not only improve their accuracy but also boost their confidence on the court.
1. Catch and Shoot Frenzy
Drill Details: Players form a line on the perimeter, each with a ball. The first player shoots from a designated spot, retrieves their rebound, and passes to the next player. The sequence continues until all players have shot from that spot. Then, rotate to a new spot.
Rationale: This drill develops quick release, shooting under pressure, and efficient footwork when catching and squaring up to the basket.
Variation: Add a defender who lightly contests shots to simulate game situations.
Coaching Points: Emphasize proper hand placement on the ball, balance, and using legs to generate power. Encourage players to focus on form and rhythm.
2. Form Shooting Focus
Drill Details: Players work in pairs, standing close to the hoop. They focus on perfect shooting form – elbow in, wrist locked, follow-through – without the ball touching the rim.
Rationale: Building muscle memory for correct form is crucial for consistent shooting.
Variation: Increase distance gradually and introduce light competition by challenging players to hit a certain number of consecutive shots.
Coaching Points: Stress the importance of consistent form and repetition. Use positive reinforcement to create a routine of proper technique.
3. Around the World
Drill Details: Place markers at various spots around the three-point line. Players take turns shooting from each spot. Once a shot is made, the player moves to the next spot. The goal is to complete the circuit.
Rationale: This drill improves shooting from different angles and distances, simulating various game situations.
Variation: Set a time limit for completing the circuit or require players to make a certain number of shots at each spot.
Coaching Points: Encourage players to focus on using their legs and consistent follow-through. Remind them to adjust their shooting angle based on their position on the court.
4. Partner Passing and Shooting
Drill Details: Players work in pairs, with one player passing and the other shooting. The passer alternates between chest passes, bounce passes, and overhead passes.
Rationale: Teaches players to catch and shoot quickly after receiving a pass, enhancing their overall court awareness.
Variation: Increase the distance between players for longer passes, challenging both passing accuracy and shooting range.
Coaching Points: Emphasize being ready to shoot upon receiving the pass. Highlight the importance of catching in a shooting-ready stance.
5. Free Throw Pressure Cooker
Drill Details: Players shoot a series of free throws with added pressure. For each miss, players must perform a physical activity (e.g., jumping jacks) before attempting the next shot.
Rationale: Simulates the pressure of free throws during a game and helps players focus under stress.
Variation: Increase the number of physical activities for consecutive misses to up the challenge.
Coaching Points: Discuss maintaining focus and concentration despite distractions. Remind players to take a deep breath and execute their routine before each shot.
There you have it – five engaging and effective shooting drills to elevate your youth basketball team’s shooting prowess. Remember, practice makes perfect, so integrate these drills into your training sessions and watch your players’ shooting skills skyrocket. Let’s turn those misses into swishes and create a team of confident, accurate shooters!
If you coach a K-8th grade team, we have hundreds of resources. All laid out in an easy-to-follow, step-by-step system to save you time and money. Check out coachingyouthhoops.com today!
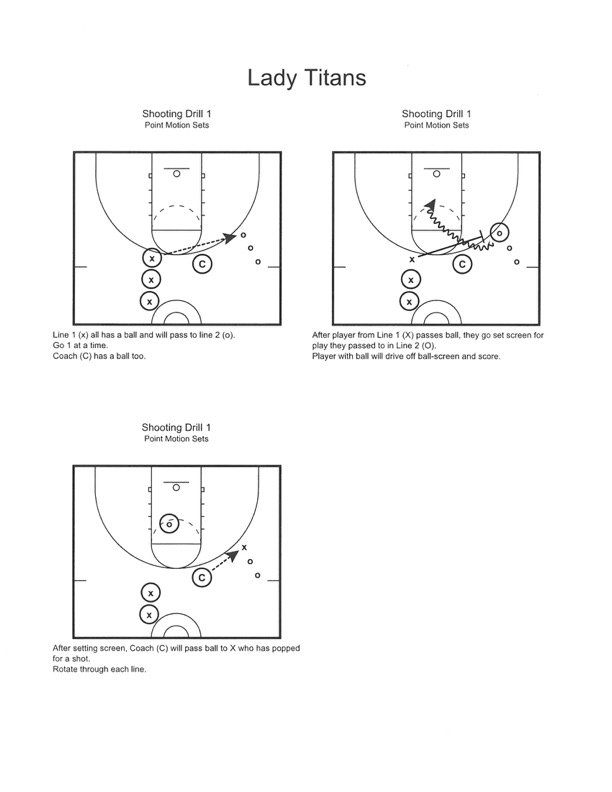
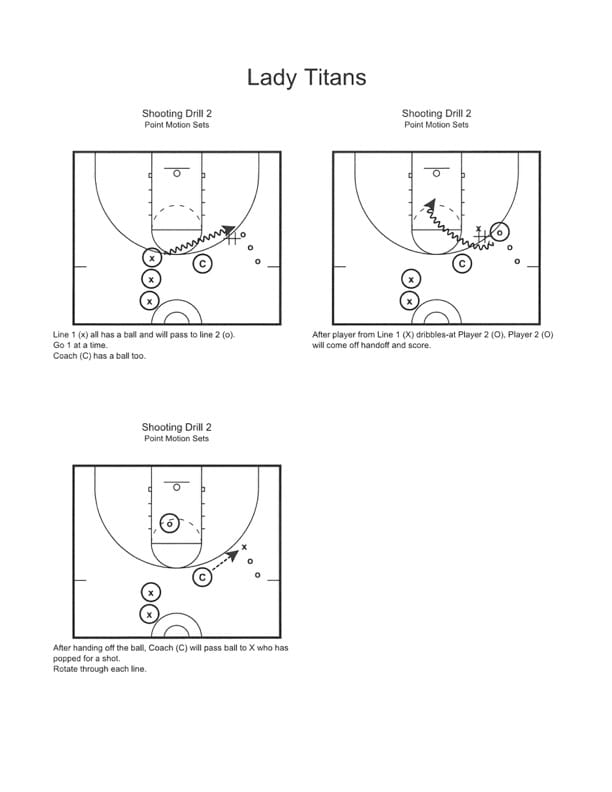
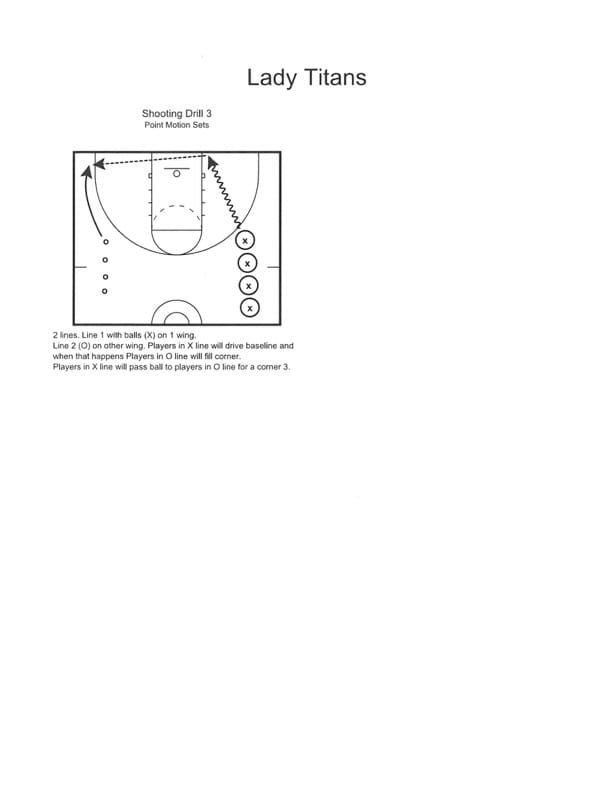
Last month’s article dealt with the installation of various Point Motion sets. What I want to focus on in this month’s article are some drills to help install and get your players shots out of these various looks. We all know that as coaches we want todevelop the needed muscle memory, footwork, and confidence from the spots on the court where the shots will come from.
Below I will describe 3 different shooting drills with diagrams attached to help get shots for players in the spots they will shoot from.
Point Motion Shooting Drills
Drill 1: Need 2 lines. 1 line in the left pinch area where the 5 will usually receive the ball and a line on the right wing. You also need a coach/manager in the right pinch area with a ball.
The line of players with a ball will pass their ball to the right wing and immediately set a ball screen. The player on the right wing will receive the ball and drive for a layup. The player that sets the screen will pop and receive a pass from the coach/manager for a shot.
Switch lines after each rep to work both actions.
Drill 2: Same setup as Drill 1. The ball line will dribble and do a handoff with the other line. The lin without the ball to start will take that handoff and drive for a layup.
After the handoff, the player that started with the ball and shape up for a shot attempt from a pass from the coach/manager.
Switch lines after each rep to work both actions.
Drill 3: This drill needs 2 lines, 1 on the right wing and 1 on the left wing. The line on the right wing will start with balls. They will drive down to the baseline, attacking the paint. The other line will move from the left wing to the left corner.
Once the player with the ball gets to the baseline area, they will hit their teammate in the opposite corner. The player willreceive the pass in the left corner and take a shot.
Switch lines after each rep to work both actions.
Kyle Brasher | Gibson Southern High School
Lady Titans Basketball Coach
If you coach a K-8th grade team, we have hundreds of resources. All laid out in an easy-to-follow, step-by-step system to save you time and money. Check out coachingyouthhoops.com today!
Incorporating the right basketball drills for kids makes all the difference for coaches at the youth level. Coaches need to gauge the skill and talent they’re working with, instituting a practice plan to maximize the growth of these young players. Developing specific basketball skills early sets both the player and the team up for success, so picking the best basic shooting drills for kids can be a good place to start.
Finding the right balance for your practice is key. You want your players to practice hard, hone their skills, and become better basketball players. But you also want them to have fun. Coaching at the youth level takes plenty of patience and positivity. You’ll need to incorporate a fast pace and keep your players occupied and engaged, especially during potentially monotonous skill development drills. Developing focus and fun at practice remains an integral effort for coaches at the youth level of the game.
While there’s no magic formula for practice planning or picking drills, leaning on your experience as a head coach often shows the right path for your players. Here’s a look a some of the best basic passing drills for kids.
Proper Shooting Form
It’s important for young players to learn the proper shooting form early so as to not develop bad habits that can be hard to break. Although the kids will want to start shooting immediately, coaches must make them understand chucking the ball does more harm than good. And becoming a great shooter isn’t an easy thing to do!
A good approach to teaching shooting form involves the nemonic “BEEF.” Beef stands for Balance, Elbow, Eyes, Follow Through.
Balance often refers to a shooter’s stance. While there’s no specific stance to teach, generally the feet should be about shoulder-width apart, turned slightly, with the lead foot forward a bit and knees bent. For Eyes, shooters should look in the direction of the rim. While there’s no one spot that must be taught, players can focus on the rim.
The shooter’s elbow remains the key to a shot’s accuracy. Players should try to set the shooting eye, the shooting hand and elbow, and the rim all on the same line. The shooting motion involves the hand and elbow getting under the ball, making an up and out motion. Make sure the elbow doesn’t flare out. Once set, the wrist should hinge at an angle with the forearm.
Follow Through is the release. The shooter should snap their wrist as the ball is released at the same time the elbow is fully extended. The ball should roll off the index and middle fingers to produce a backspin. Shooters should keep their arm extended and not let the off-hand push the ball at an angle on release.
Remember, this shooting method is designed to simplify the approach for inexperience players and kids just coming to the game. It’s not something to teach to more experienced players since it doesn’t address the nuances of great shooting.
Basic Shooting Drills for Kids
Teaching the proper shooting fundamentals remains integral for coaches at the youth level of basketball. Here are some of the best basic shooting drills for kids to help in that process.
Form Shooting
To practice the basic shooting form, kids can participate in this drill with a partner or a group of three. Form shooting allows the players to practice not only the right way to shoot, but also develop concentration. This drill remains ideal for coaches in a station setting.
Shooters begin at a given spot on the floor, depending on their strength, ability, and perhaps position. The shooter should assume the proper stance (hands up, knees bent, feet set) and await a pass. The player catches the pass and comes up shooting. Each player should take 10 shots before progressing to another spot. After another 10 attempts, the player moves to a third spot.
This drill works as a good warm-up before practice, or as part of a larger station rotation for coaches. Stress to each player the need to use the proper form, practicing each element to develop that muscle memory.
Step-Back Shooting
Another one of the valuable basic drills for kids is step-back shooting. This exercise helps players develop and improve their shooting touch with each repetition.
Shooters begin directly in front of the rim for this drill. Players should start low with the ball and arc the shot up over the rim, finishing high with the release. Shooters need to hold their form until the ball passes through the net, taking five shots in total. After the last make, the shooter should step back one and make another five shots. The shooter continues until they reach the foul line.
This drill provides direct reinforcement of the basic shooting form kids should learn. Coaches should stress hand and finger placement, as well as the motion of the elbow, as part of their instruction.
Knockout
A fun competitive game to incorporate into your practices is knockout. This enjoyable shooting drill provides kids the opportunity to learn proper form while under pressure and with a heightened sense of urgency.
Players line up in single-file at the free throw line. The first two players in line have a ball and the drill begins with the first shot attempt. If the first shooter makes his free throw, he retrieves the ball and passes to the next person in line. Then he joins the back of the line. If he missed his shot, he must grab the rebound and make a layup before the next shooter makes their attempt. Should the first shooter can make a layup before the second player scores, he’s still in the game. If the second shooter makes a shot before, the first player is eliminated.
Each time a player takes and misses a shot, the next player in line shoots to try to knock them out. Hence the name of the game. The drill continues until only one player remains, the winner.
There are several points of emphasis for this drill. Each player should maintain proper mechanics and form when shooting. Keep your head up and be aware of other players. Coaches can also stress form with layup attempts and return passes.
We also know that you can’t just waltz into a gym and tell your players to shoot some shots and call it a day. You can’t just yell “GAME SPEED” and expect them to always push themselves; you need to develop drills and put them in situations where players will compete against each other. Coach has you covered here with his 3-2-1 basketball shooting drill.
For Free Basketball drills, videos, practice plans and much more CLICK HERE
Basketball Shooting Drill
Do you have a kid(s) or a team that just loves to shoot? If you’re reading this either yes is your answer… or the answer is no it is because YOU love to shoot! Everybody in the game now knows how important shooting is; we’re entering a new “space and pace” era of basketball where the trend is to be able to attack the rim and finish or kick to an open shooter. 1-5 players today are expected to be able to hit open 15+ footers.
There always seems to be 5 spots around the perimeter that you can expect to shoot from: corner 3s (the big NBA shot), wings and top of the key. Coach has these covered with this basketball shooting drill.
Three makes (any amount of shots) all the way around for 15 makes. Then, the shooter has to hit two consecutive from those same 5 spots. This will amount to 10 makes. The following time through, the shooter has to make 1 from all the spots. Without missing. That’s 5 straight, 1 from each of the 5 spots.
Reps and Focus
How does this help? Of course, it allows you to get up (probably) a lot of shots in a short amount of time. It forces a shooter to focus, to forget about the last miss, build that mental toughness that is required to win games and compete in life.
This drill is not an easy drill to just start off your players with unless you want them to see how much they need to improve! I wouldn’t, obviously, use this as a team drill but it can be great for individual workouts. Players will get fatigued, salty, and frustrated at times; that’s why a coach should love it!
Modifying the Drill
If you like the concept of this drill but aren’t there yet, you can surely modify it. You can modify the distance to develop range and/or confidence in a shooter.
If you have a big, why not go short corners, elbows, and FT line? Those are shots bigs often get in most offensive systems or against zones.
Shooters aren’t good enough (yet)? No need to change any of the first 3 makes from each spot. I don’t think you should change the two in a row either, but the final 5 makes? If your shooter isn’t at that spot yet, why not give them a “2nd opportunity.” IE: Shooter makes 1st 3 from corner, moves to wing and misses. Give the shooter another opportunity to make the 3; if they make it. Move on. Miss? Start over.
Overall, another great drill with so much individual focus to build range, confidence, perseverance, and that gritty knockdown mentality that shooters need to excel in the game before, now, and as long as it is played.
For Free Basketball drills, videos, practice plans and much more CLICK HERE
Year after year, the NBA Playoffs offer us all a front row seat to the game of basketball being played at it’s highest level. However, even the top seeded teams can often fall short of that level when it comes to playing with maximum effort. In any given game, most NBA Teams can be trusted to play their hardest, but in a “best of 7” series, there are far more opportunities for human nature to sink in. Following a loss, the most common NBA Playoff Team adjustment is usually not schematic, but simply to play with more energy and determination.
Coaches have used several different buzz words over the years to describe either how an abundance of effort led to victory, or how a lack of effort led to defeat. In the past, the most frequently used buzz word was “desperation”, which has graced the narrative of many post-game press conferences and off-day interviews. However, in 2018, the new buzz word appears to be “force”, which ironically has been used most by Head Coach Steve Kerr of the Defending Champion Golden State Warriors. Regardless of whether “desperation” or “force” best describes maximum effort. What’s most important is why it alludes a team to begin with, and how to get it back when it does.
Overconfidence is the most common contributing factor, and also the most damaging. Overlooking any opponent brings about consequences that often cannot be reversed. Coaches of all levels can learn a valuable lesson from this years NCAA Tournament, in which a #16 seed beat a #1 seed for the first time ever. The concept of “rest vs rust” is also a major factor, when a team is affected by having either too much rest, or not enough. Lastly, is a lack of 3-dimensional preparation. Most preparation is based on 1-D and 2-D tendencies, such as preparing for an opponent that plays fast, or tries to dominate the paint. An example of 3-D preparation would be discovering that your opponent has a hidden motivation, such as a team member dealing with a tragedy, or perhaps a hidden revenge angle. That hidden motivation could make this game extra emotional for them, causing them to play with maximum effort and increased intensity. That could be huge problem if you as a coach are unaware of it, and your players enter the game at only a standard motivation level. Bottom line, there are infinite reasons why a team can lack effort in any game, at anytime, at any level. These are just a few details to keep an eye on.
First, I want to say thank you to Coach Collins for asking me to do this Blog for Teach Hoops. Two things you need to know about me is that I am not all knowing, and I am always learning how to better myself as a coach.
Right now at the college, we are just kinda at a wait and see period for some recruits with an attempt to find that gem that went under recruited by the 4 year schools. Yes, I am assistant at junior college in Wisconsin, but before that I coached 5 years as a varsity boys coach and I almost coached every level below that since my coaching journey started in 2005. As I sit typing my Blog in the sun over Memorial Day Weekend, I ponder the question….why are coaches so busy in the summer?
First, I think it’s important to know that all coaches are not busy in the off-season. For example, I consider myself as a college coach to have a lot of free time. But, my position is much different from when I coached Varsity Boys Basketball at the high school level. My current summer commitments reside in help running two youth camps and support supervision for open gyms. But, I know how much work consist in the summer for High School coaches in the summer. And in reality without summer, I think it would be impossible for coaches to function without it. Summer is a time for development, trial and error, and logistics. Here is a list of items I have done in one summer as a head coach.
Try and tweak new sets, defenses, offenses with team opportunities
Meet with High School staff weekly
Plan and organize online shoe and apparel stores for upcoming season
Wow! I forget how much I did in the summer for preparation for the upcoming season. The question you really asking is why? Winning is hard work, and frankly my tenure at my previous job had only small moments of success. I worked harder than most of my players. Personally, I saw more growth in the youth program with future players coming up the ranks in next the 5 years. But, building a program takes time and making the right decisions through the journey. The worst decision I made was not facilitating the workload to others to provide more time for my own team. My advice to young coaches is create a pipeline of people to work under you. Build and maintain positive relationships with other coaches, parents, and community members to support building your program. Your support system comes down to finding individuals that believe in your program and our invested in the program not their child. Again, the process takes time to build a program, which you have to be careful about picking the right job. That is something I can address in a later Blog.
Summer is a period of time for coaches to eliminate clutter during the season. It’s impossible to do the items above plus coach your team during the season. It would be overload. I feel the many of items on my list provide clarity and direction for the season to come. You can learn about your players and how they respond to certain offense and defensive schemes. The regular season has not enough for trial and error and building your identity. 10 practices and your competing in your first game.
Finally, coaching isn’t a full-time job that pays the bills unless you make it to the big time. I currently still teach 5th grade and coach other sports as well. Without using summer, I believe no one could function during the regular season, unless your single and retired. Please email with questions regarding my blog at [email protected].
This is one of many letters I received about the video and podcast I did concerning my son not playing AAU and summer basketball. I thought I would share
Steve,
Appreciate your views on this and agree with much of it. However a few observations:
I train my son and his skill development has exploded in the last few years. But, as you know, there are tons of kids who can “kill a drill” but can’t perform when there’s 10 guys on the court. When you have defensive pressure and lots of decision-making in a game situation, those skills can all of a sudden look a lot different. You just can’t simulate that environment in the quiet of a gym while developing skills. I know every good trainer tries to develop an athlete’s skills while doing “game-like” drills. But it is just not the same. Actual “games” must be played and it’s becoming really hard to find them outside of the AAU tourney scene.
In AAU ball, my son has learned “toughness” that he never had before, and would have never developed, in a training session in any kind of drill. There’s a clock, there’s a scoreboard, there’s fans, there’s referees, and there’s personal “pride” at stake. When he was getting beat up in an AAU game, he either had to fight back or get crushed. He chose to fight back and it has served him so well. He hasn’t turned into an aggressive maniac, but acquired just the right amount of toughness and aggressive mentality that will enable him to play high school basketball. I guarantee he would not be in the same place at this moment without AAU basketball. (He’ll never be a college recruit, but he setting himself up to have a ton of fun playing HS basketball.)
It’s really difficult to supplement skills training with “games” without having a place to actually play games. You and I know there aren’t a lot of parks or gyms that young athletes use to play meaningful “pickup” games that aren’t tied to their schools. We’ve tried playing in the local clubs and the games are mostly garbage for development purposes. Please don’t take this personally, but being a father who is a head coach gives your son access to a gym and I’m only assuming a place where players can get together to play decent pickup games (if WIAA allows, which I believe it does) during the summer. Not everyone has that.
I do agree that AAU travel is ridiculous. I myself coach a boys AAU team and my HS daughter plays AAU and I see that the competition 1 hour away is not substantially different than competition 4+ hours away. I also agree it’s way more games in a weekend than necessary. But of course, the tournaments are making money and they aren’t going to set up tournaments where you only play 2-3 games — which in my opinion would be plenty to supplement skill development.
AAU is ridiculous for kids under 12 years of age (and maybe that’s too young). The most physically mature kids dominate and nothing real productive gets done an AAU format for those young kids. But parents are feeling good that their kid “played AAU”.
I assume the birth of AAU must have been to get the very best players exposure for college. And it probably then trickled down to younger and younger age groups.
Bottom line — I think there’s value in AAU but I think it’s overhyped. At the same time, in order to become a better basketball player, it takes more than reps in the gym. Those skills have to be tested in a game format. I played DI college baseball and there was plenty of guys who hit .300+ in “batting practice” but in a game, for some it was a completely different story. It’s all a “balance” (skills practice + games) which I know is what your message is all about.
Thanks for making your video and providing quality content on Teachoops.com !!!
Eating For Performance:Training
Fruits & Vegetables
• Eat 2 different colored vegetables AND 2 different colored fruits per day- Have > 5-6 servings from these groups per day.
• Eat a salad at least 4-5x/week. Added bonus – Use Extra Virgin Olive Oil to boost healthy fat content
• Try 1 new vegetable or fruit every 2-3 weeks.
• Frozen vegetables/fruits are usually as high of quality as fresh ones & much cheaper
Protein
• Aim for 0.6-lg/lb/day
• Red meat and eggs (yolks) are HEALTHY
• Unless dairy allergies/intolerances are present or you have chosen a vegetarian lifestyle for personal reasons, select a whey protein powder post workout
Dietary Fats
• Aim for 0.3-0.5g/lb/day
• Realize that dietary fats DO NOT cause fat gain on their own
• Healthy sources include avocado, olive oil, peanuts/natural peanut butter, nuts (almonds, etc).
• Use Butter, NOT Margarine
• Avoid the following vegetable oils: Corn, Cottonseed, Soy
Fluids
• Best Bets – Milk, Water
• Be mindful of fruit juices & Sport Drinks They can be sugar bombs. If consumed, try to make sure it’s 100% fruit juice & consume close to the workout time period. Sport Drinks (Gatorade,) often not needed
• Avoid – Soda; Really Avoid —Alcohol (impairs post exercise muscle recovery, dehydration issues, etc)
• Realize energy drinks (Monster, Red Bull, etc) =/= sport beverages (Gatorade, etc). Keep sport beverage consumption only around
Power Granola Bars
2 cups rolled oats
½ cup crushed walnuts
½ cup unpacked raisins (2 oz)
4 tbsp. whole fax seed
4 scoops vanilla whey
2 tbsp. honey
¼ tsp. salt
¼ tsp. vanilla extract
¾ cup of maple syrup
Directions:
1. In a large bowl combine the oats, walnuts, flax seeds, raisins and whey.
2. Add the honey, syrup, vanilla and salt. Stir until everything is thoroughly mixed. At first, it will seem too dry, but continue stirring and it will blend.
3. Coat a clean, dry 8×8 inch baking dish with olive oil cooking spray, then press the mixture in the bottom of the dish. The mixture should extend to all corners evenly, and It should be about 1-inch thick. You can also use a smaller baking dish for thicker and chewier bar.
4. Bake at 350 degrees fro 10-12 minutes.